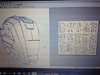
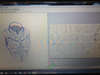
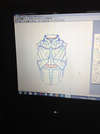
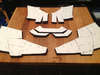
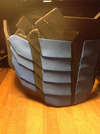
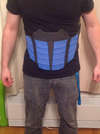
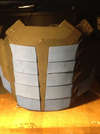
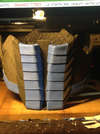
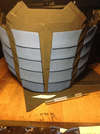
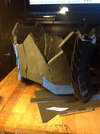
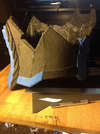
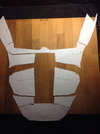
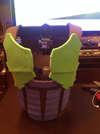
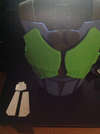
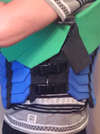
Inferno armor foam build + pep files (pic heavy)

Status
Not open for further replies.
On the helmet:

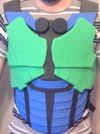
While it's good that parts such as those are separate mesh, the distance you've moved them from the helmet mesh is way too far. You probably could have kept them where they were originally. The bright red lines indicating open edges are usually enough to let people know that they're separate parts.

Scale could be a bit bigger. Because of the above point, trying to scale this would be rather challenging, because the moved parts will throw off the measurements significantly.

Unfold isn't too bad, though you could probably optimise some of that empty space and condense the unfold a bit more.

Will work on it and post an updated version :)
Did run into trouble with the scaling yes... Will get it fix!
Thanks for the input!
 
Update #2 on the helmet!
Fix the scale issue and cleaned up pep file!
e80e0f107d249dc69e0d41272da333d7_zps8c114c51.jpg

Download here:
http://www.mediafire.com/?001o7vvcsdkj1va

Feedback is always appreciated and help me get better at this :)

-Khol-
 

Attachments

  • e80e0f107d249dc69e0d41272da333d7_zps8c114c51.jpg
    e80e0f107d249dc69e0d41272da333d7_zps8c114c51.jpg
    206.6 KB · Views: 201
Before starting my 2nd try at this, here's couple of pics from my last year attempt lol
1798b78c4341baf746776dd1a3ed57ad_zps3125fd2b.jpg

ee39034412dd99e5ca160792aa3daf11_zpsa137eda5.jpg

44ac9c921d0bd7f3133408ecc5da1407_zpsf5cf3bbf.jpg

bbdab143e0255ae52efd6829ec2d45ca_zps02b5eba2.jpg

Had problems with my suit breaking, being not scaled properly and trying to sit at work lol
Things I will fix this time! Also, since I don't plan on finishing on this coming Halloween, I'll take more my time to do it correctly!
Next update the feet :)

-Khol-
 

Attachments

  • ee39034412dd99e5ca160792aa3daf11_zpsa137eda5.jpg
    ee39034412dd99e5ca160792aa3daf11_zpsa137eda5.jpg
    181.2 KB · Views: 204
  • 1798b78c4341baf746776dd1a3ed57ad_zps3125fd2b.jpg
    1798b78c4341baf746776dd1a3ed57ad_zps3125fd2b.jpg
    156.9 KB · Views: 189
  • 44ac9c921d0bd7f3133408ecc5da1407_zpsf5cf3bbf.jpg
    44ac9c921d0bd7f3133408ecc5da1407_zpsf5cf3bbf.jpg
    196.5 KB · Views: 205
  • bbdab143e0255ae52efd6829ec2d45ca_zps02b5eba2.jpg
    bbdab143e0255ae52efd6829ec2d45ca_zps02b5eba2.jpg
    88 KB · Views: 228
Today couldn't do a lot with my helmet so took some time to get my armour going!
Was suppose to do feet but getting too exited! Decided to work on torso!
ccdebeb756ca1bf5e9ecc182e8b6f13f_zps8f71fdd5.jpg

Will add some foamies for details :)
 

Attachments

  • ccdebeb756ca1bf5e9ecc182e8b6f13f_zps8f71fdd5.jpg
    ccdebeb756ca1bf5e9ecc182e8b6f13f_zps8f71fdd5.jpg
    65.4 KB · Views: 188
Build upgrade!
Started the torso with the file below:
a5fd3644c51287f9b95a7222d5ab55c0_zps13b75530.jpg

Download: http://www.mediafire.com/?s0dd5dzmemdzif2

Start with planning my build with multi Levels in the armor.
For some pattern, I had to add more to support so higher level can overlapping in some area.
Here's an exemple:
First pics with red "highlighted" piece, have been extend on each side to allow support for next layer.
7b5e427ecf40da8ed90684e3840618c7_zps8276049d.jpg

So I did print page 1-12 and all assemble again keeping some piece with some extra material for support.
Front:
06837dcf2e41f058e09ee08e0b4da7fe_zps9f63317a.jpg

Back:
861f5b91d8a00d51336bbc4f29f1493e_zpsfc9ed9a7.jpg

Kept the left side two pieces not glued to connect with velcro and added a clip in the middle...
2d9aff06aa0b2b0b5948a2def07e6f9f_zps4f33dfb3.jpg

Print pages 13-18
Other pieces, some already on :)
768390b6318758a06faf00a082835733_zps600a74ba.jpg


Here's what it's looking on me now!
821a2c945219736baf845fe9dd7c7410_zps6fd274ad.jpg

Will do more update tomorrow with pages 13-18 :)

--Khol--
 

Attachments

  • a5fd3644c51287f9b95a7222d5ab55c0_zps13b75530.jpg
    a5fd3644c51287f9b95a7222d5ab55c0_zps13b75530.jpg
    103.5 KB · Views: 148
  • 7b5e427ecf40da8ed90684e3840618c7_zps8276049d.jpg
    7b5e427ecf40da8ed90684e3840618c7_zps8276049d.jpg
    80 KB · Views: 143
  • 861f5b91d8a00d51336bbc4f29f1493e_zpsfc9ed9a7.jpg
    861f5b91d8a00d51336bbc4f29f1493e_zpsfc9ed9a7.jpg
    110.6 KB · Views: 165
  • 06837dcf2e41f058e09ee08e0b4da7fe_zps9f63317a.jpg
    06837dcf2e41f058e09ee08e0b4da7fe_zps9f63317a.jpg
    97.3 KB · Views: 143
  • 821a2c945219736baf845fe9dd7c7410_zps6fd274ad.jpg
    821a2c945219736baf845fe9dd7c7410_zps6fd274ad.jpg
    93 KB · Views: 150
  • 768390b6318758a06faf00a082835733_zps600a74ba.jpg
    768390b6318758a06faf00a082835733_zps600a74ba.jpg
    93.7 KB · Views: 153
  • 2d9aff06aa0b2b0b5948a2def07e6f9f_zps4f33dfb3.jpg
    2d9aff06aa0b2b0b5948a2def07e6f9f_zps4f33dfb3.jpg
    112 KB · Views: 153
Wow this is an ambitious armor to do! Looking like you have it under control though, that is awesome.

Thanks!
That's my second attempt, first was not scaled properly and did quick before Halloween!
I'm in the best part now! Getting the first foamies added to torso :)

Update soon to come with pics :)
 
Looks great.

Thanks! :)

big update!!

Having fun with foamies now and enjoy more then bondo lol
Here's some progress pic on the torso :)

Started on the bottom row and worked my way up!
3aebc9511b82db32da1033b9dd7f9d53_zpsa77be08d.jpg

455be5dac474812f2d4faab02f638455_zps13c40bef.jpg

64ceb0a4d4d32bde630d4de3f9d5d5af_zpseb3fe5c1.jpg

Armor on me...
ddb064e052717031c0ae3cef9efdea12_zps7d8c00de.jpg


thanks all for the help and suggestions, always appreciated :)

--Khol--
 

Attachments

  • 3aebc9511b82db32da1033b9dd7f9d53_zpsa77be08d.jpg
    3aebc9511b82db32da1033b9dd7f9d53_zpsa77be08d.jpg
    96 KB · Views: 167
  • 64ceb0a4d4d32bde630d4de3f9d5d5af_zpseb3fe5c1.jpg
    64ceb0a4d4d32bde630d4de3f9d5d5af_zpseb3fe5c1.jpg
    87.3 KB · Views: 140
  • ddb064e052717031c0ae3cef9efdea12_zps7d8c00de.jpg
    ddb064e052717031c0ae3cef9efdea12_zps7d8c00de.jpg
    80.6 KB · Views: 141
  • 455be5dac474812f2d4faab02f638455_zps13c40bef.jpg
    455be5dac474812f2d4faab02f638455_zps13c40bef.jpg
    74.6 KB · Views: 143
update! Again lol
Did manage to do back half way there... Missing the side part to add up!
Back:
8ea8f227453b58726e84692bbacfe842_zpse4041356.jpg

Side:
78aa49b2531aa9c979e24cf9dab8c577_zps66c8d59d.jpg

45bcb81b8dc83918b36e93156e787735_zpsb38d48d8.jpg

Front:
8ada6afffc9992fe3eb2ddb0417fd684_zps3ec92d6a.jpg


Yeah!!

--Khol--
 

Attachments

  • 8ea8f227453b58726e84692bbacfe842_zpse4041356.jpg
    8ea8f227453b58726e84692bbacfe842_zpse4041356.jpg
    107.5 KB · Views: 133
  • 8ada6afffc9992fe3eb2ddb0417fd684_zps3ec92d6a.jpg
    8ada6afffc9992fe3eb2ddb0417fd684_zps3ec92d6a.jpg
    118.4 KB · Views: 131
  • 45bcb81b8dc83918b36e93156e787735_zpsb38d48d8.jpg
    45bcb81b8dc83918b36e93156e787735_zpsb38d48d8.jpg
    103.5 KB · Views: 145
  • 78aa49b2531aa9c979e24cf9dab8c577_zps66c8d59d.jpg
    78aa49b2531aa9c979e24cf9dab8c577_zps66c8d59d.jpg
    133.3 KB · Views: 139
** update **
After finishing the abs and back section, did print page 13 to 17 and add foamies!
d29118316a8cd20002c409613386d007_zps88e4191a.jpg

Print page 18 to 20 for the pec section and add foamies before glueing to torso!
e84c8e6f8b16cad8951b99d48a3c0033_zps68ba1bc5.jpg

Next was the back page 32 to 36 (don't worry about hole, there's a back pack)
2a8a86b4d638c7d6c6a861a42e2f081e_zps59fed95b.jpg

I did add more material to support the next layer...
f816fd9401cf61b1503a63a491692092_zps48c0c2c8.jpg

Here's the result now with mid section and pecs, still need adjustments for the strap, but waiting for the frontal piece to be done!
539d5d8ba9e46c5b95c1e680c7fcbc9f_zpsc089ebc0.jpg

3c9c1a87382967690631f74928067dfe_zps0f3562bc.jpg

Not really set on a paint scheme yet... Will see!

Thinking about using bathroom silicone to fill gaps between foamies parts
and wood glue to seal the foam but not sure...

Any suggestions?!
 

Attachments

  • d29118316a8cd20002c409613386d007_zps88e4191a.jpg
    d29118316a8cd20002c409613386d007_zps88e4191a.jpg
    91.3 KB · Views: 124
  • f816fd9401cf61b1503a63a491692092_zps48c0c2c8.jpg
    f816fd9401cf61b1503a63a491692092_zps48c0c2c8.jpg
    86.4 KB · Views: 130
  • 2a8a86b4d638c7d6c6a861a42e2f081e_zps59fed95b.jpg
    2a8a86b4d638c7d6c6a861a42e2f081e_zps59fed95b.jpg
    78.5 KB · Views: 135
  • 539d5d8ba9e46c5b95c1e680c7fcbc9f_zpsc089ebc0.jpg
    539d5d8ba9e46c5b95c1e680c7fcbc9f_zpsc089ebc0.jpg
    76.9 KB · Views: 146
  • e84c8e6f8b16cad8951b99d48a3c0033_zps68ba1bc5.jpg
    e84c8e6f8b16cad8951b99d48a3c0033_zps68ba1bc5.jpg
    104.5 KB · Views: 161
  • 3c9c1a87382967690631f74928067dfe_zps0f3562bc.jpg
    3c9c1a87382967690631f74928067dfe_zps0f3562bc.jpg
    70.9 KB · Views: 141
** update **
After finishing the abs and back section, did print page 13 to 17 and add foamies!

Not really set on a paint scheme yet... Will see!

Thinking about using bathroom silicone to fill gaps between foamies parts
and wood glue to seal the foam but not sure...

Any suggestions?!

Dude this is an awesome build. I don't even know where this suit is from, but you're making it look good! Really nice foam detailing.
Bathroom sealant works. I know some people around here use decorators caulk for that purpose, it sounds like it's pretty much bathroom silicone though.

For sealing wood glue also works, there's a guy on these forums, Drack, who made a video tutorial on using glue for sealing. He covers most of his props and suits in several coats of PVA glue then a coat of PVA mixed with water. Then he applies Plastidip. I'll be using this method too, means I'll only need a can of plastidip instead of ten.

Thanks Spartan! That's the Inferno armor from mass effect 2-3!
Got the 3d file from Cipher_t13 and I separate/unfold them for foam (see previous post for files!)

Took a look at Drack and cereal kill3rl wow great videos!


Might be able to post more progress later tonight!

--Khol--
 
This armor is epic. Love mass effect stuff and you're kicking butt for sure! Keep it up!

Thanks TWanderer! Love this too! Was comparing to last year's pic, think I'm getting better at this lol

Last years armor (sorry for bad quality, not my camera!)
c1735fceba828b8f5a67ef19da6fe3f7_zps45ff6c66.jpg


** Update **

Did the adjustment with the straps and added middle piece!
1f1d9c2010d834b13a7834ac234d96f0_zps56bc9c69.jpg

Also modified the clip and put it outside for easier access!
That way I can put and remove it myself...
(I cut in the foam and foamies to insert the straps inside and glue it in place so it's stronger)
10819e69deaa45aa1520a025a06f5749_zps33912020.jpg

Here's what it looks on me now!
4b935791cd2b11a8fe850b3f7193b8c5_zps2a6326a1.jpg

d37c23c9d17bbb771f6f2f1cbcf555e5_zps7075b1f6.jpg

Next will be the neck and back parts!

Any comments or feedback are always welcome! :)

-- Khol --
 

Attachments

  • 1f1d9c2010d834b13a7834ac234d96f0_zps56bc9c69.jpg
    1f1d9c2010d834b13a7834ac234d96f0_zps56bc9c69.jpg
    77.7 KB · Views: 126
  • c1735fceba828b8f5a67ef19da6fe3f7_zps45ff6c66.jpg
    c1735fceba828b8f5a67ef19da6fe3f7_zps45ff6c66.jpg
    32.4 KB · Views: 157
  • d37c23c9d17bbb771f6f2f1cbcf555e5_zps7075b1f6.jpg
    d37c23c9d17bbb771f6f2f1cbcf555e5_zps7075b1f6.jpg
    73.6 KB · Views: 139
  • 4b935791cd2b11a8fe850b3f7193b8c5_zps2a6326a1.jpg
    4b935791cd2b11a8fe850b3f7193b8c5_zps2a6326a1.jpg
    393.9 KB · Views: 148
  • 10819e69deaa45aa1520a025a06f5749_zps33912020.jpg
    10819e69deaa45aa1520a025a06f5749_zps33912020.jpg
    68.9 KB · Views: 128
Status
Not open for further replies.
Back
Top