Introduction and Assault Rifle mod for Nerf Stryfe using rapid prototyping

Status
Not open for further replies.

rah66

New Member
First: Hi.
My name is Jakob, I'm a 26year old engineering student from Germany, currently living and studying in Sweden.
I enjoy playing Halo (well, that's why we're here, isn't it?) and tinkering around, so I thought of building some nice Halo guns.
Well, there's not much to tell about me - but I want to show you my first project so far and maybe get some valuable feedback from you.
I'm am not much of a forum user, and as well I'm not native to the english language, so please apologize any mistakes in language or etiquette...
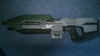
But here's my first baby:
DSC_0225.jpg

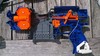
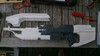
It's a Nerf Stryfe Elite with a custom made barrel and shoulder stock.
All additional parts are created in CREO2 (CAD-software) and then printed on a 3D printer. Because I had only one shot at the printer (sadly not my own), I had to work with prototype parts including all the flaws (see list at the end of the post).
But with a little fiddling and filing here and there, and some cardboard patches, it all fit together snugly. The whole gun can be disassembled with 7 screws (plus those of the Nerf gun). It is still shooting well and fully automatic. Only minor mods to the interior of the Nerf gun, like removing some restrictions. The light underneath the barrel can be substituted with a mini-Maglite. In the shoulder stock is space for a spare magazine.
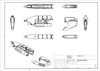
Here are some more pictures and a drawing of the CAD parts.
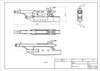
drawing1_blur.jpg

CAD drawing
iso.jpg

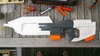
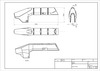
CAD 3D data, with Nerf gun in "glass"
DSC_0198.jpg

assembly, Nerf gun grey, magazines orange, rp-parts white
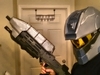
DSC_0229.jpg

not me...
oh, and i know, the paint job is horrible... i have to learn a lot there for my next project, which will be a Nerf Longshot sniper (like from Reach) mod in foam, and if foam and i get along well, a Jun266 armor suit... in the future, sometime...
maybe around christmas i'll see the gun again, and get some better pictures... above are only phone-shots.

If anyone is interested in the CAD-files, PM me. But they need some more work done, which i haven't had the time for so far (i'll do it if I have again the chances to use a 3D printer):
- increase wall thickness to min 2mm
- more accuracy around the connection of Nerf-front and barrel (I did a very bad job measuring the shape of the original gun)
- increased gaps at the connection of shoulder stock
- little bit more detail on the stock

and it would of course be possible to add some electronics for a illuminated ammo-count... but it was a birthday present (yes, i gave it away :( ) and i was running out of time.
 

Attachments

  • DSC_0225.jpg
    DSC_0225.jpg
    78 KB · Views: 6,361
  • drawing1_blur.jpg
    drawing1_blur.jpg
    87.2 KB · Views: 577
  • iso.jpg
    iso.jpg
    16.7 KB · Views: 885
  • DSC_0198.jpg
    DSC_0198.jpg
    122.1 KB · Views: 2,105
  • DSC_0229.jpg
    DSC_0229.jpg
    83.8 KB · Views: 7,261
Damn! This is epic! I used a Rayven and Recon Barrels!

FxCam_1380076132723_zps9dcb53af.jpg

And yours is a MA5D type too! I am not worthy!

You plan on selling those 3D Printed Parts? Or is this a one time deal?
 

Attachments

  • FxCam_1380076132723_zps9dcb53af.jpg
    FxCam_1380076132723_zps9dcb53af.jpg
    332.7 KB · Views: 614
!

You plan on selling those 3D Printed Parts? Or is this a one time deal?

nice helmet! i'm actually really afraid of starting mine - seems to me like one of the more complicated parts of the armor.
I thought as well about the Rayven as a basis, but then i would have rather gone for the BR55. And the whole modding is a lot easier, if you have a laser-sinter rapid prototyping machine around ;) - but due to me changing universities, I neither have access to one these days. As mentioned above, i could give you the CAD data (but not after some serious re-do, I just had a look at them... looks really bad) and you could maybe find someone from the community / at work / at another uni to print it for you. But because the parts are kind of big, that might be difficult (most 3D printers have limited space, and usually the material doesn't come cheap as well).
Let me know if you want the files, then I do some clean-up (would take some time though) and put them online!
oh, and thanks for the nice words! :)
 
How big is the volume on these parts? I would LOVE to get the Cad parts, but the printer I have access to only has an 8in x 8in x ? (LxWxhH) and it may not fit, That and for a large build I think my old teacher would make me pay him for material. I really want a second weapon, but im on a break from large scale building right now so Im not peping much. I may finish some helmets that are already in progress but thats nothing compared to what people have done here.
 
Yeah sure, send them if you like. I'll try and get Shapeways.com to create the parts for me.
 
I reworked the front part so far, maybe I'll be able to do the rear sometime next week...
it's two parts that are supposed to be fitted together using 4 counter sunk M5x20 screws (metric - I'm European...)
the volume of each part is approx 300cm^3, that is a little more than 18 cubic inch, and i present them to you as STEP files - most of the 3D printers should be able to read them.
If you use them, please show me pics of how it works out!
and you might want to have a Dremel ready, because they are not perfectly accurate, and hence I don't have another Nerf Stryfe around i couldn't re-measure.
front-1.jpg

front-2.jpg

front part [STEP]
front hood [STEP]
drawings [PDF]
- you might have to use [right click] -> [save as] on the links to the CAD files...
 

Attachments

  • front-1.jpg
    front-1.jpg
    79.2 KB · Views: 800
  • front-2.jpg
    front-2.jpg
    72.1 KB · Views: 788
Looks very good! Though I'm curious, with the ability to produce the forward portions so correctly, why not recreate the entire gun?
 
So how do you get these parts to combine with the Stryfe? Do they just slip on over then screw them on? or do you have to take the gun apart and then put it back together? Or even take apart the gun cut up the gun then reassemble? I know you said you had to mod just the gun like restrictions but im curious of the printed parts to the gun connections.
 
Looks very good! Though I'm curious, with the ability to produce the forward portions so correctly, why not recreate the entire gun?
- 'cause i wanted to mod the Nerf Stryfe, and I reused the body of that one as the center part. Again, the stock is already modeled, I am currently reworking it to get it to a printable quality and then upload it here as well.

So how do you get these parts to combine with the Stryfe? Do they just slip on over then screw them on? or do you have to take the gun apart and then put it back together? Or even take apart the gun cut up the gun then reassemble? I know you said you had to mod just the gun like restrictions but im curious of the printed parts to the gun connections.
The "front.stp" part fits more or less snugly (if you convince it with the aid of your dremel) into the front of the Stryfe, using most of the pins from the screws and the rail placement. Though you have to disassemble the Nerf gun, yes. But that's not a problem, some screws, and you don't have to worry about the internals, they don't fall out that easyly.
For the stock you have to remove some plastic from the handle to fit in this little part:
open.jpg

then you can close it, and the "hood" and stock can be attached and fixed with some M5 screws and nuts. there are fixture points for the nuts, that work pretty well, though if you want to use imperial screws, you have to do some rework probably...
assmbly1.jpg


One question, though i don't want to turn this thread into a big discussion about that:
How does the 405th community see 3D printing? is it a cop out for those who cant do proper craftsmanship? (that's how i feel sometimes seeing this awesome stuff around here) Or is it "legitimate"?
 

Attachments

  • open.jpg
    open.jpg
    169.9 KB · Views: 874
  • assmbly1.jpg
    assmbly1.jpg
    119.5 KB · Views: 1,284
Ok so Shapeways won't print the parts. I do not know why so you might want to try and produce some more. Cause this will be high demand item. And if not, oh well.
 
- One question, though i don't want to turn this thread into a big discussion about that:
How does the 405th community see 3D printing? is it a cop out for those who cant do proper craftsmanship? (that's how i feel sometimes seeing this awesome stuff around here) Or is it "legitimate"?

I obviously cant speak for everyone but as a craftsman I believe any method that produces the desired result should be given due consideration. Look at foam and how far it has come. I think with 3D printers becoming more affordable we will see an increase in the utilization of the process.

PS the AR looks great!
 
One question, though i don't want to turn this thread into a big discussion about that:
How does the 405th community see 3D printing? is it a cop out for those who cant do proper craftsmanship? (that's how i feel sometimes seeing this awesome stuff around here) Or is it "legitimate"?

Technically I would have to say its legitimate but I do see you counter argument. I feel that since you designed it that it is the same as any ordinary part of armor like a helmet that also goes through a digital design. someone is just printing the part differently , this time in 3D and not on paper as a 2D object. This takes a lot less time and anybody can do provided they have materials but technically so can armor makers.
 
noting wrong with 3d printing or rapid prototyping.

I want a the latter. Not convinced on 3d printing yet.

I too just bought two stryfe side arms. gonna turn them into SMGs though :D
 
I know it's an old topic but this job is realy amazing !!!!

rah66 Do you have the STEP file of the back part ?
I am thinking of making my one nerf halo Assault Rifle.
Again, you have made a realy great job!
 
Last edited by a moderator:
I hate to resurrect a dead thread, but I made my account on this site SPECIFICALLY because of this badass thread. I'm also interested in the files.

Got a printer and a hunger for this beast.
 
Since some people wanted those files too...
here's the backpart. But I have to warn you, as far as I remember it was a hell of work to fit the printed parts ;)
Connector part from grip to extension: back-A
And the actual back part back-B
Have fun, and maybe post some pictures of what you will have built!
 
Status
Not open for further replies.
Back
Top