PreacherMan
New Member
Hey guys!
Long time cosplayer, first time poster (I think? I've had this account for many years to the point where I really have to change my username), two time Halo costumer about to start my first H5 Buck here.
Huge shoutout and thanks to the community for being so supportive with everything- I definitely couldn't have got where I am today without 405th's help. Some of you may be familiar with some of my work (@nathandeluca) or other builds- however, Halo is something I'm looking to put more focus into.
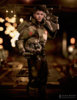
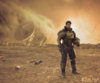
Anyway, this is my Doom 2016 build- I've been playing Doom for 20 years, so figured this would be a useful passion project.
Sean Snow Photography {facebook.com/seansnowphotography] and I had a shoot the other day for bethesda.net, and here's some of the results-


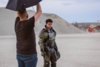
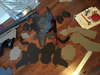
Some of the build process-


https://www.instagram.com/p/BHQtxQUgxAc/?taken-by=nathandeluca
It's wired with a speaker system that'll play the DOOM soundtrack at will, as in the video above
I have a quick non-tutorial I made about it below, I'll copypaste it below.
Cheers guys!
- - - Updated - - -
Before doing anything else, I made sure I’d tracked down the collectibles in-game which had the 3d model for the armour and the various guns I needed to make.
There’s likely better ways to do a lot of this! This is just what I had and did with my limited time and access to materials, so don’t take anything I say as gospel.
Materials needed-
Armor- Exacto knife, spare blades/sharpener, heat gun, dremel with sanding drum, craft foam, 1/4in and 1/2in foam, craft foam, Worbla’s Finest Art
Strapping- 12 metres black 1” elastic strapping, 16 parachute buckles, 2m black industrial Velcro
Paints- Rosco’s Flexbond sealant, Straken Green Citadel paint, Castellan Green Citadel paint, Leadbelcher Citadel paint, acrylic black, white, brown, tan, silver, gold leaf, yellow, semi-gloss aerosol sealant (I used Rustoleum)
Helmet- 1kg PLA, Bondo autobody filler, spot/glazing putty, sand paper, filler primer, aerosol paints
Using the screen as a reference, I drew out the armour and patterned it onto sheets of half-inch EVA foam, extrapolating the pieces and layers on paper before cutting it out of the material itself. Edges were bevelled with a dremel, undercuts were made on the inside where there were bulges, and the pieces were heatformed into the accurate shapes and to fit the contour of the chest.
Thinner pieces were made out of 1/4in EVA sheeting that were scored and cut with an exacto knife (such as the lower chest and back), which were affixed to the upper chest with internal elastic strapping with buckles for easy takedown. Shoulders were made from 1/2in foam on a 1/4in base, and were strapped to the upper torso in a similar fashion. Everything on the upper body was strapped to the upper torso and chassis, everything on the lower body was strapped around the belt.
The belt itself had an internal rigging which held the pouches on it, which two speakers are rigged to with internal wiring on two Aux cables. I sort of cheated with the electronics, using two prebuilt Bluetooth speakers and prewired LED units directly installed into the armour.
All arts which had to flex were made from 1/4in foam for flexibility, whereas all armour plates were made from 1/2in. Following the in-game model viewer, patterning was quite intuitive (thanks, ID Software/Bethesda! Please keep doing this it makes cosplay so much easier)
When the armour pieces were finished, before rigging, I applied (I had some friends help with this as it was a pretty time consuming process) two thin, wet coats of Rosco’s Flexbond to all of the exposed foam pieces, sealing the pores for painting.
Soon as it was sealed, thanks to the humidity and some bad experiences recently, I just decided to paint the entire thing with Straken Green immediately. It took about four or five cans to do the entire suit- the darker green areas were done with Castellan Green, and the silver with Leadbelcher. I weathered the edges with acrylics, as well as blackwashing and adding gradients – borrowing an airbrush from my friend @Shmuberry. The brown areas were done with two coats of brown acrylic paint, and gradients were added with black airbrush paint. Everything was sealed in afterward with Rustoleum semigloss paint. I used “Blood for the Blood God” Citadel paint to fleck on some blood spatter effects from a wet brush afterwards.
The helmet file was a bit harder- I used helmet assets taken from the game and modified to be wearable by my friend Sunday Cosplay (@wowsuchinstagram) to have thin walls- I scaled the helmet to my head (unsuccessfully the first time) and printed it in two pieces on my Formbot T-Rex.
I welded the two sides together with a soldering iron, before adding a thin layer of autobody filler to the outside. After several layers of autobody filler to mask the seams, each one sanded smooth, I started using Rust-Check spot putty and basting the entire helmet, pausing between coats to wet sand with 220 grit Wet sandpaper. After the surface was free of pockmarks, I hit it with a few layers of filler primer, wetsanded that with 400 and then 800 grit sandpaper, and hit the entire helmet with Krylon Italian Olive spray paint. The rest of the details were cut in with a hand file, and painted directly onto the helmet.
Weapons were made in a similar- I took the weapon assets from the game for the combat shotgun, double barrel, plasma rifle and pistol. I fixed some of the geometry and upscaled them to a better scale, and 3d printed them on my Craftbot and T-Rex. They were processed in a similar model- layers of bondo filler followed by putty and primer, and painted with aerosols (metallic grey auto paint for the most part as a base coat) followed by acrylic and model paint detailing.
MyMiniFactory has incredible files for the BFG and the heavy assault rifle (Lilykill did an amazing job, that’s likely being printed next). I extracted the chaingun file, but it was too work-heavy to do in time.
Anyone with any questions is more than welcome to hit me up and ask!
I'll also upload the weapon files soon as I have the privilege to upload STLs
Long time cosplayer, first time poster (I think? I've had this account for many years to the point where I really have to change my username), two time Halo costumer about to start my first H5 Buck here.
Huge shoutout and thanks to the community for being so supportive with everything- I definitely couldn't have got where I am today without 405th's help. Some of you may be familiar with some of my work (@nathandeluca) or other builds- however, Halo is something I'm looking to put more focus into.
Anyway, this is my Doom 2016 build- I've been playing Doom for 20 years, so figured this would be a useful passion project.
Sean Snow Photography {facebook.com/seansnowphotography] and I had a shoot the other day for bethesda.net, and here's some of the results-
Some of the build process-
https://www.instagram.com/p/BHQtxQUgxAc/?taken-by=nathandeluca
It's wired with a speaker system that'll play the DOOM soundtrack at will, as in the video above
I have a quick non-tutorial I made about it below, I'll copypaste it below.
Cheers guys!
- - - Updated - - -
Before doing anything else, I made sure I’d tracked down the collectibles in-game which had the 3d model for the armour and the various guns I needed to make.
There’s likely better ways to do a lot of this! This is just what I had and did with my limited time and access to materials, so don’t take anything I say as gospel.
Materials needed-
Armor- Exacto knife, spare blades/sharpener, heat gun, dremel with sanding drum, craft foam, 1/4in and 1/2in foam, craft foam, Worbla’s Finest Art
Strapping- 12 metres black 1” elastic strapping, 16 parachute buckles, 2m black industrial Velcro
Paints- Rosco’s Flexbond sealant, Straken Green Citadel paint, Castellan Green Citadel paint, Leadbelcher Citadel paint, acrylic black, white, brown, tan, silver, gold leaf, yellow, semi-gloss aerosol sealant (I used Rustoleum)
Helmet- 1kg PLA, Bondo autobody filler, spot/glazing putty, sand paper, filler primer, aerosol paints
Using the screen as a reference, I drew out the armour and patterned it onto sheets of half-inch EVA foam, extrapolating the pieces and layers on paper before cutting it out of the material itself. Edges were bevelled with a dremel, undercuts were made on the inside where there were bulges, and the pieces were heatformed into the accurate shapes and to fit the contour of the chest.
Thinner pieces were made out of 1/4in EVA sheeting that were scored and cut with an exacto knife (such as the lower chest and back), which were affixed to the upper chest with internal elastic strapping with buckles for easy takedown. Shoulders were made from 1/2in foam on a 1/4in base, and were strapped to the upper torso in a similar fashion. Everything on the upper body was strapped to the upper torso and chassis, everything on the lower body was strapped around the belt.
The belt itself had an internal rigging which held the pouches on it, which two speakers are rigged to with internal wiring on two Aux cables. I sort of cheated with the electronics, using two prebuilt Bluetooth speakers and prewired LED units directly installed into the armour.
All arts which had to flex were made from 1/4in foam for flexibility, whereas all armour plates were made from 1/2in. Following the in-game model viewer, patterning was quite intuitive (thanks, ID Software/Bethesda! Please keep doing this it makes cosplay so much easier)
When the armour pieces were finished, before rigging, I applied (I had some friends help with this as it was a pretty time consuming process) two thin, wet coats of Rosco’s Flexbond to all of the exposed foam pieces, sealing the pores for painting.
Soon as it was sealed, thanks to the humidity and some bad experiences recently, I just decided to paint the entire thing with Straken Green immediately. It took about four or five cans to do the entire suit- the darker green areas were done with Castellan Green, and the silver with Leadbelcher. I weathered the edges with acrylics, as well as blackwashing and adding gradients – borrowing an airbrush from my friend @Shmuberry. The brown areas were done with two coats of brown acrylic paint, and gradients were added with black airbrush paint. Everything was sealed in afterward with Rustoleum semigloss paint. I used “Blood for the Blood God” Citadel paint to fleck on some blood spatter effects from a wet brush afterwards.
The helmet file was a bit harder- I used helmet assets taken from the game and modified to be wearable by my friend Sunday Cosplay (@wowsuchinstagram) to have thin walls- I scaled the helmet to my head (unsuccessfully the first time) and printed it in two pieces on my Formbot T-Rex.
I welded the two sides together with a soldering iron, before adding a thin layer of autobody filler to the outside. After several layers of autobody filler to mask the seams, each one sanded smooth, I started using Rust-Check spot putty and basting the entire helmet, pausing between coats to wet sand with 220 grit Wet sandpaper. After the surface was free of pockmarks, I hit it with a few layers of filler primer, wetsanded that with 400 and then 800 grit sandpaper, and hit the entire helmet with Krylon Italian Olive spray paint. The rest of the details were cut in with a hand file, and painted directly onto the helmet.
Weapons were made in a similar- I took the weapon assets from the game for the combat shotgun, double barrel, plasma rifle and pistol. I fixed some of the geometry and upscaled them to a better scale, and 3d printed them on my Craftbot and T-Rex. They were processed in a similar model- layers of bondo filler followed by putty and primer, and painted with aerosols (metallic grey auto paint for the most part as a base coat) followed by acrylic and model paint detailing.
MyMiniFactory has incredible files for the BFG and the heavy assault rifle (Lilykill did an amazing job, that’s likely being printed next). I extracted the chaingun file, but it was too work-heavy to do in time.
Anyone with any questions is more than welcome to hit me up and ask!
I'll also upload the weapon files soon as I have the privilege to upload STLs

") I'm the girl who talked to you on facebook. your marine looks awesome
I'm the girl who talked to you on facebook. your marine looks awesome