Props MA40 Nerf Mod and Repaint

Status
Not open for further replies.

FoxODST

Member
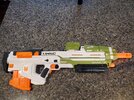
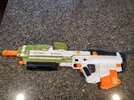
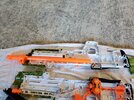
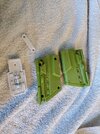
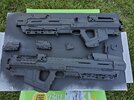
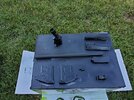
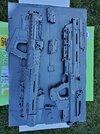
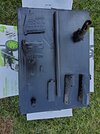
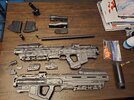
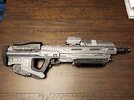
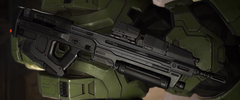
To get my self started before I begin working on my ODST build I decided to modify and repaint a Nerf MA40 I snagged at Gamestop. I used the attached screen grab for reference.

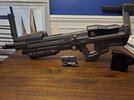
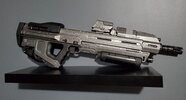
There are a lot of paint schemes for the MA40 and it was hard to tell what was correct. I did not want to use the Reach MA37 scheme because frankly I don't like the lighter color and the yellow stripe. When I approach builds I like to be as accurate to the screen references as possible. "Go with what you know until something better comes along."
 

Attachments

  • HINF_E319_MA40.png
    HINF_E319_MA40.png
    548.3 KB · Views: 4,104
Last edited:
Here are the before images of how the rifle comes out of the box. The first thing I noted was the magazine is too long and does not sit flush against the mag well like in the references.
 

Attachments

  • 20201123_081313.jpg
    20201123_081313.jpg
    4 MB · Views: 1,267
  • 20201123_081304.jpg
    20201123_081304.jpg
    4.3 MB · Views: 364
In order to rectify the magazine issue I removed the magazine and trimmed it with a Dremel. I removed about half of the magazine right at where the raised groove was. I then reassemble the mag and cut a new notch mirroring the original on the back of the mag that would fit into the mag release.

Warning!!! If you do this you will no longer be able to use the mag to fire darts in the gun. I am turning this into a prop so I didn't care if it maintained functionality.

I then removed the "Nerf" and "Halo" logos on the mag with a dremel sanding wheel and sanded with 180 and then 400 grit sandpaper until I was satisfied. I could have spent more time to get this perfect but I was moving pretty fast on this on my day off and wasn't too concerned about what could just be use and battle damage.

Some after pictures attached here. I didn't plan initially to post this build so I didn't document all the steps photographically as well as I could have.
 

Attachments

  • 20201123_093425.jpg
    20201123_093425.jpg
    3.4 MB · Views: 347
  • 20201123_093428.jpg
    20201123_093428.jpg
    2.4 MB · Views: 407
Next up I completely disassembled the rifle. I used a small Phillips screwdriver commonly used for computer repair to remove the screws. Once you do that the two halves will come apart. I took the time to remove all the internal and external components especially the ones I wanted to paint separately so no masking would be required.

Be very careful during this step!!! Take pictures of the internal mechanisms to help you reassemble the rifle after painting. This will ensure that you can still use the firing mechanism if you intend to do so. I also disassembled the sight. By doing so you can remove the clear plastic cover and the round counter and set aside.

Note that you should paint the inside barrel as you can see it through the slats on the outside of the gun.

Once I set aside the internal pieces I arranged everything for painting.
 

Attachments

  • 20201123_101435.jpg
    20201123_101435.jpg
    4.5 MB · Views: 450
  • 20201123_101438.jpg
    20201123_101438.jpg
    3.9 MB · Views: 474
  • 20201123_100954.jpg
    20201123_100954.jpg
    2.5 MB · Views: 426
Before final sanding I removed the "Nerf" and "Halo" logos from the rifle. I feel this is critical in order to make the weapon look realistic and not what it is- a toy repaint lol. I used a sanding wheel on the dremel again and then 180 to clean it up and 400 to finish. I got a little aggressive on the "Halo". Again, I could have spent more time sanding to fix the small defects but they're barely noticeable and can be passed off as wear and tear. That's the great thing about props that are meant to look used and abused!

At this point I lighly sanded the entire rifle with 400 grit sandpaper. This way the paint will adhere better than it would to the glossy plastic. After this, I washed the parts with dawn in the tub and dried throughly being careful to get water out of crevices before paint.

I elected to use a black primer for plastic. During my years painting Star Wars props and armors I have found rustoleum to be the best option for plastics. Just my preference.
 

Attachments

  • 20201123_112307.jpg
    20201123_112307.jpg
    3.1 MB · Views: 939
  • 20201123_112311.jpg
    20201123_112311.jpg
    4.3 MB · Views: 453
Last edited:
Next I moved to the main paint color step.

For the main body of the rifle I used Rustoleum flat soft iron metallic. This paint goes on amazing and gives gun a metallic look without being overly shiny. If applied a little more heavily it can give you a texture that is consistent with firearms or coated metals. It looks fantastic. For the other parts I opted for the same line of paint but satin black.

NOTE: when using primer and paint I recommend using the same brand. I.e. don't use Krylon primer and then use Rustoleum top coat. In theory it should be no issue. It actuality I have found it to be an issue on several occasions.
 

Attachments

  • 20201123_114120.jpg
    20201123_114120.jpg
    1.9 MB · Views: 542
  • 20201123_114124.jpg
    20201123_114124.jpg
    1.8 MB · Views: 531
  • 20201123_131052.jpg
    20201123_131052.jpg
    2.9 MB · Views: 694
Once the paint had dried completey the next day, I reassembled the internal components and then the whole rifle. I didn't reuse all the components as I wasn't interested in maintaining the firing mechanism. I only reinstalled what was needed internally for the trigger to function.

Once the reassembly was completed, I masked the top of the rifle for the light grey stripe. I used coastal grey by Rustoleum for this. I also masked the handle area and painted it matte black. I realized after I assembled it I had failed to notice that the handle area was black in the screen references.
 

Attachments

  • 20201123_145628.jpg
    20201123_145628.jpg
    3.2 MB · Views: 1,888
  • 20201124_135012.jpg
    20201124_135012.jpg
    3.4 MB · Views: 1,700
Final product.

I lastly used flat aluminum paint by Testors to dry brush the edges, add wear to areas like the handles and barrels and give the raised and beveled areas a worn appearance.

I used red for the selector switch indicators and a bronze for the hardware near the handle. For some reason, in the screen references that particular hardware was this color or similar.

I'm very happy with the final product and it's on display in our game/display room until it gets some use at events and cons!
 

Attachments

  • 20201124_174717~2.jpg
    20201124_174717~2.jpg
    2 MB · Views: 6,055
Glad you posted and just going to watch this, I'm thinking of doing the same thing, it looks damn good so far. Also a quick question what is the scale like? Lime 1:1 or smaller?
 
Glad you posted and just going to watch this, I'm thinking of doing the same thing, it looks damn good so far. Also a quick question what is the scale like? Lime 1:1 or smaller?
For my stature it will look properly 1:1 scale. I'm 5' 7". In terms of real world I'd say this is about 80% to scale. I only say that as I feel the actual rifle would be a bit more narrow and long. Being nerf it's a tad bulky and a bit on the short side. I think for a prop it works out perfectly. It's also great because the site already opens giving you the ability to add a custom ammo counter or LEDs.
 
For my stature it will look properly 1:1 scale. I'm 5' 7". In terms of real world I'd say this is about 80% to scale. I only say that as I feel the actual rifle would be a bit more narrow and long. Being nerf it's a tad bulky and a bit on the short side. I think for a prop it works out perfectly. It's also great because the site already opens giving you the ability to add a custom ammo counter or LEDs.
Still a worthy consideration, especially the ability for an ammo counter, by the way it still looks really awesome, you did a great job!
 
Still a worthy consideration, especially the ability for an ammo counter, by the way it still looks really awesome, you did a great job!
Definitely! And thank you! It's been a long time since I've been active in a forum so feels good to be posting again. I like that I can attach pictures without having to use a third party hosting site as well. I'll post my helmet build soon and then my armor build within the next month or so once the pieces arrive.
 
Status
Not open for further replies.
Back
Top