Mk VII - Phase 2

Fallen

Well-Known Member
Community Staff
Member DIN
S922
Never made a build thread for this since it was more of a "how quickly can I build an entire Spartan suit to have one in time for Planet" situation. Back around Jan 3 I had a helmet that needed to be re-sanded, handplates and one forearm that had been constructed. From there I built as quickly as possible being ok with close enough to get done in time for the con this week. Figured I'll make a thread as I plan to go back and build a new version after the con and want to make sure I'm documenting those upgrades.

2023-03-12 16.27.24.jpg
2023-03-13 09.22.43-1.jpg

Set up a makeshift crafting space w/ an old PC and short throw projector to view templates and/or watch videos while working. I took lots of notes about what I want to improve on v2 usually things like scale this thing down 5-10% or make this shorter but wider or whatever.
2023-02-05 14.39.41.jpg

2023-02-06 17.06.55.jpg2023-02-05 18.26.41.jpg2023-02-05 18.33.03.jpg

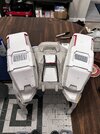
Originally had been building the chest out of foam too, but I hated it enough and was stressing about not finishing that I reached out to Emp Frosty who printed me a chestplate allowing me to move forward to the back and take the pressure off of one of the most up front pieces of the suit besides the helmet. One bonus piece I wanted is inside the thruster packs I have a shelf and a removeable cover that I can fit these tiny bluetooth speakers that pair to each other and your device to be able to play music in stereo. Still some changes I'll want to make to how they fit in for the next set, but works pretty well.
2023-02-11 14.04.18.jpg2023-02-15 09.46.33.jpg2023-02-20 10.02.10.jpg2023-02-23 08.32.24.jpg2023-02-22 09.46.07.jpg2023-02-18 16.39.07.jpg

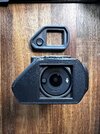
Just a few pics from throughout the build process. I believe by week 7 I had everything constructed and ready to be primed and painted.


2023-03-05 16.07.09.jpg2023-02-28 09.33.12.jpg2023-02-28 09.30.05.jpg

Wanted just about everything to be adjustable and easy to swap out for a new part. I separated the inner thighs and after making a prototype inner thigh w/ some scrap canvas picked up some material and sewed some new ones that attached via velcro. The lower piece is connected on the back and uses velcro to attach at the front as well.

2023-02-25 11.43.52.jpg2023-02-25 11.43.21.jpg2023-02-19 14.34.42.jpg
My shins are separated into front and back w/ 2 elastic straps and velcro on the back piece and velcro attachments for the front to slap onto it w/ enough overlap. My gloves are also just a piece of velcro E6000'd to some gloves and velcro on the backs of the hand plates.

2023-03-08 21.07.11.jpg2023-03-09 13.55.56.jpg2023-03-13 17.05.12.jpg

My shoulders attach to my biceps using magnets, but I can't put those on myself thanks to being hard to close my arms around the printed chestplate well. While there's pieces missing particularly for the undersuit and definitely adjustments in scaling for a more comfortable fit, given the timeframe of this build I'm happy with the end result.

What's next? First up adjustments I want to make:
1) Foam chest, as much as I like 3d printing, I prefer a foam chestplate for the flexibility
2) Scale up biceps width and depth slightly to slide onto my arms more easily
3) Scale down gauntlets length in particular and separate the wrist section so it's easier to fit over my hand
4) Scale down the thighs especially length.
5) Boots steeper angle on the top bit and fully enclosed boots with a tread and wedge instead of the existing sacrificed shoes glued into the rest of it.
 

Attachments

  • 2023-02-06 17.07.09.jpg
    2023-02-06 17.07.09.jpg
    1.8 MB · Views: 96
Last edited:
Planet Comicon is over for 2023, and I've had a chance to test out this build over the course of the weekend. Now that my suit has made it home, and I've looked it over for repairs I have a list of alterations/remakes. First, the good news, there was no major damage to any part of my armor despite wearing it nearly all of Friday and Saturday at the con. I still want to do my dirt/grime weathering as I never got the chance to do so, but I don't have any high priority repairs if something came up quickly that I wanted to attend before adjustments are made.

Before my list of improvements enjoy some photos from the weekend.

2023-03-20 10.21.08.jpg
IMG_0035.jpg

Photo Credit: @savag3ly

2023-03-18 00.44.45-1.jpg

Photo Credit: @george_not_available

IMG_1385_polarr.jpg
IMG_1480_polarr_1.jpg

Photo Credit: @george_not_available, Color Correction: WandererTJ

For updates:
  • All​
    • Finish weathering​
  • Helmet​
    • Reattach velcro for front fan, thankfully didn't fall during con, but easy fix​
    • Would love to print another eventually​
  • Chest/Back​
    • Foam chest or printed back​
    • Improve battery holder for lights/add reachable switch while in armor​
    • Speaker mount to replace duct taped speaker​
  • Shoulders​
    • Better magnets or permanently attach (I basically just didn't wear them all weekend; kind of leaning towards just one shoulder plate)
  • Biceps​
    • Improve strapping to undersuit; it felt too far back and prefer hidden
  • Gauntlets​
    • Separate inner wrist and attach via elastic
  • Belt​
    • Replace velcro w/ clips
  • Knees​
    • Velcro or snap to undersuit instead of straps
  • Boots​
    • Sharper angle on top
    • Ideal: fully enclosed boot w/ tread and slight wedge
  • Undersuit - didn't have time to complete​
    • Different pants
    • Knee wrap
    • Ab wrap
    • Neckseal

There's certainly a lot there that I want to rebuild from scratch, but that's to be expected considering if something was close enough when I built it the first time I let it go until after this event. I'll try to do a better job recording my build process as I make these changes.
 
Last edited:
I saw a post of your spartan on Instagram and couldn't figure out who it was, then I saw your name on the post. I'll be honest, you whipped it out so fast I actually forgot you built it! I mean no offense, but it just came outta nowhere. Looking forward to seeing how much further you can take this suit.
 
I saw a post of your spartan on Instagram and couldn't figure out who it was, then I saw your name on the post. I'll be honest, you whipped it out so fast I actually forgot you built it! I mean no offense, but it just came outta nowhere. Looking forward to seeing how much further you can take this suit.
That's part of the reason why I want to make sure I document updates and the other one I'm building. I was so rushed trying to get this done that I never shared progress pics w/ the community. That's deadlines for you.
 
Had no idea this was you. It turned out great. And I'm glad you didn't do the inner thighs in green like the skin has. This is better.
 
Cleveland Gaming came and went, and I made a few adjustments to the suit to tidy up what I wasn't happy with back at Planet. Highest priority was to add weathering. While planning some of weathering patterns I noticed some spots that should have been green or black to better match my armor coating inspiration and took the opportunity to make those changes. Considering most of them were on the biceps, and I fixed my magnet issue between my biceps and shoulders I doubt anyone would have really noticed the incorrect color spots. It kept bugging me because once I knew it was off I couldn't get it out of my head.

Looking back at my improvements list here's the updates:
  • All
    • Finish weathering - DONE
  • Helmet
    • Reattach velcro for front fan, thankfully didn't fall during con, but easy fix - DONE
    • Would love to print another eventually and buy a vacuum-formed visor
  • Chest/Back
    • Foam chest or printed back - plans for a completely new chest and back coming someday
    • Improve battery holder for lights/add reachable switch while in armor
    • Speaker mount to replace duct taped speaker
  • Shoulders
    • Better magnets or permanently attach - added more magnets
  • Biceps
    • Improve strapping to undersuit
  • Gauntlets
    • Separate inner wrist and attach via elastic - likely won't do
  • Belt
    • Replace velcro w/ clips - DONE
  • Knees
    • Velcro or snap to undersuit instead of straps - likely won't do; they were comfortable this time
  • Boots
    • Sharper angle on top
    • Ideal: fully enclosed boot w/ tread and slight wedge
  • Undersuit - didn't have time to complete
    • Different pants
    • Knee wrap
    • Ab wrap
    • Neckseal - getting one made
Also thanks to JTF4 for taking the below pics
DSC02541.jpg


DSC02558.jpg
 
Last edited:
i love your colors, giving me strong monster energy vibes, if i was doing a character i would be doing similar colors, great work.
 
This suit has now been deployed in its current iteration at a Tier 2.

2023-12-03 21.58.36.jpg


I know the ab wrap/tech suit is at least one thing that needs to be done to improve it, which given my recent build including building an ab wrap I've learned a lot that can be applied to doing one for this suit. I also really liked how I build my boots on the newer one better, so that might get added to the list of future improvements. In all between the 2 suits I see lots of potential for changes between each to get them both just right. A suit's not done until it's retired anyway.
 
It's that time again that a suit gets some updates. As this is likely my primary suit for at least this year and likely to remain in rotation for several more years it's worth making some updates for comfort and quality of life improvements.

I'm going to try to remember to update this as I make changes and improvements for C2E2. For starters here's simply the list of plans for updates:
- Boots
- Chest
- Back
- Helmet
- Helmet attachments
- Deadeye Helmet (stretch goal)

Boots - remake out of foam using the same method I did for my suit for GalaxyCon. They were so much more comfortable than the ones I initially did for this build.
Chest and Back - had repainted the ones from this suit for the Peppermint Laughter build, so I need to replace them. Using Turbo's files this time
Helmet - after integrating the helmet audio system it felt just a little bit too tight, upscaling and reprinting using Titlewave's files
Helmet Attachments - got a nice, small camera that I want to integrate into an existing helmet attachment style.
Deadeye - Really I just need this for a handful of photos, but hey, why not?

Things out of scope for C2E2 but that I do want to add or update by Sep/Oct timeframe:
- Ab wrap
- Gloves remake
- In-game style pouch
 
Last edited:
I'd like to know more about that little camera you mention! I've been looking for a good way to get an always-on cam for conventions to make sure I don't miss any shenanigans, but I'm not a huge fan of the chest cam because the angle is just too low and gets blocked so easily
 
I'd like to know more about that little camera you mention! I've been looking for a good way to get an always-on cam for conventions to make sure I don't miss any shenanigans, but I'm not a huge fan of the chest cam because the angle is just too low and gets blocked so easily
As I figure it out I'll do my best to share. As I want to hide camouflage it as best as possible for photos I can't do that exactly as I'd hoped with the same scale as my helmet for any attachments. Since I used Titlewave's Mk VII helmet for my new one, I'm using his attachments and looking to alter the FASCINATOR to house the camera. The other thing I need to figure out is if I can figure out a good way to connect to a battery pack in my helmet for longer run time but be able to plug any holes created when I don't want the housing attached. Alternatively I could, yes, permanently attach the housing but have the front removeable, which may be the best solution for my plans and any concerns I've had. Work in progress, and I likely won't do any physical work on it until I'm done sanding/priming/filling all my current printed parts. It may end up becoming a stretch goal, but for now I'm keeping it on the list.
1710939280006.png

This all entirely in the ideation phase, so anything in this section may be abandoned. Potential idea for a place I could plug for a cable if needed it looks like when installed it covers that front "rivet" looking piece, so I could make a plug that fits in there w/o worry about a ridge when installed and run a cable when not. I'll have to figure out the workings of the cable I need if it's even feasible to make something that can go through such a tiny spot or if I need to find an alternative way of plugging the hole or just move the location. Still I have some paranoia about using magnets to attach it temporarily depending on strength of them and all that.

1710939865262.png 1710939875848.png
 
Last edited:
Planning an update overall of where I am next week, but here's the camera process. For starters, as the helmet I'm making this time was modeled by Titlewave, I started with his Fascinator model as well. The camera I'm using is the DJI Action 2 which is about 40mm x 40mm x 23mm by itself. Since the camera itself doesn't have any ports on it, I also have this Smallrig power adapter that would let me then plug in via a USB-C connection. Unfortunately for fitting into the Fascinator this increases the height to 53mm, which is just enough outside the range I can reasonably fit inside the attachment itself. At least for now that means I'm going to work without it. I'll still be able to use my camera for up to 4 hours depending on settings I use before I'd need to recharge it. Still planning on installing a magnet or stacking if needed in which case I'll need to cut a deeper slot on the attachment for attaching to the side of my helmet.

2024-03-20 09.10.42.jpg

First prototype I just made a cube the size of the camera and made a negative out of the existing model not worrying about it being fully centered or dealing with the front face of the model.
2024-03-20 12.55.27.jpg 2024-03-20 17.09.41.jpg 2024-03-26 07.20.06.jpg 2024-03-26 07.20.32.jpg

Not going to post every prototype of which I mostly printed segments of the model to get the camera centered, or move it up to overlap the cutout I made in the front face. Current state keeps the camera inside the main body and the only adjustments to the front face is cutting out the square section to let the lens see through. I may make additional adjustments that move the camera closer to the actual front by cutting out of the front face. Also debating on if I leave it with a side cutout to insert the camera and make the front face permanently attached or add magnets to the front face and have that be how I put the camera in or take it out of its housing.

The other mini update, for fun I went ahead and printed some Purrfect Audio. They'll also just magnet onto my helmet when I want them on.
2024-03-16 21.56.40.jpg
 

Attachments

  • 2024-03-26 07.19.56.jpg
    2024-03-26 07.19.56.jpg
    1.7 MB · Views: 13
Only a few more weeks until C2E2, so more progress must be made. My one regret from my initial build on this is I did not write down the final paints and clear coat I used. I did have the list of paints I considered, but the charcoal didn't end up being any of those. Thankfully I was able to find the bottle of thinned paint I think I used and after some spoon paint tests comparing that and a couple other paints I had on hand that were on my research list both with and without clear coat I think I found the correct one. Green and black were thankfully easier to find/remember.

Most parts for this round of updates were 3d prints: helmet, chest, back, any helmet attachments.
2024-03-24 19.36.17.jpg 2024-03-24 19.23.23.jpg

Helmet and attachments are Titlewave's file at 95%, chest and back are Turbo's files at 95%.

20240401-DSC00870.jpg 20240401-DSC00878.jpg 20240401-DSC00880.jpg 20240401-DSC00881.jpg

By the end of March I had all parts assembled, sanded, primed, silver coat, liquid mask, black coat. Yesterday I finished getting my charcoal color down on everything again, but no photos of those yet. Next update.

The last update for C2E2 includes my boots. My current boots are just the top section shoe goo'd to an old pair of shoes. They're comfortable but when I did Peppermint Laughter my shoes were even more comfortable and gave me a little extra height.

For starters I found these high-top sneakers with wedges in them that are reasonably priced. I bought them in red for Peppermint Laughter and a set now in black for this and likely future builds for awhile as nothing is permanently attached. You'd get more height immediately within the shoes by getting ones from Tall Men Shoes. I do have additional wedges from when I did my ODST that I've been testing inside the ones I got to get a little more from just my shoes.

The other part of any additional height will be coming from the boot build itself.

2024-03-19 16.19.26.jpg 2024-03-21 20.17.54.jpg 2024-03-19 12.03.33.jpg

Heel section has 2 layers of 10mm foam + 6mm foam in the pattern of the game boot. Front has 1 layer of 10mm + 6mm in game boot pattern. Then I have a 10mm piece for the full shape of the boot. I found this doesn't add a lot, but it gave me a structure to work off of and is flexible enough to still be able to bend the boot to slip my shoes in and out. For traction I also cut out some shoe sole rubber. You really don't need to cut out the pattern, but I like it so why not?

2024-03-23 09.43.51.jpg

When construction is done for the first step I have the base boot but the cap over my foot won't get attached until the end as it'll attach via elastic, again to let me more easily get my shoes back out if I want/need to. One side note, I cut a strip of 2mmfoam that I used to wrap around my layered foam for a cleaner look. Especially because some of my base layers were harbor freight foam that doesn't always cut the cleanest especially w/ my bandsaw. Was waiting on LeakSeal to arrive so spent some time adding Gap Filla then sanded to smooth it and applied LeakSeal.

IMG_5756.jpg IMG_5772.jpg IMG_5769.jpg

A few more weeks, so outside of paint, weathering, and strapping, I have electronics to get set up. I do think it's possible even if there are only 23 days remaining, and other projects that I need to complete in time. That said I'd hoped to finish Deadeye in time, but I'm taking that off the list mostly due to the items that aren't Mk VII suit I still need to do.

Mini-Bonus, I got a small fog machine for photos and tested it out w/ my old helmet and some lights via a super quick setup. Could be fun to use for outdoor shoots at some point especially evening gritty ODST shoots.
20240319-IMG_5716.jpg
 
Great progress!

Does having those details on the bottom of the shoe affect you balance at all? I've never done details on the bottom of the shoe
 
Great progress!

Does having those details on the bottom of the shoe affect you balance at all? I've never done details on the bottom of the shoe
I've not had any issues with them on the bottom so far.
 
Not a ton of photos this week, but here's the updates. Completed painting and sealing on the new parts. Also ran electronics for lights, fans, and audio in my helmet, chest plate, and belt. I picked up 2 small 5v Noctua fans that sit inside the side vents currently pulling air into the helmet. I might switch one to push air out and leave the other drawing air in; haven't decided yet. Backed the actual venting section w/ some speaker mesh so they weren't entirely just open, did the same on the front vents, then put little printed mounting brackets inside and screwed the fans to those. The speaker ear cups do sit really close restricting some airflow, but I used a tiny spacer for lifting the ears from the sides into place that the air isn't entirely blocked.

2024-04-08 09.20.58.jpg 2024-04-08 09.21.28.jpg

The wires are still just kind of shoved into the helmet right now without organization, but I've got the controller for audio sitting near the back, I might move this to the front top of the helmet depending on space, and I want to model and print a small housing for it ideally. I'd just need to plan a spot somewhere off my head and working around the fan at the top that will blow down my face and visor. 2 small, flat battery packs attach via velcro to the top of the helmet, and then the middle velcro is where I place some helmet padding.

2024-04-07 17.04.20.jpg 2024-04-08 09.21.13.jpg 2024-04-08 09.21.08.jpg

Chest and belt lighting run via an Arduino Nano with an LED light strip cut into the needed sections that's programmed right now just for green using another of the same power banks I have in my helmet. The belt and chest connect via a 3 pin connector and will run underneath my undersuit shirt via slits in the shirt. Again I'd like to model up a housing for any boards at some point. Shoutout to CrimsonViper97 for sharing his supplies list and links. Consider them stretch goals for C2E2 when I get everything else, including items outside suit updates, competed.

Final thing was adding shoe rubber to the bottoms of my boots. I still like how they look having the actual tread on them even if no one else will ever notice. I was able to use a combination of wedges inside my shoes and the structure of my boots to get ~4.5-5", but the wedges were a little much, so I took out a step of those which made it ~3.5-4" in added height wearing my boots.

2024-04-07 20.48.10.jpg 2024-04-08 08.59.20.jpg
Left is strapping, dyeing, chroming, trimming, and installing the visor pulled by Angus314, and weathering then this suit will be ready for C2E2.
 
Got my wearable updates and some minor weathering done by this past weekend to wear to a small event here in my state. I have a few notes from it all. First, new fans were definitely nice. Super quiet but enough airflow. Padding in chest and back was good and comfortable which was a concern as this is the first time I've done a 3d printed backplate. I'm glad I put a piece of padding in the lower back section.

Boots need a slight adjustment. Since my shoes aren't permanently fixed there was a tendency for the heel to slightly lift as I walked. Not enough to come out but enough to bother me. Thinking of adding a strap from the heel that wraps and connects at the top of my foot so I can still remove my shoes if desired but reduce the flip-flop feel when I walk.

Lights, I realized late the night before that I need my lights to be more yellow, so I need to adjust the color, which should be no problem.

Biggest "issue" in the helmet is there's so much going on that it was a nightmare trying to place magnets for my cat ears. I'm going to have to take stuff out of my helmet, get the cat ear magnets installed, and then put stuff back. Same goes for my camera attachment which still needs to be finished in the first place.

I'm also glad that I decided to cut the "wings" off the back plate and attach them via elastic. Makes movement more comfortable.

I'll try to suit up once again before C2E2 to get some photos, but if not next update will be after C2E2.
 

Your message may be considered spam for the following reasons:

If you wish to reply despite these issues, check the box below before replying.
Be aware that malicious compliance may result in more severe penalties.
Back
Top