Mimiaga
New Member
Well hi there everyone.
So this is my first Halo cosplay. And my first big 3D printing project. So far everything from the waist up (sans some small parts) is printed, painted, and rigged to wear. I'm probably 70-ish% done with the whole kit and kabootle. I've been posting some progress videos on my tiktok (@mimiaga0) and was pointed in this direction, so here I am. Looking forward to being a part of this community.")
If there's any questions about my process or methods feel free to ask, I'll update this post as I progress.
This armor is MoeSizzlac's on thingiverse and is being printed on 2 cr10 3D printers, using hatchbox PLA.
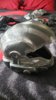
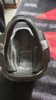
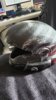
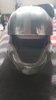
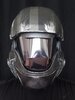
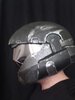
Lets start off with the helmet. It was supposed to be printed as one solid peice. However, do to a filament failure, it made it to about 75%. So it ended up being 3 parts, over 2 prints: the forehead, the jaw, and the everything past where the visor ends. I filled the seam between the 2 prints with bondo filler, and pained it a metallic green. I then taped off what I wanted to stay green, and sprayed it with a few coats of track bed liner. Then by hand, used a silver paint to weather it (this is also the painting method for the rest of the armor). The interior padding is packing foam that came with my 2 3D printers. The visor was made with .3" lexan and a black mirror tint, then hand cut and molded in.


Next is everything on the torso. As far as mounting goes, I'm using a Condor Gunner plate carrier and an NC Star battle belt. While we're at it, the uniform underneath is a Matrix combat set in black. These are are pretty cheap, intended for use with airsoft, so they're perfect for this. I used 1" straps and 1" buckles and some super glue/duck tape to rig everything to vest. For the larger buckles on the top of the chest armor, I used a set of tactical bets with cobra buckles and ran the back of the belts down the shoulder straps of the vest, securing them. The shoulder armor is hanging off the shoulder straps of the vest. On the back of the vest, I attached a Camelbak Ambush hydration pack using 6 D rings. This was a setup I used on my armor when I was in the Army for a bit, so I wanted to mimic that here. I plan on attaching some kind of printed armor to the pack at some point, but I haven't landed on anything just yet. For the waist I'm using that above stated battle belt, and so far I've attached the belt buckle piece and butt plate. The side armor still needs to made for this, and the torso.


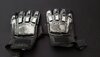
On to the arms. I had to cut out notches in the gauntlets so I can bend my elbow, as well as use a heat gun to ever so slightly warp the hand holes at the bottom so I can slide my hand back out without hurting myself. The gloves are some super cheap airsoft gloves that just really look the part.


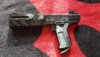
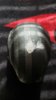
Lastly, lets talk about weapons. Instead of going with traditional ODST variants, I've gone with some customized re-imaginings. For the SMG, I'm still using a normal M7 receiver. However I've replaced most of the parts with real-world firearm variants. The pistol grip is an AK Zenitco grip, as is the charging handle. The stock is a scaled down AR15 buffer tube mounted minimalist stock. The forward grip is a Hera Arms CQC. The optic is an RMR, and the suppressor is an Osprey by Silencer Co. All of these are 3D printed replicas and non functioning. Is also has a clip on the end of the stock to sling it to the armor.
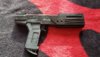
The pistol is actually the first thing I made for the project, and it's as screen accurate as I can do. However I felt like it didn't match the tone of the SMG, being totally unique. So Im working on a somewhat custom version of that as well, pictured below is the model of the new pistol, which is currently on the printer. I lacks a light in favor of a bare rail, has another RMR mini red dot optic, a custom magpul style speed plate, and a more traditional trigger and trigger guard.
A knife is also planned to be made.


And here it is on me with everything I have done so far!


So this is my first Halo cosplay. And my first big 3D printing project. So far everything from the waist up (sans some small parts) is printed, painted, and rigged to wear. I'm probably 70-ish% done with the whole kit and kabootle. I've been posting some progress videos on my tiktok (@mimiaga0) and was pointed in this direction, so here I am. Looking forward to being a part of this community.
If there's any questions about my process or methods feel free to ask, I'll update this post as I progress.
This armor is MoeSizzlac's on thingiverse and is being printed on 2 cr10 3D printers, using hatchbox PLA.
Lets start off with the helmet. It was supposed to be printed as one solid peice. However, do to a filament failure, it made it to about 75%. So it ended up being 3 parts, over 2 prints: the forehead, the jaw, and the everything past where the visor ends. I filled the seam between the 2 prints with bondo filler, and pained it a metallic green. I then taped off what I wanted to stay green, and sprayed it with a few coats of track bed liner. Then by hand, used a silver paint to weather it (this is also the painting method for the rest of the armor). The interior padding is packing foam that came with my 2 3D printers. The visor was made with .3" lexan and a black mirror tint, then hand cut and molded in.
Next is everything on the torso. As far as mounting goes, I'm using a Condor Gunner plate carrier and an NC Star battle belt. While we're at it, the uniform underneath is a Matrix combat set in black. These are are pretty cheap, intended for use with airsoft, so they're perfect for this. I used 1" straps and 1" buckles and some super glue/duck tape to rig everything to vest. For the larger buckles on the top of the chest armor, I used a set of tactical bets with cobra buckles and ran the back of the belts down the shoulder straps of the vest, securing them. The shoulder armor is hanging off the shoulder straps of the vest. On the back of the vest, I attached a Camelbak Ambush hydration pack using 6 D rings. This was a setup I used on my armor when I was in the Army for a bit, so I wanted to mimic that here. I plan on attaching some kind of printed armor to the pack at some point, but I haven't landed on anything just yet. For the waist I'm using that above stated battle belt, and so far I've attached the belt buckle piece and butt plate. The side armor still needs to made for this, and the torso.
On to the arms. I had to cut out notches in the gauntlets so I can bend my elbow, as well as use a heat gun to ever so slightly warp the hand holes at the bottom so I can slide my hand back out without hurting myself. The gloves are some super cheap airsoft gloves that just really look the part.
Lastly, lets talk about weapons. Instead of going with traditional ODST variants, I've gone with some customized re-imaginings. For the SMG, I'm still using a normal M7 receiver. However I've replaced most of the parts with real-world firearm variants. The pistol grip is an AK Zenitco grip, as is the charging handle. The stock is a scaled down AR15 buffer tube mounted minimalist stock. The forward grip is a Hera Arms CQC. The optic is an RMR, and the suppressor is an Osprey by Silencer Co. All of these are 3D printed replicas and non functioning. Is also has a clip on the end of the stock to sling it to the armor.
The pistol is actually the first thing I made for the project, and it's as screen accurate as I can do. However I felt like it didn't match the tone of the SMG, being totally unique. So Im working on a somewhat custom version of that as well, pictured below is the model of the new pistol, which is currently on the printer. I lacks a light in favor of a bare rail, has another RMR mini red dot optic, a custom magpul style speed plate, and a more traditional trigger and trigger guard.
A knife is also planned to be made.
And here it is on me with everything I have done so far!
Attachments
-
 91397514_863821430799623_3680286089290973184_n.jpg53.9 KB · Views: 266
 -
 91479008_221962035580218_5687223671333060608_n.jpg1.4 MB · Views: 279
 -
 91561933_620630391851925_2770715035083735040_n.jpg1.4 MB · Views: 293
 -
 90712577_2464265393834832_5784372167961477120_n.jpg1.1 MB · Views: 285
 -
 90742478_867873023661416_870095236695588864_n.jpg1,012.8 KB · Views: 292
 -
 90815446_533725024244507_393500874980196352_n.jpg621.3 KB · Views: 290
 -
 90815616_1746376642170865_7702583722897309696_n.jpg1.1 MB · Views: 279
 -
 91320487_578765809650026_6129775937576763392_n.jpg395.5 KB · Views: 273
 -
 91561933_620630391851925_2770715035083735040_n - Copy.jpg1.4 MB · Views: 150
 -
 92663758_223872495338439_2640988369701568512_n.jpg29.3 KB · Views: 215
 -
 92667942_220478722376476_28510967868424192_n.jpg26.1 KB · Views: 223
 -
 92692082_944771525940747_3746736813977370624_n.jpg280.5 KB · Views: 210
Last edited: