My first build. ODST Helmet.

Status
Not open for further replies.

RJay114

New Member
Hi Guys,
First off, I have to say that this community seems to be one of the most helpful and friendly on the web. I've been viewing posts here for a while, picking up hints and tips for when I eventually start my build and its tremendous that so many people have took the time to post about their experiences and knowledge, so I thought it only fair that I do the same. I've been toying with the idea for a while now and I recently found myself with some time on my hands and thought, "what better time to start?"... well, here goes...
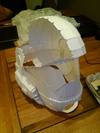
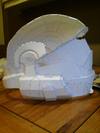
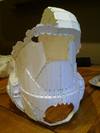
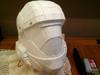
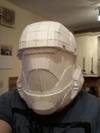
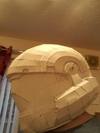
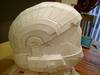
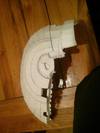
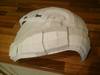
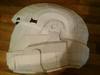
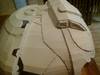
So, the plan was to pick something I thought looked relatively easy for a practice piece (HD ODST Helm) and a weapon (AR Rifle?), then move on to build my Halo 4 spartan before finishing with my favoured helm: the Halo 3 CQB. So far I've only had two pep sessions but will hopefully get to continue tonight. I'll be keeping you guys posted as well as probably annoying you all with questions about how to do stuff. Thanks for reading my post, I'll hopefully post again soon with more progress reports. Here are the pics so far (the pep file was the HD ODST Helmet by Kirrou btw. So, massive props to him/her, thanks):

20140123_022530_zps0eb096c1.jpg
After 1st pep session.

20140124_141226_zpsdb8c6a78.jpg

20140124_141320_zpsbca43342.jpg

20140124_141334_zpse957c0bc.jpg
after 2nd pep session.
 

Attachments

  • 20140123_022530_zps0eb096c1.jpg
    20140123_022530_zps0eb096c1.jpg
    85.2 KB · Views: 168
  • 20140124_141226_zpsdb8c6a78.jpg
    20140124_141226_zpsdb8c6a78.jpg
    64.5 KB · Views: 154
  • 20140124_141320_zpsbca43342.jpg
    20140124_141320_zpsbca43342.jpg
    63.8 KB · Views: 155
  • 20140124_141334_zpse957c0bc.jpg
    20140124_141334_zpse957c0bc.jpg
    62.1 KB · Views: 153
Pep is looking clean so far and the cuts look super clean. your proportions look right to me as well. My pep is done on mine but I need Resin and bondo left. Looking forward to the rest of the helmet.
 
Hey people,
Thanks for the positive comments. Just a quick update on how its going. Haven't had as much time on it as I'd hoped over the last few days, only been able to fit in one more pep session since my last post.

Pep is looking clean so far and the cuts look super clean. your proportions look right to me as well.

The pep work is very clean! What glue are you using?

Cheers guys, I can assure you its not quite as clean as the pictures make out! and I think the proportions may be a little bit out, not sure yet tho, we'll see when the pep's done. I'm just using hot glue for this, I find that it's the easiest and most manageable thing to use, you do get a lot of stringy bits all over the place tho. I did buy some silicone glue but I don't think I'll be using it.

@Harri51 - Your Helm's looking pretty good, I noticed you attached the vents and cheek details afterwards. Is that an easier way to do it?

thats pretty high res for a first build don't you think?

Yeah, quite possibly. It looked a lot simpler on the screen, then I printed it and thought: "Holy S#*t, that's a lot of small parts". But hey, go big or go home, right?

Anyway, here's the pics from my latest session. Btw, what's the general consensus on where to start with a helmet? I think my approach of 'No particular order' is going to make it difficult to finish.

20140130_161524_zps66a4703e.jpg

20140130_161439_zps2e70f023.jpg

20140130_161353_zpsf46dad2e.jpg

Thanks again folks, more to come soon hopefully.
 

Attachments

  • 20140130_161353_zpsf46dad2e.jpg
    20140130_161353_zpsf46dad2e.jpg
    77.1 KB · Views: 169
  • 20140130_161439_zps2e70f023.jpg
    20140130_161439_zps2e70f023.jpg
    58.8 KB · Views: 172
  • 20140130_161524_zps66a4703e.jpg
    20140130_161524_zps66a4703e.jpg
    68.1 KB · Views: 173
Definitely looking great! Have you thought of the process you will do after the pep work is completed?

When pepping anything, I usually build it in quadrants, paying attention to do the small parts first, and not "painting myself into a corner". Unless someone else states otherwise, I don't believe there is any specific order to pepping.

Keep up the great work!
 
First off, great job on the pepping so far.

Second, to my knowledge there's not a specific order to pepping, but I know lots of people like to start at the chin and work back all the way to the neck so they can get scale. After that they start building the dome on the top of the head.

I personally like to build the dome first, set it aside, build the rest and then connect the two. I don't know why, it just feels right.

Hopefully you don't have to restart the pep because of this speed bump.
 
Thanks for the advice guys, I think building in quadrants sounds like the way forward with regards to any future builds, yeah "painting myself into a corner" is what I seem to have done here. Oh well, just chalk it up to experience I suppose. I don't think I'll need to restart elusch (hopefully) It just might be a bit fiddly getting the rest of the dome put in. I think at this stage I will have to build the rest separately and then fit it to what I have.

Have you thought of the process you will do after the pep work is completed?

A little, I think resin to harden it, then fiberglass cloth on the inside to make it solid and finally rondo/bondo/car body filler on the outside? It's the rondo stage I'm still not too confident about. Never used it before, don't know what kind of resin to mix it with, not sure how easy a time I'll have keeping all the detail right when I do it, how easy is it to work with? Gonna be asking a lot of questions when I get to that stage.

You're Rogue build is looking fantastic by the way EVAkura, love the Binary Rifle (the scope is genius) and M6 too. I take it that since you've built yours with coloured card stock you won't be painting or rondo-ing the outside at all?

Anyway, I'll hopefully be finished the pep today and have pics up later tonight or maybe tomorrow.
 
Thanks RJay :) Rondo is really easy to work with, but I think you may have its function a bit confused. All Rondo is, is a "watered" down Bondo mixture. To achieve that, you mix in epoxy resin. The type of resin you want to use (IMO) should be the same brand as your body filler. I stick with Bondo brand epoxy and body filler just because they are readily available, reasonably priced, and I am familiar with them. I have done a lot of research on this process, and have read even more "oh man, I wish I did it that way!" threads. The general consensus is to harden the outside of your pep first with epoxy, being sure to section it off into four parts, and do the front left first, then the back right, then front right, and lastly back left (obviously does not have to be in that specific order, but hopefully you get the idea). This is to help prevent warpage.

After that all cures, you can move onto the Rondo stage. I highly recommend watching Cereal Kill3r's how-to videos on this process.

Just as an FYI, I recommend not fiberglassing the inside of the parts first if they have any sharp corners, detail, or anywhere else you may anticipate the glass not getting into and contacting ALL surfaces. If not, you will a ton of air pockets... and they are the DEVIL! They greatly weaken your build, and can be a serious hardship. This is why the Rondo stage is so important. It gets into all of the corners and detail spots, and gives you a smoother surface to then add glass to.

Hope this helps! And also, check out Cereal Kill3r's video!!! :)
 
its coming together nicely but defiantly go easy on the ear section when adding the top part when i started mine it poped out of place so be mindful of that while finishing this step and what glue did you use the placing looks so clean
 
Thanks for the advice and comments people. Jasonzed36 ,the glue I'm using is hot glue, just bought a cheap glue gun and a few sticks, I know a lot of people don't like it but I think it's pretty easy to work with. Yes, EVAkura, I was very confused about the rondo, think I've got it all figured out now (mostly). Cereal Kill3r's videos were most helpful, so, massive thanks to him for making them and thanks to you for posting them. I think I'll be re-watching them a few times as I progress.
Anyway, finally got the pep all done. It is a little on the large side but not too much to worry about, also I haven't put the detail folds on, are they just for decoration or do they have another purpose? For some reason, my camera seems to be stretching the pics ever so slightly, so it isn't as tall and thin in real life as it looks in some of these pics.

20140202_163029_zpsb7a1310d.jpg
20140202_163013_zpsb4bd4609.jpg
20140202_163201_zps2d3550c5.jpg
20140202_163246_zps7a1093b6.jpg

Hopefully I'll have some resin next week and I can get started with the hardening. Will post more pics as soon as I can.
 

Attachments

  • 20140202_163013_zpsb4bd4609.jpg
    20140202_163013_zpsb4bd4609.jpg
    73.3 KB · Views: 167
  • 20140202_163201_zps2d3550c5.jpg
    20140202_163201_zps2d3550c5.jpg
    45 KB · Views: 161
  • 20140202_163246_zps7a1093b6.jpg
    20140202_163246_zps7a1093b6.jpg
    42.7 KB · Views: 169
  • 20140202_163029_zpsb7a1310d.jpg
    20140202_163029_zpsb7a1310d.jpg
    85.1 KB · Views: 163
looks great! Proportions look great and seems like you got enough room for foam. Hugh has a simple way to do the visor then vacuum forming it if you have getting one.
 
Status
Not open for further replies.
Back
Top