my odst build.

Status
Not open for further replies.

akiyata

New Member
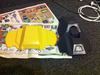
ok, im new here. i've found this 2 weeks ago threw the xbox magazine holo reach edition. i was blown away! i showed a friend of mine, and we are now both starting outfits. i'm doing an odst and he's doing a custom spartan. i have a few different costumes alredy. but none i've made myself. now i've seen what people can do with pepakura, and how to use it!!!, and i wanted to try. so i've started this...
IMG_0059-1.jpg
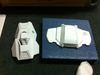
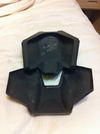
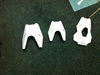
(i hope that worked....) its an odst shoulder plate. i started with the scale that was on. way too small! so i upped it X2, better... buut still to small. so i upped it X2 again and this is what i got so far.
IMG_0068.jpg
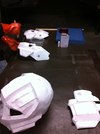
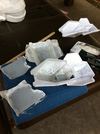
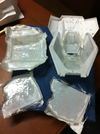
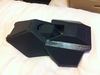
the one on the right is my first. im still working on the biggest one as we speak.

thanks
 

Attachments

  • IMG_0059-1.jpg
    IMG_0059-1.jpg
    182 KB · Views: 99
  • IMG_0068.jpg
    IMG_0068.jpg
    179.2 KB · Views: 99
Good luck with your build. Pics didnt show up, you need to host them somewhere like photobucket and then use the url to place them in your post (If you want to edit your post, click on the 'go advanced' button first.
 
thanks acttive34u. i think the pics work now.

They do. If you see them, we see them ;-)

About the scale... You should either follow the scaling tutorial or take meaasurements for each piece instead of just doubling the size each time.
 
Domo Ventrue. My friend tried that on his first helmet (a master chief helmet, not. Shure about the mk). It turned out to small. He then tried it again on his 2nd helmet (a recon) and it looks ok, he says is may be to big. so we decided to try the scaling by 10%. We where using the method on the official pepakura scaling thread.
 
hello all
i now have 1 whole shoulder peped out, but due to printer problems i'm at a stand still. i am very happy with the shoulder though.
bda636cd.jpg

also i've been doing a lot of research, how to attach everything and the way i want it to look, feel and move. i've been watching the "we are odst" video on youtube, and i like the main character's armor. his chest is in 3 pieces. i like that. better movement and if done right i think it could look right, but it has to be tight! not lose enough to flop around. i think ill use a MOLE vest i found on the under armor thread.http://www.405th.com/showthread.php/7946-Undersuit-Resource-Thread?daysprune=-1 http://www.rstacticalgear.com/pd-bds-tactical-advanced-plate-carrier-chest-rig.cfmthat would allow me to easily instal the armor. also if a pice breaks or wheres to much i can be replaced easily too.

since i couldn't print anything i got some resin, hardener, and fiberglass. (plus safety supplies of course!
b1b04d7d.jpg
 

Attachments

  • bda636cd.jpg
    bda636cd.jpg
    80.4 KB · Views: 117
  • b1b04d7d.jpg
    b1b04d7d.jpg
    168.3 KB · Views: 105
Hi, nice pepping. Good that you have safety in mind though your dust mask is not going to protect you from the resin fumes. You need a mask to protect you from organic fumes/vapour while working with uncured resin and bondo.
 
-to active84u
thanks, ill look into a better respirator. i didn't think it would be that bad outside. but it would be better to fe safe than sorry.

-to odst blue
ill try to take a look at his. i'm always looking for a better idea!
 
i've been having trouble with the printer lately but i'm back printing. i've completed the pep on the chest.
baefe0d7.jpg
now i have 1 more shoulder! im going in sections, upper, middle, thighs. also i'm modeling the chest off of the "we are odst" trailer. i like the usability it looks like it has. so i split the chest into 3 pices.
8c1468e4.jpg
im hoping to start resining these parts tomorrow, then fiberglassing the next. with about 12- 24 hours in between. im a little exited and nervous to try it. wish me luck! :)
 

Attachments

  • 8c1468e4.jpg
    8c1468e4.jpg
    158.7 KB · Views: 104
  • baefe0d7.jpg
    baefe0d7.jpg
    121.3 KB · Views: 109
just got most of the parts resined and fiberglassed. i also learned a valuable lesson: don't use 4 cc's of hardener for 1 cup resin. lol. is turns into plastic in 5 minutes. but in the end it worked out. because of my bondoggle we ran out of compound before i could fiberglass the last shoulder.
0ec7e64e.jpg
f8e2a2eb.jpg
a9fdd9d0.jpg
 

Attachments

  • 0ec7e64e.jpg
    0ec7e64e.jpg
    72.8 KB · Views: 99
  • f8e2a2eb.jpg
    f8e2a2eb.jpg
    121.7 KB · Views: 110
  • a9fdd9d0.jpg
    a9fdd9d0.jpg
    133.1 KB · Views: 103
wow this is looking great :D
did you do it like thin layer of hardner then another one then the fibre glas on the inside or did you to it differently ^^?
 
awesome pepping. Those are going to be some very strong parts on account of all that cloth you put into that. Are you based in japan/asia? it looked like a container you had had japanese or chinese lettering. About the respirator mask you can get a pack of 3 for 4$ or around there that will protect against resin fumes and it should say that on the little plastic container.
 
About the respirator mask you can get a pack of 3 for 4$ or around there that will protect against resin fumes and it should say that on the little plastic container.

I find that somewhat hard to believe. Can you link an actual (regular, not special) offer at that price?
 
thank you!

-to rensole117- i mixed the resin and hardener together. i found finding the right ratio hard because all my instructions where in japanese. but it all worked out. i probably should have read the fiberglass/resining sticky in the noob forum(i recommend that ;P )

-to wiyumishere- good eye, i'm stationed in Atsugi Japan with the us navy. also i found a good mask at our NEX depot for 7.95. it makes me look like a grunt though. lol

thanks again
 
hey guys, i'm back. i've had to temporally move for some training. so i've had to get all new materials. but i've just about finished my first stage. one shoulder and the chest is done :) the last shoulder still needs rondo on the inside and a coat of primer and paint. by the way... rondo.... is a gift from the gods! its a breeze to use, simple to make and does wonders for detailed parts or just a part that has the correct angles you want without diluting it with thick ! well on to the pics........:)
IMG_0144.jpg
IMG_0145.jpg
IMG_0146.jpg
 

Attachments

  • IMG_0144.jpg
    IMG_0144.jpg
    188.4 KB · Views: 104
  • IMG_0146.jpg
    IMG_0146.jpg
    73 KB · Views: 96
  • IMG_0145.jpg
    IMG_0145.jpg
    66.9 KB · Views: 95
Status
Not open for further replies.
Back
Top