Status
Not open for further replies.

SpartanProps

Member
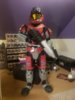
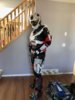
Hey everyone! I thought i would post my build progress for my noble 6 costume that i debuted at calgary comic expo!
Since its done and not in progress im not really sure what order to do the picturtes in, so i will do my best to post in clusters of what i did and explain what i have done c:

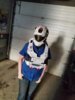
First and foremost I guess would be to talk about the helmet! I got one off of etsy, though I cant remember who it was that i bought it from! He was selling them for a discount since his resin cast had been damaged so i got to do a lot of the finishing work myself.

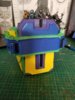
I started by cutting out the visor area on the visor as it was all one solid piece as well as cutting out some holes in the cheeks for ventilation and one in the front for the fan to have a direct air intake.
20181211_170410_zpsky52g5cw.jpg


Next I primed it to see where the dents were that needed filling and added a bunch of bondo to the areas that needed it, as sanded off the areas that were too high. I also routed all the line details to make them a bit more even.
20190111_153945_zpscpu7toh0.jpg


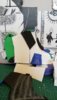
Next was to prime it again and make sure it was ready to be painted. at this stage i guess i forgot to take more pictures than i did.. But i was happy with the finish and painted it flat white.
20190316_141949_zpsyfnbezvs.jpg


Next step, I took it to the paint station and added all the black details and the reds. once i was happy with how the flat colours looked, I added my silver weathering and a black wash to make it look battle damaged.
20190318_162607_zpsenw1gktu.jpg


Next I filled the inside of the helmet with foam so it would fit a little better, after lots of test fittings I ended up using a lot of foam inside as this helmet is meant for someone a little taller than me, also a man. I glued the visor in and then aside from fan wiring, it was all done!
20190319_223413_zpsxhkdnegy.jpg
20190319_232803_zpsvvpi0zfa.jpg


Inside i used a 5v fan stolen from on of my 3d printers and ran some wire to fit 2 9V batteries into the back of the helmet, its all hidden nicely away in the foam c: I still have some upgrades to do before otafest, such as adding a moisture absorption system, and gluing the microphone in so its not flopping everywhere as it was at comic expo.


Thats all for now!
Stay tuned for more

Spartan P17 signing off.
 
Seeing this suit of armour in person was a treat. Is there going to be any upgrades or additions to the suit past what was included for Otafest?
 
Seeing this suit of armour in person was a treat. Is there going to be any upgrades or additions to the suit past what was included for Otafest?
I am planning a few upgrades! I need to fix the mechanism for the pouch so it can actually open without breaking the magnets off of the plastic, as well as a rebuild of the undersuit which i still need to figure out haha On top of that once i finish with a weight loss journey i am on, i will likely need to rebuild the entire lower half because since the journey began the thigh pieces are already too big. the biggest one I am planning is finding more comfortable shoes to wear. my heel shoes looked awesome but they hurt too much lol
 
OK! Sorry for the long wait everyone! Life has been crazy the last few weeks!
Im not really sure where to start with the armor build since it is done and I was too much of a noob to post it as I built it.. But heres the next batch of build photos!

I was bad and didnt take any pictures during the build process but this chest was a combination of pepakura files and freehand.


This one is a test of the top portion to see how it fit.
271471


here it is without the arm straps.
271472


Ab plate on and straps closed (i used buckles)
271474


I wasnt happy with the size of the ab plate so I took it apart and rebuilt it to fit a little smaller and a bit more accurate to the design in game
271473


Comparison of the 2 ab plates side by side.
271476


I guess I didnt take photos of the codpiece build but here it is fitted before i changed the ab plate! I am apparently very bad at documenting builds haha
271482


I freehanded the spinal pieces and glued them to the back.
271481


The next step was adding all the leds and wiring! (I had painted everything by this point but im just picking the parts individually and going from there)
271479
271480


I never documented it but I designed my emblem in photoshop then added it into cura as a lithopane then printed it off and painted it! It was then glued onto the chest. I had a few extra stickers left over from last years build so i added that to the chest as well. I also had some transparent panes of filament left over from a project i had done previously so I fitted them into each light slot to add the diffusers. To power the chest and the microphone we found an old car booster in my dads garage so we shoved it into the back pocket for all my suits power! I have a portable phone and car charger on my back.

Thats all for now!
SpartanP17
 

Attachments

  • 20190314_181314.jpg
    20190314_181314.jpg
    1.3 MB · Views: 233
  • 20190322_183505.jpg
    20190322_183505.jpg
    1.9 MB · Views: 296
  • 20190322_183530.jpg
    20190322_183530.jpg
    1.1 MB · Views: 300
Hi everyone! Ill try for a small update during my lunch break at work!
I thought I would talk about the 3D printing parts a bit!
I found some great files on thingiverse all halo armor related, i dont remember everyones names so excuse the lack of credit!

First off I found this awesome knife file:
272094


It was pretty low resolution when it came off, i think it was meant to be scaled super small so it didnt translate well when i scaled it up! I took the sheath and did some customizing to it:
272095

I am awful at taking photos but i did edit a hole into the inside of the sheath so i could embed a magnet to hold the blade on. It has a pretty snug fit as it is but the magnet just gives it that extra hold so it wont fall out when I'm out fighting all the crazy aliens out there.

Next up i found some gauntlet files, but they are pepakura rips so they dont print hollow. I did some magic in some programs and managed to hollow it out but i had the ends closed off, i didnt figure that part out so i used a dremel to get my arm to fit through lol
272096

The file did have some imperfections so I did quite a lot of sanding and filling to this piece to make it look acceptable. Though I may rebuild it in foam last year as it left some awesome bruises on my arms haha

For the tacticalGPS i wanted to use my phone so I commissioned a very good friend of mine, His company is called "bluecurtaintech" and he took the gauntlet file i used originally and built a case for my phone on top and made it look awesome! It is held in at the back with magnets:
272097
272098


Next up I needed to have the Kat pouch so I found a database on thingiverse that has a whole bunch of armor files and found myself the pouch, printed it off and added some magnets to make it stay closed (though for next year I have to do some fixes because the magnets kept breaking off and the pouch kept opening up. I used some strap material to held it all together so i didnt lose the lid entirely)
272099

It printed pretty rough so I had lots of filling and sanding to do on this one too. Such is the nature of untuned machines lol

Next up! I got a really awesome ODST shoulder file and printed that out as well. It was designed for being flexible but I glued it together so no flex on it at all. I have some tweaking to do with this one for next year as well but it lasted me the 4 days I wore it at conventions
272100

Lots of filling on this as well as you can see ;)

Next up was my grenade! I played around with the piece once it was fresh off the printer to make the slide pin actually slide. After some fabricating it looked pretty cool! I need to tweak how it was attached to my belt because i couldn't get it off to pose with it lol
272101


For my magnum I found a really awesome boomco blaster on amazon and took it all apart and painted it. I added some super magnets on the inside of the handle so it would stick to my thigh piece. I originally used weaker magnets and used wire to hold it in place but that didnt do so well so it was fixed for otafest (though because of it being a functional nerfgun they banned it and asked me to keep it in a bag the whole time so no one really got to see it :c)
272102


From last years build I had 3D printed a to scale DMR and it was assembled in something like 37 pieces. crazy amounts! Last year it did fall apart in several places and was reglued for CCEE 2018 and i never got time to fix it or make a new one so I reused it and it did get the job done. We did have an incident of a barrell getting knocked off in a line but super glue was there at the ready to fix it. Im not sure where the photo of the DMR is so I do apologize.

The final piece that I 3D printed apart from a few bullets for my sniper shoulder was of course, the armour ability! I had seen TurboCharizard 's awesome design for the armour ability so I asked to buy the file from him but being the awesome dude that he is he gave it to me free of charge and included all the resources for things to buy and how to program it in. So i printed it at a slightly smaller scale since my chest piece was scaled down a bit and painted her up and added all the LEDs and chip and everything to make an awesome effect on my suit! Thanks so much for the icing on the cake, Turbo!!
272103


I did wire in a button and everything but it had a short on day 1 of CCEE so I had to scrap it for the rest of the weekend. Plus it was hard to hear anyway! Another planned fix for next year!


Anyway, thats all for now!

Spartan P17 signing off
 
I love the tactical phone pad :), anyone incorporating tech earns points. I also used the same Boomco magnum for mine, makes it so easy!

I would've done the same thing if I didn't have a keyboard/tracpad installed into my forearm already.
 
Last edited:
The final piece that I 3D printed apart from a few bullets for my sniper shoulder was of course, the armour ability! I had seen TurboCharizard 's awesome design for the armour ability so I asked to buy the file from him but being the awesome dude that he is he gave it to me free of charge and included all the resources for things to buy and how to program it in. So i printed it at a slightly smaller scale since my chest piece was scaled down a bit and painted her up and added all the LEDs and chip and everything to make an awesome effect on my suit! Thanks so much for the icing on the cake, Turbo!!

I'm glad everything worked out well for you!
 
Hi everyone!
Thought I would do another posting about the next few bits in between cleaning up my office, so here goes!

Next up on topic is the shins and knees! I didnt go super pic heavy on these but I referenced some bits from the pepakura files, my lady spartan action figure and LilTyrant's super amazing KAT build from a few years ago. Between those references I was able to pull something janky together and test fit them etc.
272111
272112


Sorry for the crappy picture but I was literally laying on my back on the floor with my leg stretched out to get it haha

Originally I had designed it so the knees would be a seperate piece and velcros onto the undersuit but based on the sagging when i stood up, the thighs actually pushed them off so i ended up glueing them right onto the shins! I still need to clean that bit up since it was a bit last minute
272113


I guess thats all for the shins so onto the thighs!

Again I used the same areas for reference and came up with the thighs. LilTyrant made the beautiful point of splitting her thighs for easier bathroom access so I followed suit and did that to mine as well, and ho boy it did save me a ton of time and annoyance from armour removal.
272114
272115


The biggest problem I encountered with my thigh pieces were they kept falling down as I lost 20lbs after building them so i guess I will have to rebuild them after I am done with my diet haha

272116


Next up was the shoulder/biceps! I recycled some of my pieces from last years build since some aspects were 3D printed.


272118
272119

272120


And heres everything so far! (minus some of the 3d printed stuff)
272121
 

Attachments

  • 20190223_153949.jpg
    20190223_153949.jpg
    1.7 MB · Views: 189
Hi everyone!
Thought I would do another posting about the next few bits in between cleaning up my office, so here goes!

Next up on topic is the shins and knees! I didnt go super pic heavy on these but I referenced some bits from the pepakura files, my lady spartan action figure and LilTyrant's super amazing KAT build from a few years ago. Between those references I was able to pull something janky together and test fit them etc. View attachment 272111View attachment 272112

Sorry for the crappy picture but I was literally laying on my back on the floor with my leg stretched out to get it haha

Originally I had designed it so the knees would be a seperate piece and velcros onto the undersuit but based on the sagging when i stood up, the thighs actually pushed them off so i ended up glueing them right onto the shins! I still need to clean that bit up since it was a bit last minute View attachment 272113

I guess thats all for the shins so onto the thighs!

Again I used the same areas for reference and came up with the thighs. LilTyrant made the beautiful point of splitting her thighs for easier bathroom access so I followed suit and did that to mine as well, and ho boy it did save me a ton of time and annoyance from armour removal. View attachment 272114View attachment 272115

The biggest problem I encountered with my thigh pieces were they kept falling down as I lost 20lbs after building them so i guess I will have to rebuild them after I am done with my diet haha

View attachment 272116


Next up was the shoulder/biceps! I recycled some of my pieces from last years build since some aspects were 3D printed.


View attachment 272118View attachment 272119
View attachment 272120


And heres everything so far! (minus some of the 3d printed stuff)
View attachment 272121
Eeyyy, I had those same Loot Crates :)
 
Hello everyone! Time for another posting! I figured Id go over the shoes since thats the last set of pieces pretty much..

So wanting a smaller foot profile I decided the best route was to go with a high heel boot. I very rarely even wear heels but i loved the way it looked for tyrants build so I went the route of pain. I do plan on rebuilding the shoes due to the immense pain i was in after only 3 hours at the convention.. but anyway onto the foam build!


Started off with this monstrosity:
272364


After the initial set of wrapping in foam. I split the shoes so i could get my boot tied and zipped up outside of the foam shoe. inside would have been impossible...
272365


272367


Heres the first shoe 90% done!

272368


And done! I used spray adhesive for it was a little bit messy and got everywhere. Very good adhesive though!

272369
272370


the finished pair!


The test fit:
272371


And here is the full suit up!

272372


Next up, I did all my painting!

272374
272375
272376


And then the weathering and details!


272377
272378
272379
272380


Then I had a test run photoshoot in my basement where my best friend took the pics and made me look awesome:

272381
272382
272383


Up next, I will talk about the undersuit! I have to redo it cause it was rushed and finished literally 12 hours before comic expo so i really didnt get a tremendous amount of pictures of the process but I will explain and show what I can n_n


Until next time!!


Spartan P17 signing off
 

Attachments

  • 20190302_130528.jpg
    20190302_130528.jpg
    526 KB · Views: 254
  • 20190316_142000.jpg
    20190316_142000.jpg
    4 MB · Views: 294
I was rereading this thread, nodding my head like "mhmm, mhmm, yeah, mhmm, looking good, I like it, woah! high heals! Oh, those turned out pretty well, mhmm, still looking good WOAH WTF IT'S PAINTED I JUST GOT BOB ROSSED WHERE'D THAT ARMOR COME FROM!"

True story.
 
OK! Next posting time! Life has been keeping me super busy as of late, so sorry it took so long to update this thread!

I didnt really take a lot of pictures of the process but I wanted to talk about the undersuit (I promise when i rebuild it that i will take more pictures)

So for the undersuit, since patterns dont really exist, I used liltyrants build as reference and attempted to make a shirt! I made the prototype by pinning a bunch of paper to myself to get the basic shape and sizing that i needed.
i then had a helping hand draw out the pattern on me and then we unpinned and cut out the patterns and transferred to the muslin. We were able to tweak the pattern to fit perfectly, because paper only gets you so far. From there I was able to make this:
noface1.jpg
noface2.jpg


the next step was cutting out all the designs into the vinyl. measuring, cutting and folding and sewing the edges, example is one of the shoulder pads:

20190411_160150.jpg


I broke so many needles with this material so i definitely want to rethink my strategy for the next build!

After all the vinyl pieces were made I used my muslin pattern, and transferred all the pattern pieces to the spandex and some athletic mesh stuff for breathable spots under the armour pieces so I didnt overheat, then cut them out and assembled.
20190310_153706.jpg

For the pants I used an old pair of yoga pants that i used originally for the first suit i built, cut it apart and transferred the pieces to the new material, cut, sewed etc. I then applied all of the vinyl detail bits to the points on the suit where it needed to be and sewed them right on top. I have some velcro and clips covering the back zipper underneath some details.


When the pants and undershirt were done, I used paper and made the seals for the chest piece, then cut the pattern on to the vinyl and made the seals. then i attached them using super glue, because hot glue doesnt stick super well to the vinyl i got.


And then the final suit up! the suit was finished the night before comic expo so it was really down to the wire. all the vinyl pieces were hand stitched into the suit as well so my fingers were very painful by the end! Definitely need to invest in a better sewing machine that can handle leatherwork.


received_2194045383967996.jpeg
received_430021801148898.jpeg
received_351755408781987.jpeg


And finally! The next step is to rebuild a few things! My shoes, while they look awesome, are not functional for walking on all day, so i plan to rebuild around my set of boots that i wear every day. I also need to touch up some paint and the biggest thing to do is rebuild the entire lower half and the undersuit! While I was building I started a weight loss program and the time between building and wearing at the convention, the thigh pieces and the cod didn't fit anymore! I also got my sticker pack from Asgardianhammer so need to add those onto the suit as well!

And now, onto the rebuild!

Spartan P17 signing off
 

Attachments

  • IMG_0191.jpg
    IMG_0191.jpg
    243.7 KB · Views: 254
Ok so con season is over *insertsadfacehere* and that means it's time for repairs before the next convention! I thought I'd share a few on the fixes i made today to the suit!

The knees were originally meant to be velcro'd to the undersuit but that didn't work and as a result the yellow foam behind the painted portion was visible so I've now glued black foam to the back so it's not bright yellow anymore.
Another thing i did was i got a sticker pack from Asgardianhammer so i applied a few to the chest piece. I had trouble getting them to stick so im holding them on with packing tape for now. Barely noticeable (i hope) i also decided i needed my service tag attached so i moved my emblem and painted on the service tag. When i moved the emblem it ripped a giant hole into the foam so i decided to pretend it's a bullet hole.. some weathering and paint touch ups later i got a pretty neat look!

Thats all the time i have for now!
Spartan p17 signing off
20190821_124523.jpg
 
Ok! Now that con season is over, and outpost Anaheim was a major success, its time for some upgrades!

I decided since my original spartan from reach had that collar/breacher [R] that i would build it and add it to my suit! I didnt have time before con season to actually get it done in time. Since i dont have a robotic arm, and as much as i would love to attempt to build one, i have just started to build the attachment part to the chest. I started with the pep file, measured in a very complicated way that was probably totally unnecessary, and then added some stuff to it using a bit of free handing! Here is the foam bit:

photo4916027160960018456.jpg


photo4916027160960018469.jpg
photo4916027160960018468.jpg


I also printed off a QR code thats linked to my instagram that I will hide somewhere on the suit once all my upgrades are done.

I also didnt feel like doing all of the other bits in foam so I did some drawing and measuring in fusion360 and made 3d models for the other parts!

photo4916027160960018466.jpg


I found a file for the bullets on thingiverse, cant remember exactly where since I got them a while ago. I put the bullet into the design program and made a clip to hold that bullet exactly, so its a perfect pressure fit! After painting I will be gluing them into place just incase they fall out, or get mistaken for a real bullet.

photo4916027160960018459.jpg
photo4916027160960018460.jpg
photo4916027160960018458.jpg

The top portion is just slightly too small so I am in the process of reprinting it to the accurate scale.

Anyway that's all I got for now! Stay tuned for more updates on the collar/breacher!

Spartan A-P17 signing off
 
Status
Not open for further replies.
Back
Top