ODST Build Log, a Great Journey through the past few years as a member!

Status
Not open for further replies.

NobleofDeath16

Division PR and RCO
Division Staff
405th Regiment Officer
Member DIN
S511
Hello Everyone!
I've been itching for months to finally get a post like this started, so everyone can see my thought processes and resources I went through to really create my ideal ODST suit! So here we go:

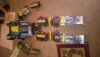
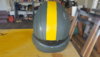
I originally way back in the year 2014, I had the idea with a friend to begin crafting our own ODST suits together. We started out with some basic drawings of what we wanted, and he began with the pepakura helmet that would eventually become the first ever finished helmet we would make! We followed the Andrew DFT method for our first suits since it was the most accessible at that time and went to town.
?hash=de02d93181b11a1809fffadb6394f4f1.jpg
271614
271616


Soon after the first few cons with this suit. I realized it was time to upgrade. Big time. So I started with first, properly logging most of the progress on that suit which you will all see as follows.
 

Attachments

  • Original ODST Suit.jpg
    Original ODST Suit.jpg
    459.8 KB · Views: 217
Now unfortunately as I would find, life would throw a big wrench in the painstaking logging I undertook by my phone breaking near the end of said project. We will name that ODST 1.0 to keep things simple! And here it is as follows.
271618
271619
271620
271621
 
As you could probably take a look and see, whether it be looking at the photos given or photos of my current suit. I aimed to correct many issues I had between this suit into my current suit and onward, and those were as follows:

Proportionate armor pieces to game depiction (I'm looking at you, baby shoulders.)
Boot Covers
Game Accurate Shins
Reduced Weathering
Elimination of empty space/baggy clothing
A new helmet

With all these goals in mind. I set off and made my first larger purchase for the project. Little did I know it would start a wonderful friendship as well with Brian Johnson, of JohnsonArms!
 
Hmm, something feels off about this post and its timestamps. It says it was posted 10 min ago, but I remember there were some thing on the armor that I saw in person that aren't here. Additionally, it says your account only has 25 messages, yet you're registered under the midwest regiment.

Is this a new post?
 
After receiving the wonderful new helmet, (A B-cast I received from Steven Lee, who is also an astoundingly nice prop builder!) I went right to work on it as follows:
271622
271623
271624

271626
271627
271628
271630


After the painting was over, I contacted Brian about getting my own visor made for the helmet, which he happily made a reality!

271631
271632
 

Attachments

  • 20171013_172744.jpg
    20171013_172744.jpg
    1.7 MB · Views: 239
  • 20171019_150227.jpg
    20171019_150227.jpg
    3.6 MB · Views: 229
Once the helmet was finished. The big beast was the armor.
I started with what I thought would be the hardest section, the upper body. My goal this time around was to nail the scaling for everything. So the armor came with me to the drawing board, so to speak!

271633
271634
271635
271636


With having the base of the torso finished out, I began working on the attachments for the chest itself! At this point, I made the decision to scrap everything from my old suit and worked on things with fresh eyes and game references in hand.
 
271638
271639
271640
271641


With the first photo to see the scale of everything, I feel like everything was in a very comfortable spot! I had all the parts I needed built for the torso and was ready to move forward with the arms.
 
271642
271643


With the help of Spidermonkey60, he created the CQC Shoulder file for me to use which turned out beautifully. I was able to achieve the tanky look I was going for with the suit within the first few pieces I was able to build. Now came the hardest pieces of the build. The gauntlets.
 
271644
271645
271646


As I said. these ended up being the hardest pieces of the whole build due to their curved nature. I would of in hindsight started with these pieces first before doing any other! My suggestion to anyone working on these pieces, use a thinner foam to fill out the inside to properly fit your wrist after it is fully built! And to just take your time. Build it all as one piece, not in pieces to be attached together later!
 
With all the upper body now effectively out of the way, it now came down to the lower body as the next step.

I started with finishing out the remainder attachments for the waist as starting on that section, and then moving down!
271647
271648
271649
271650


I had elected to build both thigh pieces at the same time to ensure they not only would be built the same way but in the same mind frame. meaning whatever errors id make on one, would subsequently be corrected in the following piece! I used this type of mindset for all parts of this building process.
 
After a brief test fit, I moved onto what was the SECOND hardest part of this build. The shins.

What made this piece interesting since it was not only my first time using the official game file base pepakura for making them, their narrow profile made it very hard for me to actually fit them without cutting a small slot in the back to properly slide my foot through. In future builds this is now corrected by using straps to entirely wrap the piece around my leg with a seam up the middle and buckle it into place.

271651
271652
271653
271655
271656
 
Now onto the final bit of fabrication for this suit! the boots. As shown in some earlier photos, these were also an interesting scenario as to they are just covers for shoes, not necessarily shoes themselves. Having made them three times since this first one they have been much cleaner but the method has stayed the same!

271657
271658
271659
271660
 
Now the fun part! Compiling all the photos from the painting and sealing! I used Plasti dip to seal each piece, and then hit it with Krylon grey max coverage primer. After everything dried, I went in with the Montana brand spraypaints as I did with my helmet and hit everything with a base coat of "Rhino" and hand painting on black detailing. I followed up on other pieces with Montana Yellow for the yellow detailing!

271661
271662
271663
271664
271665
 
And that is really where the build reel ends for the suit after it was initially made! Its been a blast trooping in this suit for a few years now and the same kit for a few years. New projects are on the horizon now that I will begin making more public soon!

As for the many alterations that have been added to the suit since initially finishing it:

Stencils provided by Huntress Creations
Backpack, Knife, and Glove provided by Sean Bradley
Assault Rifle provided by Spidermonkey60

After each con, single additions were made to the suit such as increased weathering, new attachments, new decals, ETC. Some photos provided to show this below!
271666
271667
271668
 
I love the way you cut and assemble your foam pieces, now I see how you got that extra level of depth
Thank you so much! I tried my best to move slow on each piece. I use a mixture of contact cement and I seal the back end seams with hot glue to ensure the strongest connections for each piece and durability on dynamic poses
 
As a final note; my reference material for this whole project was done by a wonderful individual and close friend, Mike Mizak. He works on SFM modeling of a plethora of games. And while a lot of these depictions may not be safe for work. He was happy to collab with me and provide torn apart sections of each part of the ODST Armor and undersuit for me to work directly off in-game models for painting and crafting!

While I would provide said pieces of reference material I am currently waiting on his approval to do so, since it was his hard work/art I do not wish to disclose the content for free if he does not wish for me to do so!
 
Status
Not open for further replies.
Back
Top