1st Build ODST build

Status
Not open for further replies.

EvanPhilip

New Member
I have been reading/listing to all the halo books at work last summer and tried to build some pep helmet a few years back. I never did finish it so with all the new free time I had this summer I wanted to start an ODST build. I've looked and read a lot of threads. I started out building the legs and arms and the chest, however, using just hot glue for everything was kinda a bad idea. I tried contact cement and works well but to wait 15 mins to glue a part would take years, and super glue is nice till your fingers stick together. I really ended up choosing fast and cheap instead of good and cheap, even though it's probably gonna be a lot more then I think after all the mistakes and whatnot I will have.
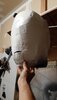
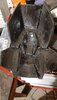
The first picture is me just trying different paint and what covers up the most. I used flex seal and its just one or two coats.
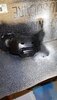
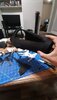
The second one is just like 7 or 8 coats of plastic dip.
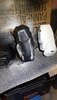
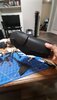
The third is the forearms and thought the size was right but might be to big and the top detail I might 3d print since I have no idea hot to get that small of detail.
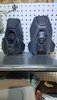
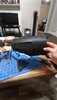
The forth is the first shoulder I ever made and the right side is the 4th shoulder.
 

Attachments

  • 20200628_231310.jpg
    20200628_231310.jpg
    1,009.6 KB · Views: 166
  • 20200628_231329.jpg
    20200628_231329.jpg
    2.7 MB · Views: 161
  • 20200628_231355.jpg
    20200628_231355.jpg
    2.4 MB · Views: 175
  • 20200628_231429.jpg
    20200628_231429.jpg
    1.2 MB · Views: 165
Nice progress so far! If you're having trouble with contact cement, you can use a hair dryer to speed the drying process. Mine only takes about 5 mins to dry enough with one layer (sometimes I can get away with less). Though for seams that have trouble sticking due to forces, I'll add two layers and let it dry longer.
 
Nice progress so far! If you're having trouble with contact cement, you can use a hairdryer to speed the drying process. Mine only takes about 5 mins to dry enough with one layer (sometimes I can get away with less). Though for seams that have trouble sticking due to forces, I'll add two layers and let it dry longer.
I don't have a hairdryer but I do have a heat gun with a low setting. but I could try that. do you put stuff on the back as well before finishing everything?
 
Looking good so far. Make sure to take your time. As for details with foam you can get a thinner foam and cut the details you want out of it. I’d leave 3D printing to the stuff you know you can here details on with the foam. It will save time and energy then.
 
I don't have a hairdryer but I do have a heat gun with a low setting. but I could try that. do you put stuff on the back as well before finishing everything?
What stuff are you referring to? Like something on the inside of the armour?
 
yeah, I think that is the cheaper version. since the stuff I am using is at least 5$ for a small tube.


Yeah how do you do it for pieces that are enclosed like the thighs or forarms. Do you shoe glue it before you put everything together?
 

Attachments

  • 20200630_100233.jpg
    20200630_100233.jpg
    1.4 MB · Views: 169
EvanPhilip I honestly just use shoe goo on the seams. I don't like spending an ungodly amount of money on shoe goo. So i buy enough to cover any seams so that the chance of a blow out is minimal.
 
I rebuilt one of the forearms today to see if it would be any better. it turned out okay maybe redo the other side, however, I always get the parts backward so ill end up building to left arms, so that's super annoying. also left out the top as you can see since I am going to 3d print that part. after my brother prints an assault rifle.
 

Attachments

  • 20200703_234441.jpg
    20200703_234441.jpg
    484.5 KB · Views: 112
  • 20200703_234437.jpg
    20200703_234437.jpg
    505.4 KB · Views: 121
  • 20200703_234414.jpg
    20200703_234414.jpg
    480.9 KB · Views: 137
Status
Not open for further replies.
Back
Top