Hey Everyone!
So it's been a while since I last posted, had to take some time off for work and university obligations, but I wanted to update with some pictures of the process I have gone through building my first ODST helmet.
Its taken me a while but I really like how its coming along!


Still a lot to do with this helmet, but I'm looking forward to making a full armor set to go with it!
Let me know what you all think!
-RxLynx
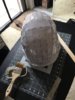
So it's been a while since I last posted, had to take some time off for work and university obligations, but I wanted to update with some pictures of the process I have gone through building my first ODST helmet.
Its taken me a while but I really like how its coming along!
Still a lot to do with this helmet, but I'm looking forward to making a full armor set to go with it!
Let me know what you all think!
-RxLynx