ODST Pep Build-Advice and Constructive Criticism Welcome!

Status
Not open for further replies.

Qis4Question

New Member
Hello all!

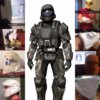
Since June, I've been working on building my first pep project. This has been a fun experience, and I plan on continuing on doing this into the future. I've always wanted to cosplay as The Rookie from Halo 3: ODST ever since I played the game with my buddies. This is the first method that I've found to be effective, and I finally decided to start doing it!

I will post pictures to this thread on what I've done and what I will be doing with this project. Any constructive criticism is welcome! For reference, I do plan on moving to foam since I've seen how effective it can be as well as the overall durability of the material in comparison to paper. I am going to employ the wood glue method for this project as well, so any tips on that would be great. Any tips on foam building is acceptable as well.

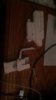
Without further ado, here are the pictures I have so far of the project. Enjoy!
1.jpg2.jpg3.jpg4.jpg5.jpg6.jpg10.jpg7.jpg8.jpg11.jpg12.jpg24.jpg23.jpg21.jpg18.jpg19.jpg16.jpg15.jpg14.jpg13.jpg
 

Attachments

  • 9.jpg
    9.jpg
    93.3 KB · Views: 292
  • 17.jpg
    17.jpg
    40.9 KB · Views: 255
  • 20.jpg
    20.jpg
    31.4 KB · Views: 276
  • 22.jpg
    22.jpg
    25.6 KB · Views: 243
Great work!

I really like the collage, it is nice to see all the progress pieces along with the reference.

Keep up the great work!


"I don't know what's weirder, that you're fighting a stuffed animal, or that you seem to be losing" - Suzie
 
Nice work on this! It looks like you're heading down a road to awesome armor!

The only tip I have for foam is to invest in a blade sharpener to keep the foam cuts nice and clean.

You're doing great!
 
Nice work on this! It looks like you're heading down a road to awesome armor!

The only tip I have for foam is to invest in a blade sharpener to keep the foam cuts nice and clean.

You're doing great!
Yup! I've heard that you need a good blade when you're working with foam. I just see how much simpler foam is as far as post-construction work (just sealing and painting essentially). The nice thing about pep is that it's just a scissor and x-acto knife job.
 
Welcome to the 405th, Helljumper.

I think you're doing great work. I see your pepakura is nice and crisp and forearms are scaled very nicely.
My only concern is - can you put the helmet on without any problems? It seems bit small - it wouldn't be a problem, I like smaller helmets, but after it's hard - can you put it on?

Also, as for durability - unless you plan to hit your pepakura with a hammer, I think those pieces are very stable and can take a beating as well.
 
Looks great. All your pieces have crisp lines. Some advice on the pep. Once you have applied all the fiberglass you want sand down all the edges you don't like before applying bondo. Try to get it as smooth as possible before bondo. This will save you a lot of weight because you won't need as much bondo. This will also allow you to keep more detail from the pep.
 
image.jpeg
This is the first thigh piece. This is the left one. It's feels like it fits for the most part, but I have a little bit more to go.
 
Welcome to the 405th, Helljumper.

I think you're doing great work. I see your pepakura is nice and crisp and forearms are scaled very nicely.
My only concern is - can you put the helmet on without any problems? It seems bit small - it wouldn't be a problem, I like smaller helmets, but after it's hard - can you put it on?

Also, as for durability - unless you plan to hit your pepakura with a hammer, I think those pieces are very stable and can take a beating as well.
I don't plan on hitting it with a hammer. I can't afford to do fiberglass, so I need to go with a cheaper method. I figure the wood glue method would be the best route in Lou of fiber glass. The helmet does come on and off fairly easily, however I would make it slightly bigger if I were to redo the piece. For the visor, I bought some small "one way" film for bird feeders. This is cheap while also offering the look I want. I'm even thinking of adding a rolling film inside. This means I would have one layer for the see through visor setting and then the other one rolled into place for a completely reflective setting. I would need to test it with the external film layer first, just to see if there's any visibility issues and external aesthetic issues,then go forward from there. I do know the pieces are fairly stable, but I need a water proof surface to paint and something to help it stay more stable (my thumbs are wider than the gauntlet bottoms by a slight fraction of an inch, causing a tear. I make sure to go through that same tear each time I put my hand through)
 
This is looking freakin amazing looks exactly like the models on the screen of your computer hope your having fun building it and I can't wait to see it finished
I plan on posting everything I do all the way through completion (including visor, painting, detailing, etc). Something I did his week was watch the Halo 3: ODST cutscenes and noticed details I hadn't before. The left shoulder piece has what you might consider a dog tag; the soldiers blood type, name, height, weight, etc is on this piece of armour in a square section. I plan on typing up a label the size of my shoulder piece section (appropriately sized to the game ID section) and placing a pressure sensitive label on it. These details are critical from making a project an A level production to an A+ level. I've figured on doing a black base layer, then doing a matte silver/grey layer, then adding some dark grey/black smudging, finalizing the project with some white on the edges to give a more weathered look. However, I do want it to be more like a standard issued armour set. I don't know why, but I have this obsession with wanting the everyday soldier look for the project. Yes, they aren't just a random Joe marine. However, I like The Rookie, he's a cool dude.

Considering I'm almost done with this thigh, I should be done with the entire construction in two or three weeks. If I'm done in two weeks, I'm guessing it will take nearly a month to finish the wood glue layer and all the painting/weathering/detailing. This would be right before Halloween, which has been my goal since June (to have a functional piece of amour, if not with weapons and such). I will need to see about the backpack, there are a lot of things I want to include in it (function top, being able to place weapons and such inside, a speaker for playing the soundtrack, etc)
 
Welcome to the 405th, Helljumper.

I think you're doing great work. I see your pepakura is nice and crisp and forearms are scaled very nicely.
My only concern is - can you put the helmet on without any problems? It seems bit small - it wouldn't be a problem, I like smaller helmets, but after it's hard - can you put it on?

Also, as for durability - unless you plan to hit your pepakura with a hammer, I think those pieces are very stable and can take a beating as well.
Here's a picture of the helmet fitting, and a failure on my chest piece
.image.jpeg
The gauntlet does fit, I just have issues with my thumb and getting it on.
 
A tip on this build. Since I read that the files are for an average person at 6'0", I have scaled most things down by 10%. This is because I am 5'7". The thighs I scaled to 92.5% of the original. I also am using painters tape to keep the pieces together until I glue them together.

I plan on getting some magnet stops for the pistol and some heavy magnets to put inside the chest core (since it doesn't fit over my head with the opening, but will fit around my neck)

I know this seems stupid (and for good reason) but I am using Elmers glue for the pieces, and then using super glue in between the pieces. I know, I should be using a low heat glue gun for this project. However, the fact that I have only gone through half a bottle of glue for this entire project so far (with the giant chest core screwup), isn't something to be over looked. If I were to resin it, I would need hot glue to do this. Since I'm doing the wood glue method, it's not as imperative as you think to use hot glue. Mind you, both Elmers and wood glue are water based. However, after letting the piece set for a while, the wood glue shouldn't be an issue to use (it hasn't been). I do plan on moving to hot glue/foam for future projects. This one will remain in this way for consistency.
 
Why are you saying you should be using hot glue? No need to excuse yourself.
I've never use hot glue when I've been pepping. Superglue all the way.
 
Why are you saying you should be using hot glue? No need to excuse yourself.
I've never use hot glue when I've been pepping. Superglue all the way.
If you're familiar with Hugh's work, the way he sets up the pieces is by making small pieces, almost like blocks, to be combined and make the bigger piece. For the individual pieces, I use PVA or Elmers glue. For combining the pieces, I use super glue.

I will need hot glue for things like magnets (for the chest core mostly).
 
Here is the latest update:image.jpegimage.jpeg

- - - Updated - - -

I may need to cut into the bottom little bit for jy thigh to be able to bend. Otherwise, the piece stays in place and I can walk around in it around the place it needs to be.
 
I actually use Elmers glue sticks for my pep. It applies easy and drys quickly. You might want to consider using velcro to attach your pieces to the under suit. The pieces may seem to stay in place now but when you start sweating they may slide.
 
Status
Not open for further replies.
Back
Top