Printed Odst helmet

Legend 113

Member
Member DIN
S331
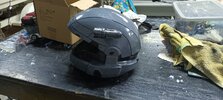
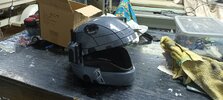
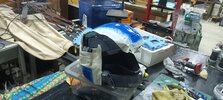
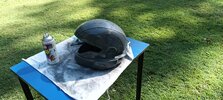
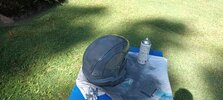
So to start off o think I might have just ruined my first 3d printed helmet , not sure. I have printed an odst helmet in multiple parts so that it would fit onto my ender 3 v2 printer. I assembled the helmet last week and used a multi purpose putty to fill the seams... but I've just sanded it back and painted a base coat on it and it has worked. I had to use a ton of putty on the top of the helmet because I printed the top sections upside to save filament and it printed terribly. I sanded it back though and applied the putty but now you can tell where I haven't sanded it properly or put enough putty on the seams. As seen in the pics.

Thinking that I might re-putty the seams, sand it all back, buy a sandable primer spray paint and use that to fix my stuff up.

But I could really use some help and advice on what to do next from anyone who could offer it.
 

Attachments

  • 20230506_102558.jpg
    20230506_102558.jpg
    3.5 MB · Views: 105
  • 20230506_102549.jpg
    20230506_102549.jpg
    2.9 MB · Views: 116
In terms of layer lines, from these images, it doesn't look all to bad! But if you really wanna nail them down, it may be worth sanding back the base coat to do a layer of filler primer. I like to use the spray filler putty from Supercheap Auto.

If I may make a recommendation on paints though, it does pay to use higher quality primers, like Rustoleum. Much less hassle then the cheaper brand paints ;)
 
Agreed with the above comment! I’ve tried doing multiple coats of other brands and Rustoleum is the way to go. I’d make sure the cans are warm before you spray them for best results, putting them in warm water before use has worked best for me to get a good atomized coating. If it’s colder I’ve had it where it comes out in drops and uneven.
 
Thanks guys, I've just bought some rustoleum sandable filler and primer so hopefully I'll be able to fix up the helmet when that gets here. For the layer lines I did 80 and 120/240 with a electric finishing sander. Then I did 240 and 320 hand sanding, finishing with a acetone rub to smooth. To damage it I melted and hot glued plasma shots on to the helmet then scuffed up the edges with 80 grit but it looks like I'll have to re-do a lot of it. Really appreciate the advice from both of u though.
 
A better method for filling smaller voids is using CA Glue (like Krazy Glue) and sprinkling baking soda on it. This won’t be smooth but it’s VERY durable, hard, and can be sanded. It cures extremely fast too. With 3D prints, you need to fill big gaps first, sand everything, apply filler primer and sand again. Repeat as many times as needed to get it smooth. Then apply a primer sealer. Once that cures, lightly spray paint it with a contrasting color like dark gray or even black and wet sand (again, more sanding) with a very fine grit like 600. This will reveal any imperfections that may remain.
 
Update Time!

I got stuffed around by the guys selling that rustoleum filler so I bought that super cheap spray putty and it worked a treat, thanks PlanetAlexander! I've now based it grey, added black details and some blue that I'm waiting to dry. Thats all I'll get to this week on the bucket. And I did the pva glue trick to give it a chipped paint affect once the paint drys. Still needs a black wash and silver damage but I'm pretty happy with how the seam lines have gone seeing that it's my first printed helmet.
 

Attachments

  • 20230521_164527.jpg
    20230521_164527.jpg
    2.2 MB · Views: 78
  • 20230521_164521.jpg
    20230521_164521.jpg
    2.2 MB · Views: 82
  • 20230521_170825.jpg
    20230521_170825.jpg
    1.6 MB · Views: 83
"The Great Journey ends here." ... for my helmet build! Just finished the visor and installed it. I used 0.5mm plastic and blue mirrored tint used for office windows. The tint has a great mirror affect, but is a little crinkled in some areas :( Still I think it turned out halfway decent for my first printed helmet. Especially when you compare it to my other foam one!

20230603_082007.jpg20230603_083738.jpg

20230603_083727.jpg20230603_083730.jpg20230603_090419.jpg20230603_090442.jpg20230603_090451.jpg20230603_090507.jpg20230603_084123.jpg20230603_084141.jpg
Visibility is also aright as it's not too dark or warped by the angle of the plastic. sorry for the terrible pics though. I'm not a good cameraman.

Thanks so much for all the help and support guys it's been one awesome ride. Will do a full suit up some time soon.
 
This thread is more than 10 months old.

Your message may be considered spam for the following reasons:

  1. This thread hasn't been active in some time. A new post in this thread might not contribute constructively to this discussion after so long.
If you wish to reply despite these issues, check the box below before replying.
Be aware that malicious compliance may result in more severe penalties.
Back
Top