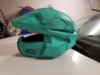
Soooo...I'm an idiot and completely botched that helmet. It was slightly warped to begin with and warped even more in the resin process because of the way I positioned the helmet during the process. I tried to forge on and painted the whole thing before taking a break from building to rethink my process.
I watched a ton of Spacemeatthecosplay and HaloGoddess tutorials and I think I identified the flaws in my building process. So for the 1 millionth time, I started over on a process.
View attachment 263836 View attachment 263837 View attachment 263838
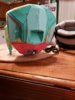
You can see that the original build (on the left) is warped and sort of squat. I kept trying to forge on but wasn't happy with it. I'm much happier wit the build on the right. Everything seems much sharper and just overall better built. I've ordered some cooling fans and LED's so I can start setting up my electronics.
View attachment 263840 View attachment 263839 View attachment 263842 View attachment 263841
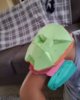
I also managed to build 2 shoulder pieces rather quickly. I added some thin foam for texture, like I did with the helmet, but this time used push-pins for the rivets along the side. I can't wait to see how they turn out after plastidiping them. But first I need to smooth over a few edges with some wood filler.

")