Sepheus 13's creative thread (multiple WIP) and a story!

Status
Not open for further replies.

Sepheus 13

Active Member
New update on Page 2 post 17!

Update: I am changing this thread into a work in progress for all of my props. I hate making multiple threads so I'll just collapse everything into one thread. ( I also thought 100 posts was when people were upgraded to Infantryman status, (aw shucks.. I guess I'm not there yet.) I was going to create this thread in the creation discussion. I'll also post this section in a new post as well as the first post.

With this update I'm beginning to upload my halo MK VI costume, my mass effect costume, and any other creations/ updates!

Story time I'm currently writing a short, quick "Novel" on halo, and on my Spartan Jake, This story's background comes from a Machinima I'm writing and will hopefully be put into development soon. I'll upload "chapters" from time to time, and I'll post in this section what page, and post they are on.

[Original post]
So as my title says I'm starting on my second project, I've been a major fan of MK VI armor, and once I completed my reach armor I decided it wasn't enough. I started on a build I would take more time on, be more careful, and overall attempt to make a better build. and so without any more words! here It is! my MK VI Build!

alright, I lied I have a few more words, my initial thought for this build was just a default MK VI, but I'm seeing a lot of other builds of hayabusa so I want to build the attachments for hayabusa and be able to add and remove the pieces any time I want. Or, I may build two suits :D

Now, Time for pictures! I'm not lying this time!
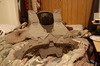
The MK VI helm
SAM_0016.jpg

SAM_0017.jpg

SAM_0018.jpg


The forearms
SAM_0013.jpg

SAM_0014.jpg


The cod piece
It's a custom piece, Although I did "use" HaloGoddess's cod piece picture to work on the back. I put use in quotes because I did everything on the cod piece free hand. no pre-made template.
SAM_0010.jpg

SAM_0011.jpg


The shins
I don't have the holes in the shins yet because I need to find something that will make a nice, neat, clean hole. Any ideas?
SAM_0001.jpg

SAM_0003.jpg

SAM_0007.jpg


Thanks for reading, I plan To have more and more updates soon!
 
Last edited by a moderator:
I would suggest a Swann Morten scapel with a number 10 blade or even and ACM Handle with a 21A blade. They are super sharp being they can slice through skin without much resistance so foam stands no chance. Then just gently cut the outline of the hole into your foam, use a sawing motion to create any curves and then clean up the edges if required after.
 
You could try getting a piece of correct size tubing, copper,etc. Beveling the edge to make it nice and sharp, then heat it up and push it into the foam. Just my two cents. Best of luck with it.:)
 
Pep work looks great! Good job with the foam stuff as well. Any thoughts on what color you're going to paint it?
 
Hey this looks fantastic! Great work. You are goingto only be the 2nd person to ever do a foam mark vi build! Thats really cool :D
 
Pretty cool build, Your kinda making me want to change out parts of my Hayabusa suit to foam, keep it up I really want to see this build progress
 
Update!

The first thing I did was add some detailing to the shins, I got the holes in them now, and I added more detail.

Well in truth, I really, really am disliking the way the thigh is turning out.. Not my best work AT All on free hand.

I decided to do it free hand, because I didn't like the way the pepakura model was and how it would turn out.

This is my progress as of 12:12 AM
SAM_0025.jpg

The red circle is what I need to fix, I need to pop it out more and give the thigh a more "Beefy" look.

And I thought this was entertaining, these are my sketches and the designs for the thigh, I find it funny because I was using measurements from a picture to actual size, I figured out that 1 inch in the picture is equal to 2.3 inches on paper. I also used geometry to try and get the best look and design. It's ironic because I'm absolutely terrible at math, I despise it. But when it comes down to something I enjoy. Then it's a completely different story.
SAM_0019-1.jpg

SAM_0022-1.jpg


R8b
... Any thoughts on what color you're going to paint it?
Not 100% sure yet, I wanted to start this build as a Master chief build.. But I'm thinking of the hayabusa attachments.. So. MC may wait. I may actually make two suits! I still have quite a bit of time before PAX Prime again. and thanks for the support

Annanymous
Hey this looks fantastic! Great work. You are goingto only be the 2nd person to ever do a foam mark vi build! Thats really cool

Oh, I didn't know I'm only the second.. That's awesome. thanks for informing me on that!
and thanks for the support!

Hyperballistik
Pretty cool build, Your kinda making me want to change out parts of my Hayabusa suit to foam, keep it up I really want to see this build progress

Thanks for the support! And I was thinking about the foam pieces for hayabusa. It may be easy to do the shoulders.. But the chest has a lot of round-ness to it so it may be a little difficult, But its worth a try!

I'll try and have an update every day.

Alright, well seriously.. its time for bed now..

Thanks for reading
- Sepheus 13
 
So, unfortunately I haven't been keeping up with my self-said quota of an update each day, I realize now, that that is almost impossible. I've been so busy recently.. with highschool and college classes, It's hard to find time to work on my costume, but here's my update.

SAM_0029.jpg

SAM_0030.jpg

SAM_0031.jpg

Red lines are for the cardboard that isn't covered in foamies, that's for another day.

The first thigh was finished today, and then the second thigh was completely made, start to finish, today

I've learned that once you make one piece of a two set, the second one is incredibly easy because you've already made all the mistakes you can.

I only have to do the biceps and the chest!!! So close to being done with the foam work, I think making 2-3 suits (including this one) by PAX 2012 is very likely! I'm really excited!

I haven't done anything with the helmet because it is still quite cold where I live. and the resin would not cure properly.

Thanks for reading!
 
A double post I know, But no replies. Oh well! I've learned that I always post at like 12:00 my time, I just get done with my costume work about now.

Anyways, this is what I've done, I have two biceps half done and it only took a half sheet of foam, So I may make another set for my third costume. I made the biceps like this so I may be able to add and remove permutations to the biceps. well enough talking, here it is.

SAM_0040.jpg

SAM_0041.jpg


Thanks for reading! and if you have any questions don't be afraid to ask!
 
Looking good man. Look forward to see how you do on this one.

As a side note after reading your thread

ANNAYMOUS
Hey this looks fantastic! Great work. You are goingto only be the 2nd person to ever do a foam mark vi build! Thats really cool
who is the second?
 
So I started work on the chest today, By looking at my reference pictures I was able to create some great stencils for my costume, The chest is turning out great! But already i'm going to go back and make some changes.

For example the red is saying that I need to make this section bigger, this will give it a more "beefy" look and it will create more of a protruding chest.
SAM_0064-1.jpg

SAM_0066.jpg


I also got the other bottom "rib" on,

You really got to hate this.
SAM_0067.jpg


I was making a cut on the other side to create a nice smooth edge, when I accidentally dug through and tore the other side, I still have the template and it will be easy enough to cut that side off and replace it. But for now I'm calling it quits, It's pretty late over here, and I need to get some sleep :D

Well thanks for reading!
-Sepheus
 
thorn696
You're foam work looks great so far. Love the attention to detail.
Thanks! that really means a lot!
Keith021
Dude! thats looking epic! Love the detail
And thanks to you and everyone else who has given me support, it what gets me through this!

So as of tonight I got the back of the chest piece done.. But it is just AWFUL. It turned out in no way as I wanted it to be. It just ruined the chest piece for me.. I may just make it out of pepakura..

Anyways.. this may be my last update for a long time.. I'm going through a bit of a rough patch in my life. and It's just really affecting me and my mood. I'm not trying to make this an attention thread.. but I'm not feeling the same creative drive that I need to complete this. I'll still try to be active and answer any questions anyone may have.

Well here are all my pictures of my armor up to date. please ignore my kitty, she was too lazy to move :D

DSC_0038.jpg

DSC_0039.jpg


DSC_0042.jpg

DSC_0038.jpg

DSC_0044.jpg

DSC_0046.jpg


DSC_0047.jpg

DSC_0048.jpg


DSC_0050.jpg

DSC_0051.jpg

DSC_0053.jpg


DSC_0054.jpg

DSC_0055.jpg

DSC_0056.jpg
 

Attachments

  • DSC_0038.jpg
    DSC_0038.jpg
    181.9 KB · Views: 146
nice work coming together nicely did you use any pep files at all for your torso? and how many hours went into it?
 
Status
Not open for further replies.
Back
Top