(slowly upgrading) Noble Six by MDBDesigns

Status
Not open for further replies.
Looking good, but are you using bondo spot putty rather than bondo automotive filler? I am curious because of how red it is. The bondo should be mixed and thick and usually white ish. If you sand the edges/corners down a bit and then apply the bondo, it should get the shape you want alot easier. The fiberglass method is also very sturdy, so although there may be minor cracks, you will not be able to see them through the paint and it will last you a very long time.

Yes, I'm using the spot and glazing putty on the exterior, Automotive bondo was used for the interior to help strengthen around shoulders and torso since those will be the most "weight bearing" areas. I've used the glazing putty for various other projects through my college design courses and found it to be the best for most things, so it was the first thing I grabbed for this project.
 
Since it's been snowing the past couple days and I'm absolutely sick of school projects...I decided to work on some detail work. This is just the head of the bolts seen on Jorges armor from Halo Reach, I know there are multiple ref images out there that make these bolts look different in many ways, so I've provided the image I based these off of. They should measure .45" wide x .31" tall (based off ref image and my own armor I've been making. I don't know how to share the STL for anyone who wants access to these, but I'm more than happy to share.
 

Attachments

  • Capture.PNG
    Capture.PNG
    82.2 KB · Views: 344
  • Capture2.PNG
    Capture2.PNG
    108.5 KB · Views: 356
  • ref image bolt top.jpg
    ref image bolt top.jpg
    56.4 KB · Views: 364
It's been a bit warmer here in Denver, and I've been able to get some work done on the suit.

I don't brag often, but damn my legs look good in this armor. lol

Anyways, I've gotten the shins and knees connected ((Will improve upon this in the future)) and I've coated the shins/knees with plasti-dip, the boots are an old pair I've had for years and they're nicely damaged and worn in, so they have become the new boots to go with my spartan suit. I've made the boot top from 10mm eva foam and added a little shoe lace clip to it ((Just more EVA with holes drilled through)) so that they're nicely held in place via the boot laces while wearing.

Just plasti-dipped the boot components, and will begin to work on thighs soon.

Chest unfortunately has been more trouble than I bargained for... the more I think on it, the more I want to re-create it with EVA. I've learned a lot, but it's just not quite where I want it to be and as I work more with EVA I feel like I can control and quickly fix any problems that come up with it. Whereas when I work with fiberglass and bondo/duraglass I have to be so careful with what I do so I don't crack or break fragile areas.

That being said, I'll probably continue with all the other components of the suit before I come back to chest, and then follow up last with shoulders.

Stay tuned :)
 

Attachments

  • IMG_0370.JPG
    IMG_0370.JPG
    2.8 MB · Views: 360
Leg Day! Worked on the legs, got them started with a base layer of black and added some 'scratches' to try a few different methods since I've never worked with foam. I'll tape off the legs in the next couple days and get the red added to them before redoing some of the scratches I cover up in the process. I plan on matching these to the Halo reach patterns and I'll match the colors with that of my helmet. I've also gotten the shoulders and biceps made, and I'll post an update on them tomorrow after I get another coat of plasti-dip on them.
 

Attachments

  • IMG_0404.JPG
    IMG_0404.JPG
    1.9 MB · Views: 373
  • IMG_0403.JPG
    IMG_0403.JPG
    2.2 MB · Views: 362
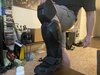
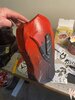
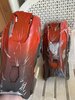
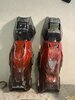
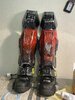
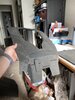
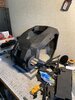
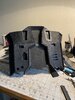
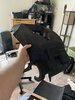
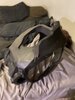
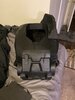
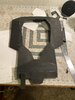
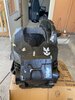
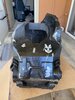
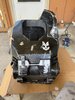
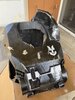
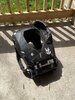
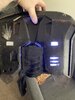
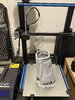
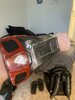
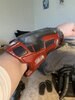
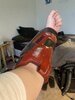
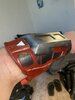
Paint has been applied, and weathering has been started. I've done a broad sweep of weathering over the shins and knees, and will reattach knees soon.

Plan going forward is to paint and weather (just a basic weathering) of each armor piece as I go. I've marked down exactly what colors I use for each step and will continue to use them through the entirety of the build.

My reasoning for doing the pain and weathering as I go is so that once I find a groove I can continue to follow steps to make each piece better. and maintain a similar practice as I go.

the process:
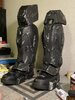
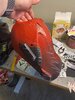
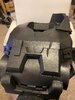
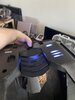
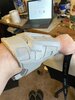
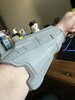
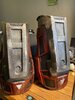
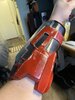
I started with a basic black undercoat, using the plasti dip as a base, then a thin coat of a flat black enamel. I spreayed a few sections silver where I wanted the paint to look like it had chipped away, and Then followed up with taping off and toothpaste coating the sections I wanted to keep black or silver before then spraying the red over the legs, trying to go for a faded look. I tried to maintain about 12" away from the piece as I sprayed because it would give it more of a injection moulded look by doing this as apposed to a smooth shiny gloss coat you'd get from a clean new polished part. After painting the red and it dried, I went back through with a silver marker and highlighted the big damaged areas, then using a toothbrush and rub 'n buff I dry brushed the seams and raised areas to give a worn and damaged look to each hard edge. After all this I gave a single coat of clear paint and waited for it to dry before giving it a wash with black, crimson red, burnt umber, and yellow ochire acrylic paints, dabbing dry to leave the 'dirt' colors in all the little cracks and corners.

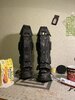
Once I've built, painted, and basic weathered ALL the parts, I'll go back over them all with a spritz of water and then powdering of Cinnamon to give the entire armor a look of dust and built up dirt in each little nook and cranny.

Maybe one day some day I'll make a video to show how I do these steps, going into more detail.

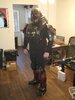
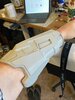
anyways, legs are almost done, just gotta build the thighs and cod piece, then it will be all upper body!

Thanks!
 

Attachments

  • IMG_0405.JPG
    IMG_0405.JPG
    1.9 MB · Views: 359
  • IMG_0406.JPG
    IMG_0406.JPG
    1.8 MB · Views: 346
  • IMG_0407.JPG
    IMG_0407.JPG
    1.9 MB · Views: 345
  • IMG_0408.JPG
    IMG_0408.JPG
    2.8 MB · Views: 369
  • IMG_0409.JPG
    IMG_0409.JPG
    2.4 MB · Views: 374
Cranked out a new chest all together. After testing the sizing, weight and several other features for my original chest I knew that it just wasn't going to work. De-lamination was becoming a big issue as well for me.

So over the past week I've been cranking out this chest piece and I'm pretty happy with the results. I've 3d printed some custom end caps for the tube along the front and I'll be installing some cooling fans in them to give the chest piece more breath-ability. Last night I cranked out the base for the shoulder guard and I'll add some more details to it later today/tomorrow. After I'm satisfied with battle damage and the cleaning up of seams, I'll start plasti-dip and painting. ((Already have 2 coats on the base of the chest, just gotta get the shoulder and details I've forgotten)) But, all said, I'm nearly done with the chest!

I believe I shared it on here already, but I also 3d modeled the little bolt heads that run all along the chest piece, I think there's 9 or 10. I'm going to have one SLA printed and I'll try to make a mold of it so I can make a bunch of them. those will definitely go on before paint job.
 

Attachments

  • IMG_0420.JPG
    IMG_0420.JPG
    1.6 MB · Views: 339
  • 61004119565__E9B4D255-C9A6-4461-A079-A49300B1AB25.JPG
    61004119565__E9B4D255-C9A6-4461-A079-A49300B1AB25.JPG
    2.2 MB · Views: 207
  • IMG_0422.JPG
    IMG_0422.JPG
    2.4 MB · Views: 329
  • 60997535078__02C5B4B6-DFD9-4879-9081-FF8548FA6A0A.JPG
    60997535078__02C5B4B6-DFD9-4879-9081-FF8548FA6A0A.JPG
    1.7 MB · Views: 201
  • IMG_0428.JPG
    IMG_0428.JPG
    2.4 MB · Views: 366
  • IMG_0430.JPG
    IMG_0430.JPG
    2.4 MB · Views: 367
  • IMG_0431.JPG
    IMG_0431.JPG
    2.1 MB · Views: 371
  • IMG_0427.JPG
    IMG_0427.JPG
    1.9 MB · Views: 368
  • IMG_0411.JPG
    IMG_0411.JPG
    2.2 MB · Views: 363
Alright, big update for today!

I got my chest fully painted and added my UNSC sticker. Then added battle damage highlights as well as pain chips. After the black layer cured I came back through and painted white highlights to the chest and the shoulder guard (jorges chest has 052 signifying his spartan ID number and I've added 894 to mine since that is my ID number on MCC) then clear coated the entire chest to seal the white. Then I went through and used rub'n'buff on a toothbrush to add little scratches and details to all the armor before clear coating once more (this time with a satin clear coat) just to make the piece look less shiny and to again seal in all the scratches and little damage I'm wanting to keep. After all this I gave the whole piece a wash with brown black and yellow to give it a muddy/dirty look. Once that was dry I then spritzed the entire piece with water and dashed a little Cinnamon onto it. I like using Cinnamon because 1) it smells good on your armor and 2) it gives a really nice dirt/dust effect to my armor that gets stuck in all the nooks and crannies! Once i wiped the armor down with a rag and got some of the cinnamon off, I then clear coated it once more, using a semi-gloss finish sparingly (mostly just to hold the cinnamon in place and keep it looking muddy/wet) and it's done! All I have left to add are the bolts all around the rig, and I'm onto forearms!!

If anyone is looking for really good weathering/painting walk-throughs Tested has some good ones as well as Punished Props and one of my favorite cosplayers EbonyWarriorStudios. All of them use different techniques and I highly recommend checking them all out!! I like trying different things on every project I work on so I can learn what works for me and what doesn't.

'till next time!
 

Attachments

  • IMG_0435.JPG
    IMG_0435.JPG
    2.1 MB · Views: 355
  • IMG_0436.JPG
    IMG_0436.JPG
    2.3 MB · Views: 351
  • IMG_0437.JPG
    IMG_0437.JPG
    2.1 MB · Views: 164
  • IMG_0438.JPG
    IMG_0438.JPG
    2.4 MB · Views: 285
  • IMG_0439.JPG
    IMG_0439.JPG
    2.7 MB · Views: 355
  • IMG_0441.JPG
    IMG_0441.JPG
    644.7 KB · Views: 306
Dang, looking good! Great work on the chest piece, it looks awesome.

Is the UNSC logo just a basic vinyl sticker? I have access to a vinyl cutter, so I was thinking of doing that for the labels on my build as well.
 
Dang, looking good! Great work on the chest piece, it looks awesome.

Is the UNSC logo just a basic vinyl sticker? I have access to a vinyl cutter, so I was thinking of doing that for the labels on my build as well.

Thanks!

and yes, these are vinyl stickers I cut out on a little cnc cutter, I have the .ai files if you want them, I have ODST, Noble team, UNSC ( emblem and lettering) as well as some detailing stickers (triangles, angled lines, etc,) ((feel free to reach out to me on the discord server if you're interested in the file for them)

Yeah, that would great actually, thank you! I actually didn't know there was a 405th Discord, I'll check it out.
 
Small update today, I added some lighting to the back of the chest piece today to give it a little life.

I was able to find some cool little led string lights when I went to hobby town way back when the world wasn't all locked up inside. Anyways I cut little slits in the foam and pushed each little LED bulb into the spots before coiling them within the spine piece.

I made the spine piece by stacking 2mm foam and .04" (I think?) PETG sheeting. I sanded the sheets to let the light shine a bit more on the edges and adhered them in place.

As for the side pieces I took some of the PETG sheeting and lightly hit it with white spray paint from about 20" away to give it a dusting of paint, this let it look like a fogged glass look and then I just cut the parts I needed and wedged them in place before securing with some Super glue.
 

Attachments

  • IMG_0449.JPG
    IMG_0449.JPG
    1.8 MB · Views: 345
  • IMG_0450.JPG
    IMG_0450.JPG
    2.3 MB · Views: 345
3d printed one of the forearms, it fits, but it's snug. I'll sand down the inside to help with certain areas, but the second forearm will be 10% larger. I already have the file printing now, so it should be done in the next 12 hours. Once they're both printed, i'll start cleaning them up and get them ready for paint!
 

Attachments

  • IMG_0480.JPG
    IMG_0480.JPG
    1.6 MB · Views: 324
  • IMG_0479.JPG
    IMG_0479.JPG
    1.6 MB · Views: 336
  • IMG_0476.JPG
    IMG_0476.JPG
    1.9 MB · Views: 349
  • IMG_0477.JPG
    IMG_0477.JPG
    2.2 MB · Views: 330
  • 61050787907__AFC0F7F2-F115-4FDC-A074-B4F7C8F26E47.JPG
    61050787907__AFC0F7F2-F115-4FDC-A074-B4F7C8F26E47.JPG
    1.4 MB · Views: 193
After printing, One forearm is drastically larger than the other, and that is on purpose. I'll be attaching some parts to the smaller forearm that will make it appear much larger, so by making it a little smaller, and then attaching the parts, they should look about the same size after.

I painted these using my own character from reach MCC as a template (as I've done with every part so far) and then weathered using rub'n buff and acrylic black and burnt umber.

I should be getting 8mm foam this week so I'll be making the belt and the soft parts for the chest soon.

after that I'll get the thighs made

and after all that, I'll begin working on the undersuit!

then the armor is complete, and I'll begin making either a DMR or an MA37
 

Attachments

  • IMG_0497.JPG
    IMG_0497.JPG
    2.4 MB · Views: 316
  • IMG_0492.JPG
    IMG_0492.JPG
    2 MB · Views: 310
  • IMG_0496.JPG
    IMG_0496.JPG
    1.9 MB · Views: 338
  • IMG_0494.JPG
    IMG_0494.JPG
    1.8 MB · Views: 308
  • IMG_0495.JPG
    IMG_0495.JPG
    1.6 MB · Views: 309
  • IMG_0493.JPG
    IMG_0493.JPG
    1.8 MB · Views: 314
  • IMG_0491.JPG
    IMG_0491.JPG
    2.2 MB · Views: 308
Lookin' good! What's the plan for the undersuit?

No idea lol

I'm planning on doing one of two things.

plan 1:
I already have some black battle shirts that have velcro shoulders
1589215903200.png

much like this one here. I've already made it so that my shoulders and forearms will attach to this using basic velcro 2" tape.
I'll add on to this around the belly and lower spine to create the details seen on the soft parts for the armor. Luckily Colorado Fabrics is a warehouse of all kinds of fabrics and materials so I plan on going there and buying some of the stuff I need, I'm sure I'll get a couple yards of pleather or vinyl. Then I'll just have to get my sub assemblies made for all the joints and what not before sewing them onto the shirt and pants.

Plan 2:

On the discord TurboCharizard and Angus314 both shared Electrknite's bodysuit build in which she makes a pretty damn good body suit using some templates from a cosplayers handbook (forgive me I forget the name) I could follow in these steps as well by sewing my own body suit and adding the details needed to complete it.

I could also buy a black body suit from any party city/walmart I'm sure and sew details onto that, but I'd like to have something a bit more hand made and durable.

I've still got plenty of time before I get to this though, it's quite a ways out for me. Plus I've got finals this week (just 2 presentations) so I'm sure I'll be off of building for a week while I get that and the anxieties that go with it out of the way.
 
No idea lol

I'm planning on doing one of two things.

plan 1:
I already have some black battle shirts that have velcro shoulders

much like this one here. I've already made it so that my shoulders and forearms will attach to this using basic velcro 2" tape.
I'll add on to this around the belly and lower spine to create the details seen on the soft parts for the armor. Luckily Colorado Fabrics is a warehouse of all kinds of fabrics and materials so I plan on going there and buying some of the stuff I need, I'm sure I'll get a couple yards of pleather or vinyl. Then I'll just have to get my sub assemblies made for all the joints and what not before sewing them onto the shirt and pants.

Plan 2:

On the discord TurboCharizard and Angus314 both shared Electrknite's bodysuit build in which she makes a pretty damn good body suit using some templates from a cosplayers handbook (forgive me I forget the name) I could follow in these steps as well by sewing my own body suit and adding the details needed to complete it.

I could also buy a black body suit from any party city/walmart I'm sure and sew details onto that, but I'd like to have something a bit more hand made and durable.

I've still got plenty of time before I get to this though, it's quite a ways out for me. Plus I've got finals this week (just 2 presentations) so I'm sure I'll be off of building for a week while I get that and the anxieties that go with it out of the way.

Nice! I'm still a ways out on mine, and I know a basic pair of BDUs are a good look for ODSTs, but there's still some undersuit details that I'd wanna try and incorporate like on the lower spine and biceps. I was thinking of sewing the details using neoprene and then wearing them over top of the BDU, but neoprene seems pretty hard to come by here in Canada. The same look might be achieved with some thin, high density foam, but I might wait for Fabricland to open again and see what they've got there as a fabric option.
 
Nice! I'm still a ways out on mine, and I know a basic pair of BDUs are a good look for ODSTs, but there's still some undersuit details that I'd wanna try and incorporate like on the lower spine and biceps. I was thinking of sewing the details using neoprene and then wearing them over top of the BDU, but neoprene seems pretty hard to come by here in Canada. The same look might be achieved with some thin, high density foam, but I might wait for Fabricland to open again and see what they've got there as a fabric option.


It's hard to gauge what will work for the effects needed! and it's even harder when you can't get there in person to see and feel the materials. I completely understand. I luckily bought 2 rolls of 10 mm EVA foam before all this hit the US so the quarantine for me was mostly just building my suit, but now I've noticed even Amazon is out of stock on 3d printing materials and foam.

If I find anything that looks really promising (material-wise) I'll be sure to post it up on here, I look forward to seeing your ODST!!


P.S.
ODST's are the best
 
Working on the chest a bit more today. I got some 8mm foam in and was able to get the arm holes all cleaned up. I'm very happy with how this side came out, now time to just get the other side finished! (then I'll move onto the thighs and belt I promise)
 

Attachments

  • IMG_0507.JPG
    IMG_0507.JPG
    1.7 MB · Views: 322
  • IMG_0503.JPG
    IMG_0503.JPG
    1.6 MB · Views: 325
  • IMG_0506.JPG
    IMG_0506.JPG
    1.6 MB · Views: 336
  • IMG_0502.JPG
    IMG_0502.JPG
    2.4 MB · Views: 304
Status
Not open for further replies.
Back
Top