SPARTAN Josh Z-001 GEN2 Armor Build

Status
Not open for further replies.
subscribed!

awesome idea on the undersuit, using EVA for that, and then the old traditional fiberglass/resin for the armor... although I don't envy the heat issues you may have.

I honestly am just excited to see a Spartan IV coming together, let alone the fact you're building the Raider helmet which is my favorite too. Keep up the awesome work. I'm really looking forward to seeing this one progress.

//Reply-Thank you, I always saw people make the 'aprons' so I decided to step it up a bit; as for the possible heat issues I may have a solution for that, but it mas to wait until I see how the armor fits.

// Incoming build Update
// Begining playback...

Well I recently got some more work on the helmet done and all I can say is that it looks 'epic'. The only problem is that the back caved in a little bit, so now it is a slightly steeper angle than intended; however it is hardly noticeable and rather miniscule.
Also I cut out the visor and I am now thinking a Red visor would look cool, emphasize the Demonic/angry look of the helmet. Finally I applied my first layer of Primer for Bondo, but I won't be able to get any more Bondo for a week or so. In the mean time i am getting back to work on the under suit, specifically the arms, the torso just needs some minor modifications then I can work on attacking the arm pieces.

Finally, does any one know (or think) if it is okay to brush a thin layer of Smooth-Cast 300 plastic resin to smooth out a helmet instead of Bondo? Thing it I have a ton of the stuff but no Bondo, any tips would be appreciated.


temporary_zps67b34a7d.jpg

temporary_zps24ecbb79.jpg

temporary_zpsd3d50bc6.jpg
 

Attachments

  • temporary_zps67b34a7d.jpg
    temporary_zps67b34a7d.jpg
    652.4 KB · Views: 242
  • temporary_zpsd3d50bc6.jpg
    temporary_zpsd3d50bc6.jpg
    720.4 KB · Views: 235
  • temporary_zps24ecbb79.jpg
    temporary_zps24ecbb79.jpg
    139.5 KB · Views: 254
// Incoming build Update
// Beginning playback...


Well, it has been a LONG time since I have up-dated this and alot has happened since... DECEMBER!? Damn, didn't think it had been that long. Any-hoos, with school now over and the Halo 5:Guardians hype being real, I now have the motivation to finish this armor.
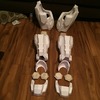
There has been quite a bit of work that has happened, but first some bad news, half of my armor was damaged in testing some new materials, the legs and shoulder-guards have to be remade. Also I am re-starting my under-suit build, after analyzing the situation I realized that it will not work, I have a plan for it's construction involving 1/4" foam padding, lots of fabric and EVA-foam. Last order of business before going over what I have done is that I am also starting on two other builds, one from destiny (for me) and the other (for a friend)... A new instrument, / Waiting for a sonata / That I will conduct.

Now on to the good stuff!
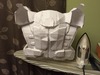
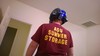
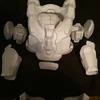
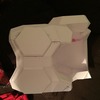
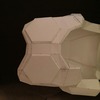
So in the time that I was MIA, I got alot of work done. First I want to thank Head Shot Props for the amazing H4 Magnum raw cast which now hangs on my wall waiting for use, it is a beauty. All I did was some simple sanding and body work to smooth it all out then painted it. I was also able to mostly complete the torso, I still need to finish the shoulder-blade things that stick out; unfortunately my Destiny and other build have me distracted at the moment.
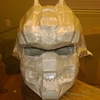
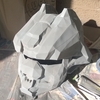
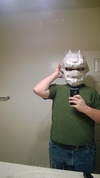
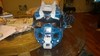
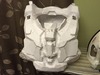
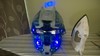
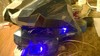
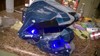
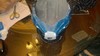
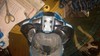
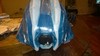
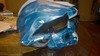
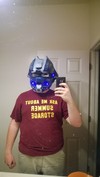
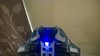
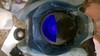
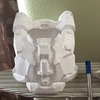
Finally I finished the helmet after finishing the paint, my classic blue and grey, on top of a silver base coat. After that I proceeded to electrical... and damn was I out of practice, but I was able to do it. The helmet has a total of 6 blue LED lights, and a single fan salvaged from an old Xbox. I proceeded to cut a hole in the back of the helmet for ventilation and threw in an LED do add some glow to the gap and the fan... and boy does it work. When everything is on the helmet looks amazing, the fan keeps it cool and the light just accent the ferocity of the Raider helmet. Finally the padding was added, enough to hold my head in place and keep the fan from eating my hair, but placed so the air flow was steady.

Well that is all, ON TO THE PICTURES!!!

4916785B-5EDD-4C2C-A698-1EDBDF6E306D_zpsh7nnn3ns.jpg

F6C2DAA2-E97B-430C-B302-AF661DFD12D9_zpspm6zq8lb.jpg

WP_20150419_019_zpstvhjotnu.jpg

WP_20150419_020_zpspgxzotuy.jpg

WP_20150419_022_zps6glr6tnl.jpg

WP_20150419_021_zps33expgst.jpg

WP_20150419_023_zpssosi5ydq.jpg

WP_20150419_024_zpsno53npso.jpg

WP_20150425_12_16_39_Pro_zps86albsrt.jpg

WP_20150424_00_04_41_Pro_zpstvfm4xzk.jpg

WP_20150424_00_04_33_Pro_zpsacx47qow.jpg

WP_20150423_23_05_23_Pro_zpsmv9lzjac.jpg

WP_20150425_12_17_04_Pro_zpszaijxs8v.jpg

WP_20150424_21_27_44_Pro_zpszu0mt8qb.jpg

WP_20150424_22_25_16_Pro_zps1bt74uof.jpg
 

Attachments

  • WP_20150419_020_zpspgxzotuy.jpg
    WP_20150419_020_zpspgxzotuy.jpg
    176.7 KB · Views: 239
  • WP_20150419_019_zpstvhjotnu.jpg
    WP_20150419_019_zpstvhjotnu.jpg
    167.5 KB · Views: 236
  • F6C2DAA2-E97B-430C-B302-AF661DFD12D9_zpspm6zq8lb.jpg
    F6C2DAA2-E97B-430C-B302-AF661DFD12D9_zpspm6zq8lb.jpg
    196.5 KB · Views: 205
  • 4916785B-5EDD-4C2C-A698-1EDBDF6E306D_zpsh7nnn3ns.jpg
    4916785B-5EDD-4C2C-A698-1EDBDF6E306D_zpsh7nnn3ns.jpg
    189.3 KB · Views: 230
  • WP_20150425_12_16_39_Pro_zps86albsrt.jpg
    WP_20150425_12_16_39_Pro_zps86albsrt.jpg
    159.4 KB · Views: 237
  • WP_20150424_00_04_41_Pro_zpstvfm4xzk.jpg
    WP_20150424_00_04_41_Pro_zpstvfm4xzk.jpg
    155.5 KB · Views: 212
  • WP_20150424_00_04_33_Pro_zpsacx47qow.jpg
    WP_20150424_00_04_33_Pro_zpsacx47qow.jpg
    185.2 KB · Views: 228
  • WP_20150419_024_zpsno53npso.jpg
    WP_20150419_024_zpsno53npso.jpg
    145.2 KB · Views: 237
  • WP_20150419_023_zpssosi5ydq.jpg
    WP_20150419_023_zpssosi5ydq.jpg
    162.5 KB · Views: 241
  • WP_20150419_021_zps33expgst.jpg
    WP_20150419_021_zps33expgst.jpg
    145.7 KB · Views: 243
  • WP_20150419_022_zps6glr6tnl.jpg
    WP_20150419_022_zps6glr6tnl.jpg
    186.2 KB · Views: 250
  • WP_20150424_22_25_16_Pro_zps1bt74uof.jpg
    WP_20150424_22_25_16_Pro_zps1bt74uof.jpg
    118.8 KB · Views: 225
  • WP_20150424_21_27_44_Pro_zpszu0mt8qb.jpg
    WP_20150424_21_27_44_Pro_zpszu0mt8qb.jpg
    131.6 KB · Views: 238
  • WP_20150425_12_17_04_Pro_zpszaijxs8v.jpg
    WP_20150425_12_17_04_Pro_zpszaijxs8v.jpg
    131.8 KB · Views: 228
  • WP_20150423_23_05_23_Pro_zpsmv9lzjac.jpg
    WP_20150423_23_05_23_Pro_zpsmv9lzjac.jpg
    146.6 KB · Views: 222
Got a cool technique for texturing the undersuit I just discovered.
I have a post about it in my build thread. (See my sig)
Might be able to take your undersuit to the next level!

Another cool method is to use a dremel with the bit that you can attach a removable barrel sander to, and then you leave it only half way attached, then you use it to cut circles, which will leave diamond shapes between the circles. For the diamonds, you apply a heat gun and then massage them down and it turns out really good looking.

Keep up the good work!
 
Can i ask you about summer storage?

Yes, Yes you can... although on Friday I will no longer work there lol

hey where did you get the templat's for the under armor

The template I found some time ago, but I can PM you the folder I made with the template and references, although the template is scaled to my size.
---------------------------------

Well now after some time of being AFK I can finally say that my suit is pepped and ready for resin!
One problem I always have with the legs is that they are a pain to put on... and impossible to take off, so I came up with an idea for a magnetic locking system using magnets and utility hinges. On the Thighs and Shins the dark pen lines on the legs mark cutting points and the boxes with X are magnets or locks and the other marks with O are the hinges. I haven't got the exact mechanism down but I think that this will work. Anyway one I start getting a good paycheck i will pick up the resin and Bondo to harden and finish my armor for the Halo 5: Guardians release.

64CEE710-3952-48D1-9249-4A7FC1EB0A65_zpsxosey3p9.jpg

87B7F34A-CA47-42AD-AD78-8B94734A011C_zpsisjzn9x0.jpg

B6B216C4-A60A-47A3-8F7E-27CCA0C3AEF2_zpsjidf30y8.jpg

A01E25FD-BEA2-40A0-BAED-87C16087456B_zpsm6rpzrnt.jpg

2A26DECB-C4B6-4455-ACA5-88FC5B369690_zpsnkm23msh.jpg

24AEA566-5766-4253-95B8-370466F6612B_zpsj1skbiea.jpg

490E9E0E-BB92-4094-9115-E1892D0EA99C_zpsacrwbpdu.jpg

8E51CEE7-E651-4FD5-B147-045B423DF6AD_zpsf981op4j.jpg

1F70F279-A8AB-44F9-A8D9-6A8FF19548C9_zps4otxnums.jpg

62022C3C-890A-4058-BD4E-0B78807496D4_zpseociz3cr.jpg

3A1241D3-451C-4126-B314-9717574AC439_zpskqfnpjwe.jpg
 

Attachments

  • 64CEE710-3952-48D1-9249-4A7FC1EB0A65_zpsxosey3p9.jpg
    64CEE710-3952-48D1-9249-4A7FC1EB0A65_zpsxosey3p9.jpg
    242.4 KB · Views: 172
  • 87B7F34A-CA47-42AD-AD78-8B94734A011C_zpsisjzn9x0.jpg
    87B7F34A-CA47-42AD-AD78-8B94734A011C_zpsisjzn9x0.jpg
    231 KB · Views: 183
  • B6B216C4-A60A-47A3-8F7E-27CCA0C3AEF2_zpsjidf30y8.jpg
    B6B216C4-A60A-47A3-8F7E-27CCA0C3AEF2_zpsjidf30y8.jpg
    245.7 KB · Views: 175
  • A01E25FD-BEA2-40A0-BAED-87C16087456B_zpsm6rpzrnt.jpg
    A01E25FD-BEA2-40A0-BAED-87C16087456B_zpsm6rpzrnt.jpg
    182.3 KB · Views: 177
  • 2A26DECB-C4B6-4455-ACA5-88FC5B369690_zpsnkm23msh.jpg
    2A26DECB-C4B6-4455-ACA5-88FC5B369690_zpsnkm23msh.jpg
    251.2 KB · Views: 166
  • 24AEA566-5766-4253-95B8-370466F6612B_zpsj1skbiea.jpg
    24AEA566-5766-4253-95B8-370466F6612B_zpsj1skbiea.jpg
    173.1 KB · Views: 171
  • 490E9E0E-BB92-4094-9115-E1892D0EA99C_zpsacrwbpdu.jpg
    490E9E0E-BB92-4094-9115-E1892D0EA99C_zpsacrwbpdu.jpg
    185.2 KB · Views: 194
  • 8E51CEE7-E651-4FD5-B147-045B423DF6AD_zpsf981op4j.jpg
    8E51CEE7-E651-4FD5-B147-045B423DF6AD_zpsf981op4j.jpg
    162.1 KB · Views: 184
  • 1F70F279-A8AB-44F9-A8D9-6A8FF19548C9_zps4otxnums.jpg
    1F70F279-A8AB-44F9-A8D9-6A8FF19548C9_zps4otxnums.jpg
    171.7 KB · Views: 165
  • 3A1241D3-451C-4126-B314-9717574AC439_zpskqfnpjwe.jpg
    3A1241D3-451C-4126-B314-9717574AC439_zpskqfnpjwe.jpg
    167.8 KB · Views: 161
  • 62022C3C-890A-4058-BD4E-0B78807496D4_zpseociz3cr.jpg
    62022C3C-890A-4058-BD4E-0B78807496D4_zpseociz3cr.jpg
    165.6 KB · Views: 186
Status
Not open for further replies.
Back
Top