Foam Targaryan themed Spartan build

Status
Not open for further replies.

OttyrCosplay

Member
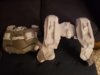
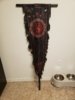
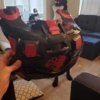
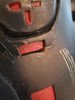
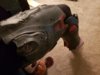
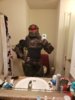
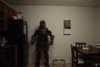
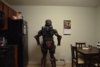
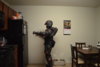
I'm about halfway through my first huge foam build! All the fabrication is done and I have begun plastidiping. Some parts are further along than others, such as getting to the paint chipping bits! I've attached a few random photos that I have on my phone, will be sure to add more once I get back to my computer and can get a full array!

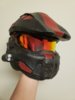
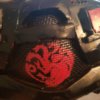
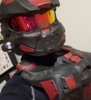
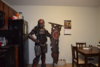
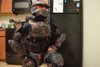
I went with a red and black Targaryen theme because it's honestly what I had on hand.

Also I didn't realize until pretty far into the build that I was building Master Chief's specific armor and not just the multiplayer version (it has been a very long time since I have played Halo, please forgive me) so this is more like a red and black Master Chief :/ oh well!

Everything is foam! I used up some old floormats I had lying around before moving on to some foam from TnTcosplay supply! And then back to floormats when that ran out and I needed some more foam.

Am planning on debuting this at Galaxycon in Raleigh, NC!

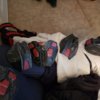
I also have been documenting this build more thoroughly on Instagram (same username) if you want to go on there and see more pics (also plenty of my dog).
 

Attachments

  • 20190624_184417.jpg
    20190624_184417.jpg
    505.9 KB · Views: 373
  • IMG_20190623_211234_224.jpg
    IMG_20190623_211234_224.jpg
    39.5 KB · Views: 370
  • 20190621_070838.jpg
    20190621_070838.jpg
    1.3 MB · Views: 379
  • IMG_20190625_200102_496.jpg
    IMG_20190625_200102_496.jpg
    63.3 KB · Views: 352
272855


So I got the helmet all weathered and it's pretty much done! The weathering took the red from BRIGHT FIRETRUCK to my preferred blood red. And I hit it all with a flat clear coat hence why in the pre weathered pic it looks shiny (I only have glossy paints and I wanted flat for this build)

I'm waiting on a new visor :/. The one I ordered was a really cool flexible one and it WOULD HAVE WORKED, let me preface that it was 10000% a great product from a seller on etsy....but I'm an idiot. Firstly, FOR SOME REASON my dumb self decided to mark on the RED HEXAGON SIDE when I was positioning the visor....I honestly can't believe I did that. THEN, I figured, huh, hot glue might not be strong enough EVEN THO THE MAN WHO SELLS IT SAYS RIGHT IN THE ITEM DETAILS THAT THIS ADHERES WITH HOT GLUE JUST FINE, SO INSTEAD I TRIED SUPERGLUE..well folks, that sure has heck didn't work. It took the red and the hex pattern off the visor and it was bad. OH, AND I DECIDED THAT HUH, THIS THING HAS LOTS OF FINGER PRINTS ON IT, LEMME USE RUBBING ALCOHOL TO CLEAN IT AND IT ALSO TOOK THE RED OFF.

So basically a series of really unfortunate events led to me stupidly ruining what would have been an amazing product.

For round two I am purchasing a motorcycle visor, purely because I have money in my amazon account and it ended up being cheaper for me that way. The visor is a cool reddish orange looking one so it looks like fire which works for my Targaryen theme. But I'm still super disappointed I ruined the first round of visor.

I'm also playing around with lights and fans for the helmet but not seriously until I get the visor installed so I know where I do and do not have room.

ALSO, when clear coating, a part of the helmet took on this milky, cloudy look. I tried to google why and couldn't get a clear consensus on why that happened. It did it before on my Mercy staff from Overwatch. I'm wondering if it is the humidity issue because I do live in the South of the USA. In any case, I saw someone say something about hitting it with a heat gun so I lightly did that and IT WORKED. But you do have to do it VERY SPARINGLY or the paint will bubble (you can't see it, but there is some bubbling on the back of the helmet).
 
Last edited:
I am so sorry the visor was ruined D:

My guess for the cloudiness would be either you sprayed the clearcoat/paint too close to the helmet, or sprayed it in a spot for too long and it puddles up and was too wet compared to everything else, or you painted mid day and the heat ruined the paint in the spot the sunlight was directly hitting the most. I have to spraypaint at sunset because of the temperature now... it's getting hot out there :(

It could have been the first two things you mentioned. I don't think sunlight was an issue as I am spraying indoorsish in a spray booth. So no direct sunlight, but good to know that that could also be an issue.

And yeah, super bummed about the visor, it would have fit the color scheme a bit better, I think since it is a darker red but gotta make do! I will find joy in the new visor. :D
 
Visor has been installed! It was a challenge and there are parts I goofed on but they are minor mistakes that really can't be seen. You can kinda still see my face but it isn't as bad as I had thought when I opened the visor up earlier today.

As for the costume, I am laying down more black, with only the back piece and one thigh left as of right now. I am hoping my black lasts through it cause I really don't want to buy one more can for ONE piece.

I have also started to add the red detailing and that is going well. The worse is masking off all the bits. I hate masking.
 

Attachments

  • 20190702_215637.jpg
    20190702_215637.jpg
    966.4 KB · Views: 337
  • 20190702_211048.jpg
    20190702_211048.jpg
    380.1 KB · Views: 342
Small update, no pics at the moment tho. I ran outta black XD. Thankfully of all the things to run out of, it was that color. For I remembered that it my quest for cosplay dominance, I bought a tool and materials haven't really had the chance to play with just yet. An Iwata airbrush and Createx paints. I did a quick test comparison and the blacks are pretty similar tho the spray paint I was using is a semi gloss and the Createx isn't....however, that isn't a problem when factoring in that I'm using a matte clear coat in the end so it will balance things.

Plus, it's on the back jetpacky, back pieces so no one will REALLY be able to see any of the small nuances that the different paints have with clear coated....at least that's my hope XD.
 
I have finished laying down all the red. All that remains is clean up cause, like on the chest piece, there was quite a bit of bleed through and I ripped my stencil off too fast. T_T I cleaned up mostly everything, tho, and all that remains is the shins.

Once that is done, I will remove all the mustard that is hidden beneath and be ready to clear coat!
 

Attachments

  • IMG_20190704_194208_283.jpg
    IMG_20190704_194208_283.jpg
    66.9 KB · Views: 327
  • IMG_20190704_194208_282.jpg
    IMG_20190704_194208_282.jpg
    69.5 KB · Views: 310
  • IMG_20190704_194208_284.jpg
    IMG_20190704_194208_284.jpg
    63.9 KB · Views: 325
No pictures again cause the paint room is a horrible place to be atm with all the clear coat clouds floating. But I took the mustard off! It was harder than anticipated. I did this some time ago and it turned out fine but it was difficult. I wonder if part was I let it sit too long. Or if it is because on the red parts, it therefore had two layers to protect it. IDK. I had to use extra fine steel wool to scratch it all off and even then some places got hit more than others. But it's over and I now have clear coated everything to begin weathering tomorrow and clear coating once more. Then Sunday is padding and strapping day where I figure out how to put this all on my body.
 
WEATHERING TIME!!!

Also second pic is some accidental weathering. Last post I talked about rubbing off mustard with steel wool....welllllll, I used water to help and never rinsed off any pieces. So water plus steel wool particles equals real rust. OOPS.
 

Attachments

  • IMG_20190706_125113_520.jpg
    IMG_20190706_125113_520.jpg
    2.5 MB · Views: 336
  • 20190706_130005.jpg
    20190706_130005.jpg
    2 MB · Views: 334
Padding has begun. :cool:

I wasn't going to start until tomorrow but I figured there was no harm in getting a head start. Enjoy some random pics I have only shared with a select group aka my two friends and parents.:p

The selfie one is entitled, "I am the Halo", in case you were wondering if it had a title. Because it does. (I am feeling goofy tonight, forgive me!)
 

Attachments

  • 20190706_221818.jpg
    20190706_221818.jpg
    1.8 MB · Views: 350
  • 20190706_201106.jpg
    20190706_201106.jpg
    365.2 KB · Views: 302
  • 20190706_201538.jpg
    20190706_201538.jpg
    1.3 MB · Views: 337
No photos because today was not super successful. Spent most of it trying to attach the chest to the back with magnets. Only to have it not work. So went with plan B which is just backpack clips and I am pretty happy with that result. Now I just need to connect the lower bits of the chest and back to each other.

But I was finally able to try them on which was awesome! And then I held up the donger protector. Now I see why people do more detailed undersuit then just wearing their under armour or whatever. There is a lot empty canvas between the chest and the lower abcod. I was already thinking about making a pair of shorts to wear over the under suit so we will see what else can be done. I really don't want to have to craft more, lol!

Edit: while looking for chest armor subs so I don't have to craft any armor I saw that there are tactical chest rigs with like 25928 pouches n such and wonder if that could be of use instead of dropping money on a chest/stomach armor that might not fit under my chest and back armor. Plus think of all the tactical snacks.
 
Last edited:
Test fitting went well! I definitely need the tactical snack bag to help take up room on the belly canvas. I know how the costume moves and what attachments need to be longer (donger onto belt).

Instead of making shorts, I just did a simple fix and tucked my shirt into my pants. The main issue I was having was the shirt is a men's M and a compression shirt so it is meant for someone taller and with more bulk so it is like a dress on me.

Also, yes, I need to clean my bathroom.
 

Attachments

  • 20190708_205914.jpg
    20190708_205914.jpg
    1.2 MB · Views: 332
Small update: got my belly bag. Will need to sew the straps because the webbing is as smooth as butter and they easily loosen. I weathered the bag a little, nothing fancy just some brownishred. Is it blood or mud? We don't know.

The helmet got a fan installed! First time soldering and it turned out all right!.

In my bid to try and secure the visor even more, however, I goofed. And some superglue dripped onto the visor area that I see out of on the outside. Welp. I just scratched it up and it's battle damage now. I AM NOT REDOING THIS DANG VISOR AGAIN.

My goal is to take the final product shots tomorrow. I need to fix up strapping on the armor but I have some ideas to do that so it shouldn't be too difficult, knock on wood.
 
AND DONE. Just a few 360 shots to get a full view of the armor. Super proud of it! A little hard to get good 360 shots when you live alone. Used my Nikon to do timed shots.

ps: YOU BETTER LIKE THIS POST, I CLEANED MY KITCHEN FOR YOU PEOPLE!! ;P
 

Attachments

  • DSC_0020.JPG
    DSC_0020.JPG
    3.8 MB · Views: 278
  • DSC_0021.JPG
    DSC_0021.JPG
    4.1 MB · Views: 309
  • DSC_0022.JPG
    DSC_0022.JPG
    4.1 MB · Views: 308
  • DSC_0023.JPG
    DSC_0023.JPG
    4.2 MB · Views: 290
  • DSC_0024.JPG
    DSC_0024.JPG
    4.4 MB · Views: 185
  • DSC_0027.JPG
    DSC_0027.JPG
    3.9 MB · Views: 240
That looks awesome! (The kitchen, not your suit) I'm joking by the way :b

That is really cool! The paint scheme is awesome, and that flag! Wohoho! That is awesome!!! This build is amazing!
 
That looks awesome! (The kitchen, not your suit) I'm joking by the way :b

That is really cool! The paint scheme is awesome, and that flag! Wohoho! That is awesome!!! This build is amazing!

Thanks so much, I worked really hard! Lots of windex and 409 went into this project! XD

But for real, thanks! I'm glad i was able to do the color scheme justice. The flag is honestly one of my fave parts because A: it unscrews for easy travel (coupling in the middle) and B: it was just all weathering and that's always the best part of cosplay.

I appreciate your kind words! <3
 
Status
Not open for further replies.
Back
Top