Props The Acheron Security M363: Remote Projectile Detonator..

Status
Not open for further replies.

alix965

Well-Known Member
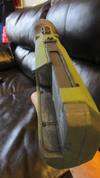
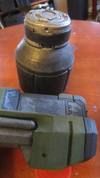
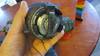
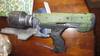
...or "Sticky D" as it's known on the field of battle.
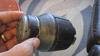
Started this project eons ago...didya hear me? EONS!!!! after doing a paint test on the projectile part of the thing, this li'l beaut sat in all her naked pink glory atop my computer hutch. She sat patiently beside my poor m6, competing over which one of them could collect the most dust. Then about a month ago I was feeling the need to be creative so I air dusted the cobwebs offa her and brought out the paint kit. I experimented with some brushing techniques and realized that she was starting to look good...real good.
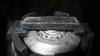
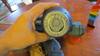
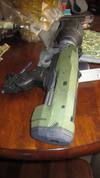
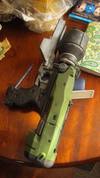
She's about 95 percent finished and I thought I'd share some pics of her with my fellow infantry persons.

IMG_4053_zps24e5f9aa.jpg

IMG_4052_zps51c94572.jpg

IMG_4050_zps82df6b65.jpg


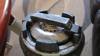
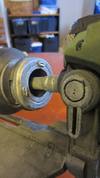
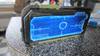
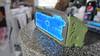
I'm working on the targeting screen and there is still some weathering to be done, but other than that...
 

Attachments

  • IMG_4053_zps24e5f9aa.jpg
    IMG_4053_zps24e5f9aa.jpg
    61.5 KB · Views: 265
  • IMG_4052_zps51c94572.jpg
    IMG_4052_zps51c94572.jpg
    77.8 KB · Views: 267
  • IMG_4050_zps82df6b65.jpg
    IMG_4050_zps82df6b65.jpg
    73.6 KB · Views: 204
That is beautiful. This lines are really crisp, but the paintwork sets it off! What brand/color code is the green you used? I have need of a similar color soon.

Redshirt
 
Yeah that is a beauty. As stated the lines are really crisp and the screws/bolts/sling mount? you sunk into the body are really nice touches.
I'm much enamored with the grip area, so packed full of detail and despite being painted black(s) it isn't flat at all. Great job!
 
That is beautiful. This lines are really crisp, but the paintwork sets it off! What brand/color code is the green you used? I have need of a similar color soon.

Redshirt
Hey Redshirt!!! Thank you for the compliments! I got the lines by using drawing directly onto the foam with a red pen then following it with new blade on my utilty knife at it's longest setting/notch along a metal ruler. Long slow pull with incremental corrections as neccesary. Since i'm not confident with my airbrushing skillz, my Badger remains packed in my closet.This is all brush painting!

The paint is plain ol Craftsmart OLIVE GREEN acrylic paint from Michaels craft store. It's not labled but I think it's a flat finish. I get the color modulation by misting a gloss black acrylic wash on the overall coat, from one of those mini spray bottles that come in a travel kit. be careful to use a q-tip to soak up any puddles. After that I let the wash air dry where it lies then go back and accent the worn edges with a medium gray/olive green drywash.

For the spot near the targeting computer with the excessive wear, I used undiluted bit of the same green with a small bit of black.
P.s. a drop of dish detergent in your spray bottle will thin out the wash making it less likely to puddle. But I'm sure you already knew all of this.
 
Yeah that is a beauty. As stated the lines are really crisp and the screws/bolts/sling mount? you sunk into the body are really nice touches.
I'm much enamored with the grip area, so packed full of detail and despite being painted black(s) it isn't flat at all. Great job!
Believe it or not I used a circle guide with a ball point pen held directly perpendicular to the foam to make the screw heads. i then drew a line across the circle to make the slot. same with the sling mount. the bolts/pins I pressed the retracted head of a click ball point pen, firmly into the foam and rotated it till It was deep enough to suggest a pin. I think the ink eats away at the foam where it makes contact. which is hella convenient.
 
Styrene frame with a Sapphire Metallic base coat on white with Brilliant Blue reticle and border, topped off with some self-leveling floor(Future) polish. A ray of sunlight makes this baby look like it's backlit.
IMG_4069_zps9c8ed8df.jpg
IMG_4068_zps1e5f4bde.jpg
IMG_4070_zps944d0a3e.jpg
watta ya think?
 

Attachments

  • IMG_4069_zps9c8ed8df.jpg
    IMG_4069_zps9c8ed8df.jpg
    85 KB · Views: 228
  • IMG_4068_zps1e5f4bde.jpg
    IMG_4068_zps1e5f4bde.jpg
    75.1 KB · Views: 217
  • IMG_4070_zps944d0a3e.jpg
    IMG_4070_zps944d0a3e.jpg
    68.7 KB · Views: 189
Awesome job on this! That targeting screen looks great. You are making me consider giving insulation foam another go!
 
Hello Halo friends!
Been taking a look at all my stop/start projects-this being one of them-and decided I should finish up at east on the big things before I start a new project (thinking of the pulse grenade.) So here are some pictures of the completed(?) 'Stickee D.' thing.
Forgive the flash photography and the incomplete weathering on the targeting access panel. Also I need to develop a swivel hinge to attach the screen. Tell me what you think! :)
IMG_4197_zps5679165f.jpgIMG_4196_zpsea2eef06.jpgIMG_4191_zps7f4c97f2.jpg
my symmetry isn't all it's cracked up to be
IMG_4194_zpsba4361e7.jpg
Still pink
IMG_4188_zpsea1d97a5.jpg
LE SEXY TIME :0
IMG_4189_zpsbadae28e.jpgIMG_4183_zpsdcaf18b9.jpg
Doesn't really stand up to flash huh?
IMG_4184_zps5deaa9fd.jpg
Stoopit weathering
IMG_4186_zps1bab2a44.jpgIMG_4185_zps47cc72a6.jpgIMG_4181_zpsa354900b.jpgIMG_4179_zps3d6a725b.jpg
 

Attachments

  • IMG_4194_zpsba4361e7.jpg
    IMG_4194_zpsba4361e7.jpg
    57.4 KB · Views: 214
  • IMG_4191_zps7f4c97f2.jpg
    IMG_4191_zps7f4c97f2.jpg
    54.2 KB · Views: 214
  • IMG_4196_zpsea2eef06.jpg
    IMG_4196_zpsea2eef06.jpg
    56.3 KB · Views: 231
  • IMG_4197_zps5679165f.jpg
    IMG_4197_zps5679165f.jpg
    59.3 KB · Views: 233
  • IMG_4188_zpsea1d97a5.jpg
    IMG_4188_zpsea1d97a5.jpg
    69.9 KB · Views: 217
  • IMG_4186_zps1bab2a44.jpg
    IMG_4186_zps1bab2a44.jpg
    55.2 KB · Views: 229
  • IMG_4184_zps5deaa9fd.jpg
    IMG_4184_zps5deaa9fd.jpg
    68.6 KB · Views: 231
  • IMG_4183_zpsdcaf18b9.jpg
    IMG_4183_zpsdcaf18b9.jpg
    54.3 KB · Views: 236
  • IMG_4185_zps47cc72a6.jpg
    IMG_4185_zps47cc72a6.jpg
    59.2 KB · Views: 227
  • IMG_4181_zpsa354900b.jpg
    IMG_4181_zpsa354900b.jpg
    59.4 KB · Views: 216
  • IMG_4179_zps3d6a725b.jpg
    IMG_4179_zps3d6a725b.jpg
    54.8 KB · Views: 221
  • IMG_4189_zpsbadae28e.jpg
    IMG_4189_zpsbadae28e.jpg
    60.1 KB · Views: 229
THAT is a good looking grenade! I'd love to see your detonator up close. In my view, it's your paint work that really sets it off--weathering to highlight the details, not to make it look abused. That approach is so much better than just attacking with silver paint.

Nice work!

Redshirt
 
Status
Not open for further replies.
Back
Top