1st Build The Red ODST Halo: Reach build log.

Status
Not open for further replies.

KGSupreme

Member
Kgcraftsprops on insta

Intro:

Hello everyone. I figured now was about time that I stopped lurking and started posting my own build log, I'll try to organize it for fast browsing. I have wanted to build my own armor set based off my custom armor from Halo: Reach, it's been nearly a full decade since that game came out and I have finally got around to building it. I purchased a 3d printer last year, a Creality CR-10s, and after a few prints trying to get used to the dynamics of 3d printing and 3d modeling I think I finally reached a point where I am comfortable with printing a full armor set.

I plan for this thread to just be a collection of my progress and some extra information to lead other people in the right direction or give inspiration. I don't really think anyone should use this as a tutorial, nor do I plan to write out very direct instructions on how everything is done. Still, thanks for checking it out. It's also a two way street, if you have any words of encouragement or information to share that may be relevant, I would appreciate it. Thanks

Edit 2: I have made some progress, I got distracted by some other props that some friends wanted printed, but I have come back around to this big boi. More later.

Shout-outs and experience:
First, a reference to some of my previous, non-Halo related projects. Linky . (Bonus Shadowhawk)
As you can see if you browse my photos, a lot of my previous projects were either made with wood or metal, and some 3d printed parts I purchased from someone else. Now that I have my own printer, I have been trying to practice more with 3d printed plastic parts from the ground up. This involves learning about the programs involved, specifications of infill, materials that can be used, hardware upkeep and maintenance, intricacies of a 3 day print job that may run out of filament on day 2.... etc. lots of stuff to learn.

Second, a big shout out to MoeSizzlac, MDBDesigns, @KitKatGoose, @TD0013, electricknite, and TurboCharizard for any 3d models, images, or miscellaneous resources and inspiration for this build, couldn't have done any of this without y'all leading the way. Hell, the whole 405th community does so much to provide helpful tips and great inspiration to try and get this done, you all deserve credit and kudos. Thanks.

References:
Anyways, here is the armor set I want to build as a reference. One image from Vanity, one is an action figure from the Mcfarlene series of toys that I put together and painted wayyyyy back in the day, and the last I found out that you can unlock all the armor pieces on MCC PC using a mod, it was pretty easy.
VanityArmorLoader.pngTgaPJ.jpg20200717154155_1.jpg

You can see it's a red ODST set based on the armor from Halo: Reach.

Things I have purchased to make it easier:
Gloves

I bought some protective gloves off Amazon for cheap, they look good enough for what I will use them for and I don't mind sacrificing them for the armor build.
Gloves.png

Grenades
Thats a whole nother issue. I considered 3d printing each grenade separately, but I wanted to save myself the time and material by using some Airsoft GL grenades I already owned from playing airsoft. I had to purchase 2 more to complete the set for the belt and chest piece, but the two extra I received are no the same color..... I'll probably just use those two on the chest piece and just say they are "Elite Buster" grenades or something. Idk. They look a whole lot better than I could make, and hopefully it's easy to show a convention that they are not real munitions nor will they be able to fire anything. When you load bb's into them you have to put a rubber plug in the hole to keep them in place, if I don't load them they wont be able to fire anything. Anyone have experience with something like this at a convention?

Edit: I went ahead and printed 10 grenades from one of MoeSizzlac 's files. I edited them to be a similar size to the aluminum airsoft grenades that I have so in the future when I make the belt/bandolier for all of the grenades they will be interchangeable depending on where I will be wearing the full suit.
20201022_173125.jpg
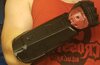
Here you can see the grenades next to M6 handgun, Forearm piece, and some Destiny Handcannons I was also working on.

Undersuit
I purchased a full body lycra suit off Amazon, I plan to make some undersuit accents as part of the full armor set, but I have not gotten around to that yet. I also purchased knee and elbow sleeves off Amazon that fit very well and can be used to keep some armor pieces in position, I have glued the calf/knee pieces and the Bicep pieces to the knee sleeves and elbow sleeves, so far they are tight but work really well for keeping the armor in place without using buttons or pins or such in the full body suit, I think this is good for the future in case I want to swap out the full body lycra suit for something else, I wont have to do a bunch of editing or removal of work to accommodate.

Magnets(How do they work?)
I purchased a set of magnets on Amazon. I have been using little mock discs in 3D Builder to decide where I want to put them in my armor/guns. I have not tested to see if they work well yet, here's hoping.
Magnets.png
Had to go back to Amazon to purchase larger, longer rectangular magnets. While messing with the nearly completed pistol, I found out quickly that using the smaller circular magnets would not work. Maybe I can use those somewhere else.


Please bear with me while I edit and add to this thread.

Saving other posts in the thread for progress.
 
Last edited:
Saving this post for progress pics and stuff.

3d model sizing
3d model full sizing.png

As you can see, I had to assemble all of the 3d models I downloaded and a male body model to try and mock-up all the objects to see if I could size them properly. I am glad I did so far, because the default sizes for the models would not have fit my head, legs, feet, hands, waist, chest, or arms. I am a fairly big person, 6' 3" 250 lbs last I checked, and I will need to lose some weight(Damn you quarantine! Spring 2020 never forget) to make this all look better on the outside.

Progress Pictures.

BOOTS

I started with the boots first.
At the moment I think I'm just going to use some of the boots I have on hand, a pair that I purchased from Academy sports a few years ago for like $30 US. So far the models I have printed fit really well around the boots, and the laces underneath shouldn't be an issue. I could just buy some material to cover that up if I really feel the need.
bootmockup.jpgbootarmormockup.jpg

bootarmorfilamentswap.jpgbootarmorprintmessupsotra.jpgWhile printing the front section of the right boot, I had to swap filament near the end of the print. Even though it missed a line and nearly messed up entirely, I was lucky that it was an easy fix.

J07z5lC.jpgLTw2kud.jpgREcY9Vn.jpgI figured out a way to keep the boots unscathed while making it so the armor pieces can fit securely. STRAPS AND FOAM BABY. I think that may end up being the motto for this whole build. I used some metal loops, nylon webbing, and foam to make the armor fit snuggly to the boots without flopping around. Now on to painting and sanding. I'll still need to find a way to attach the two other pieces of armor, but those wont be nearly as difficult as the heel and toe parts.

HANDS
The hand plates were easy enough, measure the back of my hand and make the 3d model similar in size.
glovemockup.jpg
I think I will use the hand armor as a practice platform to get the paint job and detailing that I want for the rest of the armor, it's easy to replace if I mess it up too much. Glueing the armor to the gloves is the most straightforward way to get these put together.

fjJu5Ft.jpgI did some paint tests of some different colors of red on the hand plates, I settled for a Flat Red from Rustoleum.
pCK5C6h.jpg This will be the red paint I use for the rest of the build, I think it looks great.
HJsEnvF.jpgkx0jjNs.jpgmiOYaEc.jpg Hand Plate detailing, I think it looks pretty good in person, doesn't seem to come out perfectly in an image.

LEGS AND KNEES
I printed the knee pads before the rest of the legs. The best way to print them for the least amount of material was at a slight angle on the build plate for the printer, and it turned out so perfectly that when the heated plate had cooled down after finishing the print, I found the completed piece had fell over. The heat from the build plate made it so the PLA plastic stuck to the plate the whole time. So awesome.
Kneepadprint orientation.jpgTwoKneepadsdone.jpg

I was looking at how I should go about printing the lower leg/shin pieces. Do I segment them into smaller pieces to reduce the liklihood of messing up a long print job, or print the whole thing in one go to make it all uniform and reduce the work I need to do later to clean up any creases or splits.... HMMMM
lowerlegarmormaterialcost.png
Also you can see that it will take nearly 500 grams of material to print ONE lower leg armor piece. This means nearly half of an entire 1 kg spool of material for one piece of armor. At the moment we are in May 2020 of the pandemic/quarantine, so Amazon has a low stock of the PLA material I like. Might need to think this one over.

I managed to print each of the shin/calf armor pieces in one go. It took about 3 days for each and a little more than 500 grams of material. The first one failed twice because my extruder got clogged, then after tinkering and changing the speed settings I had a half second power outage that stopped the third attempt. Luckily I was able to edit the Gcode that the printer uses, and resume from the height the print stopped at.

RlfcNaN.jpgDYvhgAN.jpgHere you can see where it stopped after the power outage.

K6UkTIv.jpg This little support piece was a pain. It was meant to go all the way up to the top to support an overhang, but instead it just fell apart and print material would just get all over the place for the rest of the 3 day print. Oh well, everything managed to finish just fine.

UYEiNB0.jpgvYuHktc.jpgJ8FX5lz.jpgdbQhGz1.jpgp503zcB.jpg Here's a series of photos showing the nearly completed lower leg armor. And the absolute SPIDER-WEB of material that got all over the place on the inside. It took a little bit of cleanup but I dont think it messed with the overall quality of the print. Last you can see me sizing up the shin with my boot armor, and then giving each piece I printed with the knee pads their first coating of XTC-3D.

Next I need to find some way to attach the Knee pads to the shin/calf armor so they are able to move seperately from eachother while also supporting them on my bod. I will have to fill the shin/calf armor with foam padding so it rests comfortably on my legs without moving around too much. Maybe I can fit something on the bottom of the shin/calf armor so that it doesn't sink too low over the boots.

Go36h4J.jpgrmObQgJ.jpgDJPwdZp.jpgWxa1LaC.jpgFresh Coat of paint, and using a knee brace/sock i bought on Amazon, fitting test with the boots. Working on Detailing now.


BELT AND BUTT
The belt and butt plate for the armor will take a lot more material than I thought it would at first.

The butt plate was easy to size, I will likely have to put together a nylon belt and some clips to get everything to stay together. Also, this one was printed vertically and the whole support structure came out in one easy pull rather than having to scrape off all the remaining burrs. Perfect.
Buttplateandsupportremove.jpg

NGUVDf4.jpg 5atQg4x.jpgHSNbkgV.jpg9prbUln.jpgI have printed the cod piece and the belts, I manged to find an inner tube from a bicycle tire I had lying around. While the Rubber turned out to be a great material for its flexibility, it is terrible at trying to glue to anything. I may have to remove the rubber and use some Nylon Webbing instead, because that is super easy to Super Glue to PLA. Anyways, still working on the belt, need to make it comfy and sturdy because it will be holding a bit of weight forward with the grenades hanging on the front.

CHEST
I couldn't find the right type of chest piece I was looking for, the HP/HALO chest piece. Unluckily it's a very vague name for a specific chest piece. LUCKILY MoeSizzlac is awesome and was able to put the chest piece together really quickly. Link to his Download
LowerChest Piece.png
I have not printed this yet.


Shoulders and Arms
Scroll down for the first arm Update

Check out this post on Page 2 For the Second arm update.


ForearmPhoneHolder1.pngForearmPhoneHolder2.pngI grabbed one of MoeSizzlac's models for the Left Forearm Utility, and tried modifying it to fit my phone. First time trying to model something functional like this, I will have to print it once or twice just to test it out. I found out already that the gloves I am using already work on my phone, so I figured why not incorporate my phone into the armor so I don't spend time taking off parts of my armor and pulling out my phone at a convention or other places.

Check out this post for the phone holder update


HELMET
GaG9g2U.jpgAYUzVu8.jpgI started Printing the Helmet. After days and days measuring my head and trying to shape the helmet the best I could in 3D builder, I went ahead and decided to print it. I figure that if the bottom of the helmet doesn't fit my head through it perfectly, I can just cut off the excess to make it fit. I wanted to avoid making the whole thing so large that it starts having a bobble-head affect. I already have a big head, making the helmet too large will ruin the whole look in my opinion. It's also at this point in my printing that I REALLY wish I could recycle or reuse my printing material. The options I have found online are not cheap, and some of it seems like more trouble than it is worth.

While I was resizing the helmet model to fit my head the best I could, I went ahead and cut out some sections of the helmet to accommodate buttons and speakers so I can implement a speaker system. I initially wanted to do a dual system that made it easier for me to hear, but I reason that it's easier for me to hear people than it is for them to hear me. Luckily, Moe has a resource for that too.

mRgUfCi.jpgHelmet printed, need to bondo and clean it up. I am SO PUMPED

GUNS
I started with the M6 Handgun. I wanted to try and use a magnet system so it would attach to the upper thigh armor whenever I get around to that, so I looked around online and got some Neodymium magnets, made some 3d models to match the size and implemented them into my models.

I may have printed the handgun too large though.. i went for the "Canon Dimensions" of the M6 at 13.7 inches long, but that is clearly too large. My real world handgun is only 8.5 inches long. And after printing the Magazine, trigger guard and accessory light I think I may need to resize the whole thing. Oh well.
pzlrSd4.jpgFtIoobf.jpgEQiToSu.jpgDENcYLs.jpgMy real gun magazine compared to the M6 mag I printed, and the Trigger+Mag+accessory in a mock up to see how big it is. TOO BIG. I am 6'3" and this is too big for me. :oops: 
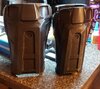
So after I finished printing the whole thing, I figure I may as well drop it on Ebay to make some money back. I don't think anyone will be able to use it as a prop(unless they have massive hands), but maybe someone will want to clean it up and paint it for a display piece. If you see this and might want to buy it from me, send me a pm.

Check out this post for the completed gun update

I decided that I will do the DMR and Grenade Launcher as my other pieces of kit. I will need to find a way to either sling them on my bod or magnetize them to the armor pieces somehow.


THINGS I HAVE LEARNED
Sizing everything twice, three times, four times is always the best way to go. When a full spool of PLA costs $20 something for one kilo, using 250grams on a print that is the wrong size is a waste of time and money.

XTC-3D is a finicky material to work with just like any other 2 part epoxy. It doesn't like high heat and humidity, so working with it outdoors in the Texas summer is no bueno. But at the same time, it emits fumes while it is curing, so be careful using it indoors. Also, make small, SMALL batches. I poured out a batch that was obviously too much, and the whole thing cured solid in about 60 seconds and was hot to the touch. 2 part epoxy resin like XTC-3D is an exothermic process, so the larger the volume the hotter it gets and the faster it cures. Work with small amounts.

Learn how to adjust your printer settings. Tinker with it, test it, retest it, read online what other people have to say. Learn to edit the Gcode in case you need to resume a failed print.

Want a quality piece of armor? Spend money and time for every step of the process. Dont buy cheap PLA that clogs and requires high heat to work properly. Take your time to redesign your 3D models. If it's a print that requires 3 days to print, dont try to rush it. Use your epoxy coating, primer sprays, paints, and finishing techniques properly. Think things through from start to finish.

Have tools available. Tools you will likely need
  • 3D printer and any tools associated with maintenance or repairs
  • Sharp cutting tools such as box cutters, X-acto knives, and scissors
  • Adhesive materials such as super glue, hot glue, duct tape(or gorilla tape), etc.
  • Power tools may be necessary depending on what you want to do, I heavily suggest a Dremel tool with plenty of bits.
  • So much paint. On this project alone I have used at least 4-6 different colors of spray paint, Oil based pens, alcohol based pens, pencils, charcoal, sharpies, acrylic pens, and others. Get ready to detail.
  • Measuring tools, a good piece of measuring tape for body dimensions is super valuable.
  • If you decide to print your armor like I did, a "Deburring tool" is super freaking helpful. Look it up.
That's all for now, more later.
 
Last edited:
Best of luck with your build! With the airsoft grenades, I think you gotta be really careful. Not only does the 405th have some problems with people making airsoft guns/armour (though since yours is for display only it might be alright), conventions may have an issue as well, even if they don't work. What is it made of? I think my local conventions would have problems with metal airsoft grenades.
Also with your shins, do you need to add support on it? There's a few spots that look like they may struggle without it.
 
What is it made of? I think my local conventions would have problems with metal airsoft grenades.
Also with your shins, do you need to add support on it? There's a few spots that look like they may struggle without it.

The grenades are aluminum, fairly heavy and very obviously made of some metal. I don't plan on making any of the weapons functional, even the grenade launcher I want to make won't be able to open the breach, and the tube doesnt fit the grenades according to the 3d model I downloaded already. Might be a good Idea to paint the insides of barrel for any weapons I make bright orange. I'll have to check ahead with any conventions I plan on going to, maybe printing the grenades might be the way to go.

The shin armor might need some support, I tested the overhang for my printer and the PLA I use and it goes up to 65 degree without failing, I tend to make my prints have support for anything about 55 or 60 degrees just in case depending on the complexity.
 
Are you reinforcing your prints with anything?

My first thought was using some of that XTC-3D epoxy product that is primarily used to smooth 3d prints, since it is an epoxy it dries really hard and adds a protective layer to the PLA plastic I am using. The main issue there would be how much that stuff costs compared to how much surface area we are talking about for a full armor build. I have not come to a conclusion on what to use to attach the armor pieces to the undersuit, do I use snaps, buttons, clips, straps or some other thing? I get the feeling it's going to be a little bit of everything depending on the armor piece and it's location.

The way that each armor piece was designed there are plenty of empty cavities on the interior facing the body, I could fill those empty spaces with some sort of epoxy or foam filling material. And I was able to print the pieces I have so far with more than 80% infill so they are significantly more dense than my average prints, that should help make them sturdy. If paint+primer+clear coat is enough to protect the PLA material from degrading then I should be good to go.
 
My first thought was using some of that XTC-3D epoxy product that is primarily used to smooth 3d prints, since it is an epoxy it dries really hard and adds a protective layer to the PLA plastic I am using. The main issue there would be how much that stuff costs compared to how much surface area we are talking about for a full armor build. I have not come to a conclusion on what to use to attach the armor pieces to the undersuit, do I use snaps, buttons, clips, straps or some other thing? I get the feeling it's going to be a little bit of everything depending on the armor piece and it's location.
XTC-3D can go quite a long way if you're careful. I coated two suits using one 24oz kit (they float around $30-$40 which isn't terrible).
 
In progress weathering on the knee and shin armor, thoughts? I feel like I may need to pull back on the silver for most parts, the knee seems like it would be something that gets ground contact pretty frequently and should look a bit more worn.
 

Attachments

  • KLsa94t.jpg
    KLsa94t.jpg
    454.2 KB · Views: 300
Update: Even after I said on my own thread that a lesson learned was making sure to measure everything multiple times and double checking just to make sure the 3D model comes out right, I messed up. I printed the left forearm, and made it quite large in an attempt to attach my phone holder thingy. After 4 days of printing(i should have stopped early) I had to resize everything and reprint. The second attempt came out a little tight, but not so terribly that I cant just sand things down to make it more comfy. Anyways, failures will happen, even if they are operator error.... WHATEVER. Pick up and move on.
 

Attachments

  • 7iWVAPEcrop.jpg
    7iWVAPEcrop.jpg
    734 KB · Views: 278
  • bLQXfY0crop.jpg
    bLQXfY0crop.jpg
    496.3 KB · Views: 273
  • xXJNifEcrop.jpg
    xXJNifEcrop.jpg
    487.1 KB · Views: 276
Update: Even after I said on my own thread that a lesson learned was making sure to measure everything multiple times and double checking just to make sure the 3D model comes out right, I messed up. I printed the left forearm, and made it quite large in an attempt to attach my phone holder thingy. After 4 days of printing(i should have stopped early) I had to resize everything and reprint. The second attempt came out a little tight, but not so terribly that I cant just sand things down to make it more comfy. Anyways, failures will happen, even if they are operator error.... WHATEVER. Pick up and move on.

It happens, I did the same thing on my forearms as well. Ended up placing my data pad onto the smaller one so that they both seem to be the same size even though they are not. Keep up your hard work, it's looking great! Adapt, Improvise, Overcome!
 
wow bro... you are pumping this out fast... while I just sit over here with a Halloween deadline taking my sweet time for some reason lol. I've been on the codpiece for like a week... aka I only worked on it for one day and then took a 6 day break... your armor looks awsome! Welcome to red team! :)
 
wow bro... you are pumping this out fast... while I just sit over here with a Halloween deadline taking my sweet time for some reason lol. I've been on the codpiece for like a week... aka I only worked on it for one day and then took a 6 day break... your armor looks awsome! Welcome to red team! :)

Man I feel like I have so far to go, codpiece and belt isn't done even though I have had it assembled and epoxied for weeks, boots are assembled and painted but I havnt detailed them or weathered at all. Helmet has been assembled but I have been avoiding doing too much with it until the visor is ready to go.. I've been trying not to put any deadline pressure on myself just so I'm not rushing but I still have so much to do.
 
Man I feel like I have so far to go, codpiece and belt isn't done even though I have had it assembled and epoxied for weeks, boots are assembled and painted but I havnt detailed them or weathered at all. Helmet has been assembled but I have been avoiding doing too much with it until the visor is ready to go.. I've been trying not to put any deadline pressure on myself just so I'm not rushing but I still have so much to do.
While you're making a project, it seems like it could go on forever. But once you finish it, which will come sooner than you think, it'll feel like the time flew by. Weird how that works. You suit looks great so far! Can't wait to see what the finished product looks like!
 
Status
Not open for further replies.
Back
Top