'lo all.
Now, before I begin: this isn't meant to be a tutorial to supplant THE ONE DONE BY RUNDOWN (< link, for the click-impaired) - instead, this is meant as a semi-comprehensive guide on how to go from scratch to competent in Blender specifically, since quite a few people now have asked me for assistance and guidance. Hopefully, this guide will help teach those interested in modelling the basics they'll need to create models to export to Pepakura, for whatever purpose.
What I don't expect, and I would ask people to refrain from, is debating which programs out there are superior. This is a Blender tutorial, let's keep it focused on Blender, please.
With that main spiel out of the way, let's dive right in.
PART THE FIRST - That Which Concerns The Program
Blender. It's a program that has some people running to the hills, but for me, it's the tried-and-tested program of choice for basic 3D modelling and mesh manipulation. I definitely won't argue that there are more powerful tools out there, especially when you're considering 'industry-standard' programs such as 3DS Max, Maya or C4D - but unfortunately, that sort of power costs money. Serious money, in some cases (a yearly license for 3DS Max will set you back roughly $2,900. Pucker up.) - and I don't advocate finding copies by more 'illicit' means, no matter how expensive these programs are.
Luckily, however, Blender is completely free, and even better: it's open-sourced. It's fully configurable from the ground up, too - for example, if you don't like the default grey theme, you could change it to something a little more colourful. Don't like the hotkeys? There's a tool to change those, too. You can even set Blender to remember how your workspace is laid out, so that when you start a new project, you don't have to waste time re-configuring your workspace to your liking. Better still, it's lightweight, so unless you're running models with tens of thousands of polygons, your old Intel 4 craptop will be able to at least churn out a viable piece - though, naturally, better computers will run the program more smoothly. I recommend at least 2Gb of accessible RAM and a reasonably modern processor. An OpenGL graphics card wouldn't co amiss, either.
You can download Blender from THIS LINK - once you have that down the pipe, we can continue with the next part.
PART THE FIRST, BUT WITH AN EXTRA BIT ADDED - That Which Concerns User Input
Blender is not a laptop friendly application. In order to make full use of the functions it offers, you will need the following without exception:
As I said, laptops need not apply unless you have access to a USB Num pad and an external USB mouse. You simply cannot model in Blender using a trackpad and alt-keys. It can't be done, and believe me, I've tried several times. If anybody wants to ask me how to get it running on a laptop without those accessories, the answer is simply 'don't'. Save yourself the headache.
PART THE SECOND - That Which Concerns Our First Boot Up, or, 'Oh Christ What The Hell Is This?'

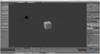
This is what you can expect to see upon your first boot-up of the program. Looks daunting, right? Don't worry, we'll soon have this all cleaned up and ready to use. The first thing we need to do is remove all the stuff we're not going to need - mainly the bits that concern animation, modifiers and such. This is even before we jump into hotkeys and mesh manipulation, of course; it's essential that you create a workspace that you're comfortable with. And relax, this really isn't heavy stuff we're going into.

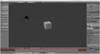
See that red line? Hover your cursor over it. It'll change shape, into a pair of opposing arrows linked by a line. RIGHT-CLICK this line to bring up a little box called 'Area Options'. Since we're not looking to create another area, you'll need to hit 'JOIN AREA'. This will give you a greyed-out area, and an arrow depicting which area you want to get rid of, like so:


This should give you a workspace that looks something like this:

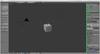
Next, we need to remove the stuff from the right of the screen, and free up some space:

And you should be left with something that looks like this:

To maximise your workspace, you can also click-drag away the menu on the left. Notice that when you do so, you'll be given a little '+' symbol at the top-left of your workspace, to recall that panel when we need it - and believe me, we'll need it.
Now, before I begin: this isn't meant to be a tutorial to supplant THE ONE DONE BY RUNDOWN (< link, for the click-impaired) - instead, this is meant as a semi-comprehensive guide on how to go from scratch to competent in Blender specifically, since quite a few people now have asked me for assistance and guidance. Hopefully, this guide will help teach those interested in modelling the basics they'll need to create models to export to Pepakura, for whatever purpose.
What I don't expect, and I would ask people to refrain from, is debating which programs out there are superior. This is a Blender tutorial, let's keep it focused on Blender, please.
With that main spiel out of the way, let's dive right in.
PART THE FIRST - That Which Concerns The Program
Blender. It's a program that has some people running to the hills, but for me, it's the tried-and-tested program of choice for basic 3D modelling and mesh manipulation. I definitely won't argue that there are more powerful tools out there, especially when you're considering 'industry-standard' programs such as 3DS Max, Maya or C4D - but unfortunately, that sort of power costs money. Serious money, in some cases (a yearly license for 3DS Max will set you back roughly $2,900. Pucker up.) - and I don't advocate finding copies by more 'illicit' means, no matter how expensive these programs are.
Luckily, however, Blender is completely free, and even better: it's open-sourced. It's fully configurable from the ground up, too - for example, if you don't like the default grey theme, you could change it to something a little more colourful. Don't like the hotkeys? There's a tool to change those, too. You can even set Blender to remember how your workspace is laid out, so that when you start a new project, you don't have to waste time re-configuring your workspace to your liking. Better still, it's lightweight, so unless you're running models with tens of thousands of polygons, your old Intel 4 craptop will be able to at least churn out a viable piece - though, naturally, better computers will run the program more smoothly. I recommend at least 2Gb of accessible RAM and a reasonably modern processor. An OpenGL graphics card wouldn't co amiss, either.
You can download Blender from THIS LINK - once you have that down the pipe, we can continue with the next part.
PART THE FIRST, BUT WITH AN EXTRA BIT ADDED - That Which Concerns User Input
Blender is not a laptop friendly application. In order to make full use of the functions it offers, you will need the following without exception:
- A decent mouse with a clickable scroll wheel
- A keyboard with a Num pad (essential for swapping between views)
- OPTIONAL: a mouse with thumb buttons (I personally use a Logitech G400 and have Save and Undo mapped to the two thumb buttons)
- OPTIONAL: multiple monitors. I personally use three monitors, so I have more screen space to work with. More is, well, more, where modelling is concerned - you can spread your work out better and have multiple views open at once.
As I said, laptops need not apply unless you have access to a USB Num pad and an external USB mouse. You simply cannot model in Blender using a trackpad and alt-keys. It can't be done, and believe me, I've tried several times. If anybody wants to ask me how to get it running on a laptop without those accessories, the answer is simply 'don't'. Save yourself the headache.
PART THE SECOND - That Which Concerns Our First Boot Up, or, 'Oh Christ What The Hell Is This?'
This is what you can expect to see upon your first boot-up of the program. Looks daunting, right? Don't worry, we'll soon have this all cleaned up and ready to use. The first thing we need to do is remove all the stuff we're not going to need - mainly the bits that concern animation, modifiers and such. This is even before we jump into hotkeys and mesh manipulation, of course; it's essential that you create a workspace that you're comfortable with. And relax, this really isn't heavy stuff we're going into.
See that red line? Hover your cursor over it. It'll change shape, into a pair of opposing arrows linked by a line. RIGHT-CLICK this line to bring up a little box called 'Area Options'. Since we're not looking to create another area, you'll need to hit 'JOIN AREA'. This will give you a greyed-out area, and an arrow depicting which area you want to get rid of, like so:
This should give you a workspace that looks something like this:
And you should be left with something that looks like this:
To maximise your workspace, you can also click-drag away the menu on the left. Notice that when you do so, you'll be given a little '+' symbol at the top-left of your workspace, to recall that panel when we need it - and believe me, we'll need it.
Attachments
-
 firstboot_zps6fd9f1b7.jpg44.7 KB · Views: 283
 -
 removesector1_zps7a39a1e0.jpg45.3 KB · Views: 278
 -
 removesector3_zps7699eecd.jpg22.2 KB · Views: 263
 -
 removesector2_zps552232be.jpg18 KB · Views: 272
 -
 removesector4_zps5303bf7f.jpg39.2 KB · Views: 259
 -
 removesector5_zps3371ed6e.jpg40.1 KB · Views: 254
 -
 workspacecleaned_zps36477392.jpg24.2 KB · Views: 270
