Props ventrue's MA37 Assault Rifle (WIP)

Status
Not open for further replies.

ventrue

Well-Known Member
I've announced this project in the other thread almost two weeks ago - and then got hit by the flu, which stopped about all the momentum I had. But here it is finally, my first rifle.

Ideas I plan to incorporate:
  • Realistic looks, of course
  • A little weight (Don't want it to be blown away by the wind :))
  • Modular design (Makes repairs and building easier... I think)
  • Backpack-mountability
  • Working display and ammo counter. I have a PIC lying around, and this looks like a good opportunity to actually use it. (Edit: PIC is scrapped, I switched to the other side and will be using an Arduino.)
  • Working flashlight, but with a switch near the grip and without using a Maglite.
  • Several lights on the side, I'll deviate from the reference material here.
  • Sound (No idea how to do that yet)
  • Recoil simulation (Some idea how to do that)
  • Smoke simulation (Not sure yet if that's a good idea at all)

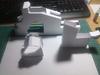
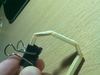
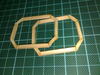
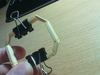
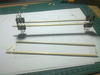
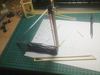
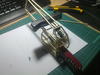
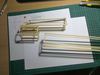
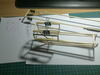
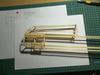
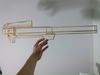
Now, you know me, my first attempt always fails at least partially, and so it did this time. I tried pepakura (model by Rid3r), and the plan was to build it in sections that I would harden separately and then put together. It didn't turn out too bad and with some putty and a Dremel this could definitely be turned into a good looking prop, but there's no fun in assembling it whatsoever.

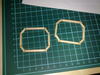
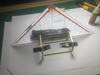
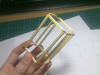
So while I was using some popsicle sticks to reinforce flat areas, I came up with a completely different idea that, to my knowledge, nobody has used yet. And... I think this is going to be awesome. Or at least I hope so ;-)

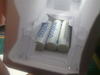
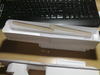
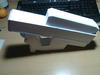
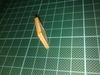
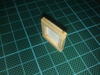
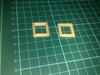
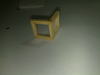
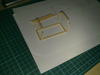
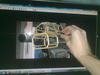
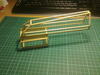
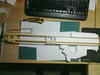
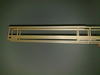
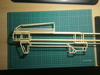
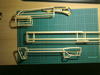
Pictures: Some pepakura subsections, sections, reinforcement, a battery placement test and the mysterious teaser pic (wohohooo!) of what I'm up to next. And I bet it's not what you think! :-D

01112010363.jpg


01112010355.jpg


05112010367.jpg


05112010370.jpg


10112010387.jpg
 

Attachments

  • 01112010363.jpg
    01112010363.jpg
    49.1 KB · Views: 271
  • 01112010355.jpg
    01112010355.jpg
    82.4 KB · Views: 246
  • 05112010367.jpg
    05112010367.jpg
    81.8 KB · Views: 249
  • 10112010387.jpg
    10112010387.jpg
    68 KB · Views: 245
  • 05112010370.jpg
    05112010370.jpg
    80.6 KB · Views: 263
Very nice. I like the list of features. It's like looking at the stickers at a Farrari showroom.

I especially like the soft focus lens you used for the beauty shots of your progress. I'm sure you'll not fail the first time this time around. All win.
 
I like the popsickle stick idea to reinforce the structure, good idea!!! Looking pretty good so far!
Keep us updated on progress!!!
 
what i do is put a lot of cardboard inside to reinforce, but very, very nice MA37 man it is looking really good and clean pep work :)
 
Progress: Not really progress, but I'm feeling very creative tonight, so I've started to play around with my new building material a bit. You've already seen it: 3mm by 3mm modelling pine slats. My new plan involves more fun, more wood, less paper and a bit more scratchbuilding. If you look at the pics below, you'll probably see what I have in mind. Using a Dremel might give cleaner results.

Pictures: Just some random experimenting.

11112010402.jpg


11112010412.jpg


11112010413.jpg


11112010421.jpg


-----

I especially like the soft focus lens you used for the beauty shots of your progress. I'm sure you'll not fail the first time this time around. All win.

Haha, so it's called "soft focus" now? :)
This "feature" is probably the result of the camera's inability to properly to focus, combined with my shashashaky hands and a bright desk lamp ;-)


I like the popsickle stick idea to reinforce the structure, good idea!!! Looking pretty good so far!
Keep us updated on progress!!!

what i do is put a lot of cardboard inside to reinforce, but very, very nice MA37 man it is looking really good and clean pep work :)

None of the cardboard I have can put up a lot of resistance against bending, whereas these sticks keep the long edges right above the grip hole perfectly "in line", so to speak. That would have been important to actually put the pieces together later, as any warpage would have ruined the fit.

But as I said, I've scrapped the whole Pepakura thing for the rifle. I'm doing this as a hobby, so it's got to be fun to do. As it turns out, working with wood is a lot more satisfying and "creative" than cutting out paper pieces for hours. I can totally understand now how people like LeeKegan can push out prop after prop with such passion ;-)

Anyways, thanks for the compliments, I appreciate them :)
 

Attachments

  • 11112010413.jpg
    11112010413.jpg
    164.7 KB · Views: 252
  • 11112010412.jpg
    11112010412.jpg
    113.5 KB · Views: 247
  • 11112010402.jpg
    11112010402.jpg
    190.8 KB · Views: 247
  • 11112010421.jpg
    11112010421.jpg
    29.4 KB · Views: 253
Since you're using my pep file, I want to warn you: I really didn't have any good reference other than the blueprints Bungie posted, so some of the parts are probably way off (most of the clip I just guessed on; for the grip I really didn't have any idea how rounded it was). So, you might want to get some good reference shots of these yourself, like taking screenshots in third person of your player reloading to get a good idea of what the clip looks like.
 
Progress: Just another small update. I've decided to start at the front of the rifle this time, not sure yet if that was such a good idea because of all the weird angles in that area. Getting these thin slats into the right place is a bit tricky, because for some reason, super glue takes about 10 to 15 minutes to get hard when I use it on the wood and the pieces have to lie perfectly still the entire time. I'll probably have to look for a different glue here and/or for a new way to keep the pieces in place.

Pictures: Pictures below are of all the different "stages" these two base parts went through:

Just glued together.
13112010427.jpg


Cleanup; taken off the protruding tips (one piece done by hand, then I decided to break out the Dremel).
13112010434.jpg


The pieces are not exactly identical...
13112010438.jpg


...so I sanded the unneccesary material off. The inner edge is still unsymmetrical, but that doesn't matter, because the outside edge is going to carry the paper that will form the actual surface of the model.
13112010442.jpg


This is what's going to happen next (not yet glued together).
13112010446.jpg


-----

Since you're using my pep file, I want to warn you: I really didn't have any good reference other than the blueprints Bungie posted, so some of the parts are probably way off (most of the clip I just guessed on; for the grip I really didn't have any idea how rounded it was). So, you might want to get some good reference shots of these yourself, like taking screenshots in third person of your player reloading to get a good idea of what the clip looks like.

Well, having abandoned pepakura for this project, I'm not using it any more. But aside from the grip and the area right above the magazine there was nothing wrong with it. Most of the detail I would have skipped anyways and carved into the hardened model later on. And the way you modelled the grip was pretty nice actually, I was thinking of using rubber for these straight pieces that go into the main grip piece in your model and maybeI'll still come back to that idea later. I think such a detail would go very well with the general, highly detailed looks this rifle has (in contrast to the MA5C, for example, which looks a lot.. "sleeker" and "cleaner").

And who cares what the clip looks like? People are going to be thrilled by the fact that the weapon has a removable clip at all ;-)
 

Attachments

  • 13112010442.jpg
    13112010442.jpg
    132.5 KB · Views: 232
  • 13112010434.jpg
    13112010434.jpg
    172.3 KB · Views: 253
  • 13112010427.jpg
    13112010427.jpg
    188.4 KB · Views: 238
  • 13112010446.jpg
    13112010446.jpg
    78.3 KB · Views: 287
  • 13112010438.jpg
    13112010438.jpg
    124.4 KB · Views: 237
Hi!

Very good job on that rifle Ventrue!!!

One tip, when I want to hard a lot and fast with superglue (any cyano actually) I drop a few amount of cyano on the joint area and later I add some dust ( I used to use regular baking soda or bondo dust from sanding) so it mix as a rock and pretty fast ;)

Good luck with your proyect!!!
 
Progress: I think I'm starting to get the hang of this. If you look closely, you can actually see which part of the rifle I just finished! I'm really happy with it so far.

I used reference pictures from Juliet76, in case you're wondering where I got them.

Pictures: Some more progress and the result at the end. I got a bit creative propping all the pieces up, but other than that there isn't much to explain.

14112010453.jpg


14112010458.jpg


14112010460.jpg


15112010465.jpg


15112010469.jpg


15112010481.jpg


15112010470.jpg


-----

Very good job on that rifle Ventrue!!!

One tip, when I want to hard a lot and fast with superglue (any cyano actually) I drop a few amount of cyano on the joint area and later I add some dust ( I used to use regular baking soda or bondo dust from sanding) so it mix as a rock and pretty fast ;)

Good luck with your proyect!!!

Thanks :)

The dust idea sounds good, but I can't try it at the moment. I only have powdered soup here and I don't want a rifle that smells like soup :-D
 

Attachments

  • 14112010453.jpg
    14112010453.jpg
    87.4 KB · Views: 259
  • 14112010458.jpg
    14112010458.jpg
    64.9 KB · Views: 215
  • 14112010460.jpg
    14112010460.jpg
    74.1 KB · Views: 233
  • 15112010465.jpg
    15112010465.jpg
    105.3 KB · Views: 233
  • 15112010469.jpg
    15112010469.jpg
    103.1 KB · Views: 223
  • 15112010481.jpg
    15112010481.jpg
    77.9 KB · Views: 241
  • 15112010470.jpg
    15112010470.jpg
    142.6 KB · Views: 232
Progress:
I would have loved to present you the finished front and base pieces today, but the base piece isn't finished yet. I glued one of the slats down 3 mm too low, so I have to go back and fix that...

Anyways, I cut the superfluous pieces out of the front piece and added the rails that will keep it in place on the base. The base is mostly a cage with rails on the sides, I'll do most of the detailing with my Dremel later.

Pictures:
Taken before I noticed the mistake. Front piece should be mounted 3 mm higher on the base.

16112010489.jpg


18112010497.jpg


18112010496.jpg


-----

That's a really cool idea! What kind of glue are you using?

It's super glue, it's the same I use for pepakura. At least for now, until I find something better.
 

Attachments

  • 18112010497.jpg
    18112010497.jpg
    95.7 KB · Views: 226
  • 16112010489.jpg
    16112010489.jpg
    87 KB · Views: 210
  • 18112010496.jpg
    18112010496.jpg
    94 KB · Views: 234
This is looking amazing so far, its definately a new method. Can't wait for more updates.

Just curious, what was your thinking for adding recoil, I'm making an AR myself and want to make it so the charging handle moves when I pull the trigger.
 
Hi!

Very good job on that rifle Ventrue!!!

One tip, when I want to hard a lot and fast with superglue (any cyano actually) I drop a few amount of cyano on the joint area and later I add some dust ( I used to use regular baking soda or bondo dust from sanding) so it mix as a rock and pretty fast ;)

Good luck with your proyect!!!
So thats what happened to all my fireplace matchsticks!!!!!

VENNNTTTRUE!!!!!!

Zabana is correct. CA glue and baking SODA not crystallize into a sort of rock hard opaque mixture. But it's an instaneous chemical reaction. I usually push the baking soda into whatever crevice, then dropping the glue onto it. I use the very 'runny' type. The result is amazing. Instant body filler. Like an A and B part modelling putty. Be warned the process gives off SEVERE fumes that I suspect are poisonous, if not toxic, at the very least tear inducing.
 
Progress:
Only 11 more parts to go! Fixed and finished the base piece, except for the rails on the back. I will add those once I get there.
Actually this is not really update-worthy stuff, but I thought why not throw in a few pictures while replying ;-)

In other news, the Dremel accessories I had ordered have finally arrived, along with something called a "sanding sponge". Turns out, this thing is awesome to sand away superfluous superglue in a 90°-corner on these wood models. A quality tool made in the UK - thanks guys ;-)
(By the way, for other German members: I also ordered the stuff in the UK. Way cheaper than buying it here!)

Pictures:
Just to make one thing clear: I am NOT going to glue the pepakura parts onto the wooden frame. That last picture is just there because I think it looks nice :)

18112010516.jpg


18112010511.jpg


-----

So thats what happened to all my fireplace matchsticks!!!!!

VENNNTTTRUE!!!!!!

Zabana is correct. CA glue and baking SODA not crystallize into a sort of rock hard opaque mixture. But it's an instaneous chemical reaction. I usually push the baking soda into whatever crevice, then dropping the glue onto it. I use the very 'runny' type. The result is amazing. Instant body filler. Like an A and B part modelling putty. Be warned the process gives off SEVERE fumes that I suspect are poisonous, if not toxic, at the very least tear inducing.

Huh.. good to know. Well, you wouldn't believe it, but sometimes I am actually wearing my respirator while using superglue. That stuff starts to hurt in your nose and eyes after a while even without those tricks, especially when you use lots of it at once.

And... 1 m long matches?? You must have one hell of a large fireplace! :-D

This is looking amazing so far, its definately a new method. Can't wait for more updates.

Just curious, what was your thinking for adding recoil, I'm making an AR myself and want to make it so the charging handle moves when I pull the trigger.

Well, your thread has actually been major inspiration to me :)
My initial thought was to use a large solenoid, because that's faily easy to implement mechanically. But a motor might work as well.

I also had an idea the other day to actually fill the magazine with shells and throw one out after each shot, and it would be practical to use the same thing to move everything that moves. So, bottom line: I have no idea how I'm going to do all that (yet!) :)

Holy turd... Not bad! I'd love to see more of this!

this is incredible!

Thanks everyone :)
 

Attachments

  • 18112010511.jpg
    18112010511.jpg
    90.8 KB · Views: 220
  • 18112010516.jpg
    18112010516.jpg
    60.8 KB · Views: 232
Progress:
Bottom part finished. I think it's good enough to use, but if I had to do it again, I would do it in smaller parts rather than make the whole outline in one huge step. Doing it like this leads to warpage really easily. You may notice I had to put in some diagonal braces because of that.

Pictures:
The progress-pics are getting a bit old, so I'll skip right ahead to the finished part and the rifle's current state.

20112010528.jpg


20112010527.jpg


20112010533.jpg
 

Attachments

  • 20112010533.jpg
    20112010533.jpg
    82.6 KB · Views: 307
  • 20112010527.jpg
    20112010527.jpg
    124.8 KB · Views: 237
  • 20112010528.jpg
    20112010528.jpg
    115.8 KB · Views: 210
Status
Not open for further replies.
Back
Top