Hello!
This is my first thread, hopefully its formatted correctly. Back in 2021 I decided to build a Master Chief helmet, what was meant to be a small project eventually snowballed into a summer long escapade into building a full suit. While this wasn't my first time building out of foam and hot glue, it was my first time using pepakura to build an accurate suit, so I had a lot to learn!
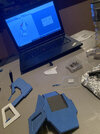
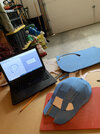
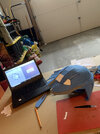
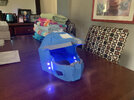
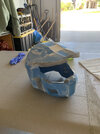
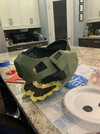
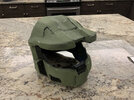
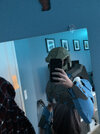
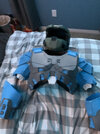
I started my build in my garage with an ancient laptop, a lot of templates, and some dusty foam I found. Of all the pieces the helmet probably took the longest, as I was adjusting to using pepakura, and figuring out how to put pieces together. Once the helmet was done I decided it needed some lights, but I didn't have a soldering Iron (still don't lol) so I came up with a temporary solution, finger lights. I remembered messing around with these as a kid and turns out they fit in my helmet perfectly, a great temporary solution!


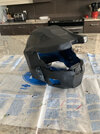
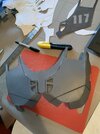
After the build, I went through the very tedious process of filling gaps with Kwikseal, and sanding them with my rotary tool. After that was done I set my sights on the visor. At the time I didn't know it, but this single part of the whole armor gave me the most trouble out of anything. I went through a MILLION different variations and techniques, and finally settled on a binder divider with window tint on it... I desperately need to get the materials to vacuum form stuff. The first version of the visor consisted of two separate pieces of plastic heat formed and cut with my rotary tool. I eventually scrapped it because the cuts were sloppy, and my inital attempts to dye it didn't work (user error).


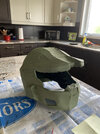
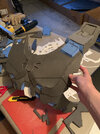
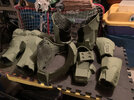
Took a break from the visor and went directly to painting. Did a base coat of plastidip, masked some stuff, then painted the olive drab. after that I did some detail work and my favourite part, weathering!


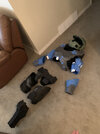
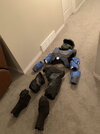
It was at this point that I decided to build the rest of the amour, so I began with the arms! First was the shoulders, then the forearms. Both of which were pretty straightforward to build, so I moved on to the chest. The chest was probably the most difficult to build, mostly because of its size, and some difficulties I had gluing it, but I chugged along! At this point I decided to try on all my finished pieces together.


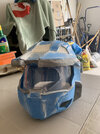
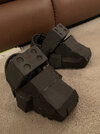
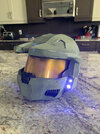
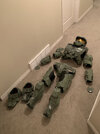
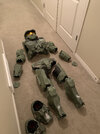
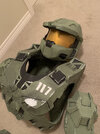
At this point I kinda forgot to take progress pictures, so theres a big jump, sorry! After the chest I built the belt, thighs, shins, and boots. I had gotten used to the workflow so progress went along smoothly, I also upgraded from the garage to the basement! Once that was done I returned to the visor. For this version I tried spray painting it with tamiya TS-73 Clear orange, then a light misting of gold spray paint, I'd say this worked pretty well!


I was finally at the point where I was ready to paint. Because I was on a strict time schedule of finishing this before September (it was late August at this point), I decided to skip the filling and sanding of the rest of the parts. I know I should've done this and I hope to make a much more detailed suit sometime in the near future! I followed the same process for painting the rest of the parts. Plastidip, olive drab, details, dirt, then scratches.


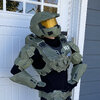
At last, time to put it all on! Obligatory hero pose : )


If I was to do anything differently with this suit It would ultimately boil down to two things: being more careful, and getting a 3D printer. There were a lot of places (such as the legs) where the scaling is kinda off, I don't think it takes too much away from the finished product however I can still improve on that front. As I mentioned before, for my next build I won't skip the filling and sanding, and I plan on using contact cement to minimize gaps, as hot glue is a little old fashioned lol. I also want to get a 3D printer so I can make more detailed components, as well as make a mold for a vacuum formed visor, any recommendations on printers?
Overall I thoroughly enjoyed building this suit, and I'm currently doing an overhaul of it. So far I've made a much better visor, and am planning on making a proper undersuit rather than black clothing, so stay tuned! Thanks for reading!
This is my first thread, hopefully its formatted correctly. Back in 2021 I decided to build a Master Chief helmet, what was meant to be a small project eventually snowballed into a summer long escapade into building a full suit. While this wasn't my first time building out of foam and hot glue, it was my first time using pepakura to build an accurate suit, so I had a lot to learn!
I started my build in my garage with an ancient laptop, a lot of templates, and some dusty foam I found. Of all the pieces the helmet probably took the longest, as I was adjusting to using pepakura, and figuring out how to put pieces together. Once the helmet was done I decided it needed some lights, but I didn't have a soldering Iron (still don't lol) so I came up with a temporary solution, finger lights. I remembered messing around with these as a kid and turns out they fit in my helmet perfectly, a great temporary solution!
After the build, I went through the very tedious process of filling gaps with Kwikseal, and sanding them with my rotary tool. After that was done I set my sights on the visor. At the time I didn't know it, but this single part of the whole armor gave me the most trouble out of anything. I went through a MILLION different variations and techniques, and finally settled on a binder divider with window tint on it... I desperately need to get the materials to vacuum form stuff. The first version of the visor consisted of two separate pieces of plastic heat formed and cut with my rotary tool. I eventually scrapped it because the cuts were sloppy, and my inital attempts to dye it didn't work (user error).
Took a break from the visor and went directly to painting. Did a base coat of plastidip, masked some stuff, then painted the olive drab. after that I did some detail work and my favourite part, weathering!
It was at this point that I decided to build the rest of the amour, so I began with the arms! First was the shoulders, then the forearms. Both of which were pretty straightforward to build, so I moved on to the chest. The chest was probably the most difficult to build, mostly because of its size, and some difficulties I had gluing it, but I chugged along! At this point I decided to try on all my finished pieces together.
At this point I kinda forgot to take progress pictures, so theres a big jump, sorry! After the chest I built the belt, thighs, shins, and boots. I had gotten used to the workflow so progress went along smoothly, I also upgraded from the garage to the basement! Once that was done I returned to the visor. For this version I tried spray painting it with tamiya TS-73 Clear orange, then a light misting of gold spray paint, I'd say this worked pretty well!
I was finally at the point where I was ready to paint. Because I was on a strict time schedule of finishing this before September (it was late August at this point), I decided to skip the filling and sanding of the rest of the parts. I know I should've done this and I hope to make a much more detailed suit sometime in the near future! I followed the same process for painting the rest of the parts. Plastidip, olive drab, details, dirt, then scratches.
At last, time to put it all on! Obligatory hero pose : )
If I was to do anything differently with this suit It would ultimately boil down to two things: being more careful, and getting a 3D printer. There were a lot of places (such as the legs) where the scaling is kinda off, I don't think it takes too much away from the finished product however I can still improve on that front. As I mentioned before, for my next build I won't skip the filling and sanding, and I plan on using contact cement to minimize gaps, as hot glue is a little old fashioned lol. I also want to get a 3D printer so I can make more detailed components, as well as make a mold for a vacuum formed visor, any recommendations on printers?
Overall I thoroughly enjoyed building this suit, and I'm currently doing an overhaul of it. So far I've made a much better visor, and am planning on making a proper undersuit rather than black clothing, so stay tuned! Thanks for reading!
Attachments
-
 64767205297__CD351E26-CE64-4A4C-8471-9E33A117D5BA 3.jpg2.1 MB · Views: 61
 -
 IMG_3700 3.jpg2.1 MB · Views: 54
 -
 IMG_3727 3.jpg1.7 MB · Views: 46
 -
 IMG_3779 3.jpg2.9 MB · Views: 55
 -
 IMG_3798 3.jpg2.4 MB · Views: 54
 -
 IMG_3829.jpg2.4 MB · Views: 53
 -
 IMG_3861 3.jpg2.2 MB · Views: 58
 -
 IMG_3862 3.jpg2.4 MB · Views: 56
 -
 IMG_3875 3.jpg2.3 MB · Views: 60
 -
 IMG_3888 3.jpg2.5 MB · Views: 61
 -
 IMG_3911.jpg2.7 MB · Views: 55
 -
 IMG_3933 3.jpg1.6 MB · Views: 62
 -
 IMG_3938 3.jpg3.1 MB · Views: 57
 -
 IMG_3992.jpg2.7 MB · Views: 58
 -
 IMG_3994 3.jpg2.5 MB · Views: 58
 -
 IMG_4021 3.jpg2.7 MB · Views: 57
 -
 IMG_4023 3.jpg2.5 MB · Views: 50
 -
 IMG_4037 3.jpg2.3 MB · Views: 50
 -
 IMG_4049 3.jpg2.3 MB · Views: 60
 -
 IMG_4055 3.jpg3 MB · Views: 51
 -
 IMG_4075 3.jpg2.5 MB · Views: 55
 -
 IMG_4076 3.jpg2.3 MB · Views: 45
 -
 IMG_4077 3.jpg2.5 MB · Views: 53
 -
 IMG_4078 3.jpg2.8 MB · Views: 66
 -
 IMG_4138 3.jpg491.9 KB · Views: 61
Last edited: