The Helmet
Okay, so I printed this sometime ago, but wanted to say a few things about the process leading up to and after the printing.
Complications ")
When I first started printing the helmet from NerdForgeDesigns, I had chosen not to resize the helmet. After printing half of it out, I realized that it was going to be absolutely massive on me, so I started over. I measured my head using some methods I learned on here combined with 3D Builder to make my head (I use the armory now). This was a royal pain, but technically worked fine. The operator helmet is a smaller helmet than a lot of the other helmets in Halo Reach, so I sized it to just fit my head through the bottom opening. After the new helmet pieces were printed, I realized that my head would not fit through the neck seal, which I had printed at a later point (oof). I have it connected through Velcro right now so that I can put the helmet on and reattach it, but I think I'll be swapping to elastic so that I can just stretch it as needed and have it hug the helmet again.
Definitely an amateur mistake, but during the last of my helmet print I ran out of filament. I thought that the Ender 5 Pro would
automatically stop when the filament ran out, but boy howdy was I wrong. To correct this, I made some adjustments to the helmet file and split it at the exact point where the print ended and then reprinted that piece. Of course, my measurement was off by just the smallest amount, but I will be sanding/cutting it until it fits proper... or I'll just splice and reprint again.
When joining the parts together, I tried to use super glue. It seemed to go pretty well, so I just rolled with that for the upper half of the helmet. After a day, I tested the strength and found that it just came apart immediately. So then I thought "Gorilla Glue must be the answer!" Short answer: No, no it was not. After Gorilla gluing the helmet together, I found that it held together pretty well. Little did I know that I had it all over my hands without noticing. While handling the helmet, I got glue all over the outside of it, but I couldn't tell until it was dry. I washed my hands and waited a few hours where I thought "It has to be dry by now... I'm gonna put it on." Bad idea. Very, very bad idea. So, then I spent my evening cleansing my hair of the gorilla, wondering if it would be a part of me forever. Thankfully, it came out after using lots of alcohol to deactivate the glue (thanks internet). I then decided to look on YouTube for recommendations to join prints together (yeah, I probably should have done that before attempting it with every glue in the drawer) where I found that plastic welding using a soldering iron can be done on the inside of the helmet. I then joined the pieces using that method and got the final result.
Aftermath
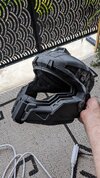
So I got my helmet all welded up and then had what is shown below (you can still see the glue
). I still don't have the chunk in the back, but it is printed and ready to be cut to length. Some of the pieces were slightly off (specifically the jaw piece), since I did not have anyone to help me hold them when I welded them at the time. But I did minimal welds so that I could disconnect them later when I do have a helping hand.
Overall, this print has been a learning experience, but I'm happy with how it turned out.
Next up will be the forearms because I go in weird orders, lol.
Edit: The attachments will actually be next... since I already have those printed out.