IMP3RIOUS
New Member
Hey all, new guy here from the UK! I started this build a few years ago, but after a few health scares i never got to finish it, so only recently picked it back up again and actually looking forward to making some progress with it now! So i'll give you the run down
I have no background in making anything like this, so just kind of making it up as i go along with the help of all the resources available
So this is the beginning of my first ever build! I've always loved the ODST and been following a number of peoples builds on the 405th Facebook group for a while now so decided this is the route i wanted to go down for my first ever build. My idea/plan is to do the full armour set but starting with the helmet.
After looking at a number of different files available online, I decided to purchased the BrinkStudio Halo 3 ODST files for my build!
I own a Ender 3 V2 Neo Printer, and as you guys know, the bed size is rather small, and there was very little files online for broken up models to print on smaller beds and i didn't want to have to go down the MeshMixer route. I know the basics of Fusion360, so i decided this is where i would convert a mesh to solid, and then break up the helmet into 9 pieces and glue together to begin with!
So, here's how i stared, by breaking up the helmet into 8 pieces in Fusion360. Before i knew about ArmourSmith, i decided to measure my head, make a sphere in Fusion360 and then size the helmet based on that!
So below is my broke up model and how i planned to print the pieces.


PRINTING
So, i decided to slice my files in Cura, using a 0.6 printing nozzle, 0.25 layer height with 15% infill with some tree supports for some places, brim bed adhesion , printing with PLA+ at 100mm/s. Each part was roughly take between 10/15 hours to print, and over the course of 8 days i began to slowly get all the pieces printed for my helmet!


Test printed a visor to see what route i wanted to go down with the visor!


I will try vacuum forming my own one at some point, but for the time being, on ETSY i found a seller called ReconService in Italy.
Giulio has been very helpful. When my first visor turned up (and i can appreciate that dying a visor probably isn't the easiest of tasks to do! The first visor was covered in a fair amount of dye spots, which he was very quick to admit and get a replacement visor sent out for me! So top notch service from ReconServices!
I placed my 3D printed visor over the top of the vacuum formed one, drew out a trimming line and trimmed out my visor for the helmet!


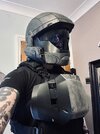
The fit was spot on for my build and the fit is very snug and nice. Visibility is good and overall very happy with the outcome!
(Nothing is currently fixed in place as i still need to prep the helmet, fill in the seam build lines, sand and paint) So everything is currently loose fitted.
INTERIOR
So, padding out the helmet.
I searched online for a number of hours, from other peoples builds, to helmet linings, and eventually came up with my own plan.
I found a helmet lining that looked like it would fit real nice! I liked the way the cheek pads were angled and i thought this would work nice with the visor alignment!
I also purchased an number of other basic padding for the helmet. I have attached them loosely for the time being but overall this plan seems to/will work really nicely for the route i'm going down with padding out the helmet.
(LINK TO HELMET LINER IS ANYONES INTERESTED)

.png")

AND FIRST TEST FIT WITH PADDING TO MAKE SURE ALL WAS FITTING CORRECTLY


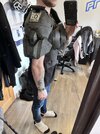
So next, while i am prepping the helmet and getting it ready for paint, i started the shins ans the thighs! These are currently all printed and sizing looks good. Used ArmorSmith for the sizing for everything apart from the helmet.


And that's basically where i am up too with this build!!! I'm currently printing the main central chest piece, i have the tactical vest on the way from AliExpress which ill use to mount everyone onto.
I work in the graphic design industry, so i've currently been going through the HaloWiki, and all other resources for references to aid with the build and making logos into vectors ready for printing on large format printers i have at work.

Thanks all for taking a look at my current build thread and looking forward to progressing and posting more
I have no background in making anything like this, so just kind of making it up as i go along with the help of all the resources available
So this is the beginning of my first ever build! I've always loved the ODST and been following a number of peoples builds on the 405th Facebook group for a while now so decided this is the route i wanted to go down for my first ever build. My idea/plan is to do the full armour set but starting with the helmet.
After looking at a number of different files available online, I decided to purchased the BrinkStudio Halo 3 ODST files for my build!
I own a Ender 3 V2 Neo Printer, and as you guys know, the bed size is rather small, and there was very little files online for broken up models to print on smaller beds and i didn't want to have to go down the MeshMixer route. I know the basics of Fusion360, so i decided this is where i would convert a mesh to solid, and then break up the helmet into 9 pieces and glue together to begin with!
So, here's how i stared, by breaking up the helmet into 8 pieces in Fusion360. Before i knew about ArmourSmith, i decided to measure my head, make a sphere in Fusion360 and then size the helmet based on that!
So below is my broke up model and how i planned to print the pieces.
PRINTING
So, i decided to slice my files in Cura, using a 0.6 printing nozzle, 0.25 layer height with 15% infill with some tree supports for some places, brim bed adhesion , printing with PLA+ at 100mm/s. Each part was roughly take between 10/15 hours to print, and over the course of 8 days i began to slowly get all the pieces printed for my helmet!
Test printed a visor to see what route i wanted to go down with the visor!
I will try vacuum forming my own one at some point, but for the time being, on ETSY i found a seller called ReconService in Italy.
Giulio has been very helpful. When my first visor turned up (and i can appreciate that dying a visor probably isn't the easiest of tasks to do! The first visor was covered in a fair amount of dye spots, which he was very quick to admit and get a replacement visor sent out for me! So top notch service from ReconServices!
I placed my 3D printed visor over the top of the vacuum formed one, drew out a trimming line and trimmed out my visor for the helmet!
The fit was spot on for my build and the fit is very snug and nice. Visibility is good and overall very happy with the outcome!
(Nothing is currently fixed in place as i still need to prep the helmet, fill in the seam build lines, sand and paint) So everything is currently loose fitted.
INTERIOR
So, padding out the helmet.
I searched online for a number of hours, from other peoples builds, to helmet linings, and eventually came up with my own plan.
I found a helmet lining that looked like it would fit real nice! I liked the way the cheek pads were angled and i thought this would work nice with the visor alignment!
I also purchased an number of other basic padding for the helmet. I have attached them loosely for the time being but overall this plan seems to/will work really nicely for the route i'm going down with padding out the helmet.
(LINK TO HELMET LINER IS ANYONES INTERESTED)
ONeal Helmet Liner Kit Cheek Pads Brand New Sierra 2 Series 3 Series O Neal | eBay
Race & Sports Boots. Chest Protectors. New Arrivals. All goods are subject to availability. Back Protectors. Motocross Jerseys. Armoured Vests. Armoured Shirts.
www.ebay.co.uk
AND FIRST TEST FIT WITH PADDING TO MAKE SURE ALL WAS FITTING CORRECTLY
So next, while i am prepping the helmet and getting it ready for paint, i started the shins ans the thighs! These are currently all printed and sizing looks good. Used ArmorSmith for the sizing for everything apart from the helmet.
And that's basically where i am up too with this build!!! I'm currently printing the main central chest piece, i have the tactical vest on the way from AliExpress which ill use to mount everyone onto.
I work in the graphic design industry, so i've currently been going through the HaloWiki, and all other resources for references to aid with the build and making logos into vectors ready for printing on large format printers i have at work.
Thanks all for taking a look at my current build thread and looking forward to progressing and posting more