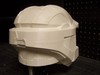
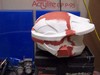
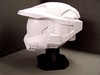
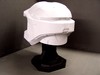
I had my good friend Calladar print it out for me. It is PLA. He didn't do any cleanup. I'll do that when I get it, hopefully tomorrow. But from what he said, it is very clean. I'm sure I'll use some filler putty, and high build primer, and get it perfectly smooth.
You are using an out of date browser. It may not display this or other websites correctly.
You should upgrade or use an alternative browser.
You should upgrade or use an alternative browser.
JUSTINIAN's Mark VI
- Thread starter JUSTINIAN 117
- Start date
- Status
- Not open for further replies.
Thanks. This is turning into an insane speedbuild. I hope I can pull it off.
I've been in the same boat as you since I first saw foam builds. They do go together fast, and are very comfortable. But I have had painting issues since I first started doing tests a month ago. From what I can tell, higher quality paints work very bad, and cheap quality paints work ok. They are more for temporary builds, compared to fiberglass builds which last a very long time. I probably won't do another foam build, as the finished quality just doesn't quite cut it, for the quality I want. But in a pinch, like I am in, they will work very well.
On to build the next parts...
Have you seen xRobots method for plastic coating foam? I've given it a try and it shows promise, though you have to sacrifice some of the flexibility of the foam to take advantage of it, or at least be very conscience of it so you don't crack your butt plate when you sit down or something haha.
It basically involves foaming a piece, and then covering it in PVA glue (regular old elmers glue). Once it dries, you can put some smooth cast on it and slush the outside of the piece. The plastic won't stick to the foam itself, but the PVA gives it a substrate to hook onto. Then you sand it down and can finish it like you would any other plastic part. I tried on a boot I was messing with, got mixed results. It's a TON of work.
I think hybrid foam/fiberglass is the way to go myself. Foam for pieces like the cod and boots, maybe the thighs so you can sit etc easily.
On my previous suit I did the plasti-dip method on my boots only- it does work pretty well, but you need liberal amounts of plasti-dip. It does have a little elasticity to it so if you bend a piece while wearing it you may not ruin it, but it might cause a seam or bend mark to appear in the finish.
Good luck! Loving that helmet too.
OH, Keep your eyes open for Volpin Props and his Needler (it is BEAUTIFUL)! He's said he wants people in Halo costumes to pose with it and your suit(s) would look snazzy
")
^^^^^ What Revenant said.
I can't recommend James Bruton's site enough to people, he's a wizard at what he does. www.xrobots.co.uk
I was also wondering which low-def file you have based you're chest piece on, can you provide a link?
Keep it up, it's looking astonishing.
I can't recommend James Bruton's site enough to people, he's a wizard at what he does. www.xrobots.co.uk
I was also wondering which low-def file you have based you're chest piece on, can you provide a link?
Keep it up, it's looking astonishing.
Thanks. I feel pretty insane for attempting this build with only 2 weeks left.Wow man this is just insane
Have you seen xRobots method for plastic coating foam? I've given it a try and it shows promise, though you have to sacrifice some of the flexibility of the foam to take advantage of it, or at least be very conscience of it so you don't crack your butt plate when you sit down or something haha.
It basically involves foaming a piece, and then covering it in PVA glue (regular old elmers glue). Once it dries, you can put some smooth cast on it and slush the outside of the piece. The plastic won't stick to the foam itself, but the PVA gives it a substrate to hook onto. Then you sand it down and can finish it like you would any other plastic part. I tried on a boot I was messing with, got mixed results. It's a TON of work.
I think hybrid foam/fiberglass is the way to go myself. Foam for pieces like the cod and boots, maybe the thighs so you can sit etc easily.
On my previous suit I did the plasti-dip method on my boots only- it does work pretty well, but you need liberal amounts of plasti-dip. It does have a little elasticity to it so if you bend a piece while wearing it you may not ruin it, but it might cause a seam or bend mark to appear in the finish.
Good luck! Loving that helmet too.
OH, Keep your eyes open for Volpin Props and his Needler (it is BEAUTIFUL)! He's said he wants people in Halo costumes to pose with it and your suit(s) would look snazzy
Thank you both. I have seen his stuff. I have done some tests with it. It is a very tedious process, and there are just too many fine details in spartan armor to do it effectively. But I did figure out that you can do it to the inside of parts, and not have to worry about sanding. Some of my parts need to be reinforced to hold their shape properly, and this does the trick.^^^^^ What Revenant said.
I can't recommend James Bruton's site enough to people, he's a wizard at what he does. www.xrobots.co.uk
I was also wondering which low-def file you have based you're chest piece on, can you provide a link?
Keep it up, it's looking astonishing.
I will have to find Volpin at Dragon Con. I would love to see his stuff in person.
Update again.
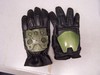
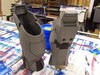
Last night I got the forearms done. And can I say that I absolutely hate doing the forearms on any build. It took me about 5 hours to do just these.
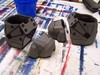
This morning I did some tests with my paint. And I think I got it down pretty good. I will be using the same paint from my last suit. And with a little weathering, it completely changes the color to be what I need. The left one is just an extra FUD hand plate I had laying around, the right one is from my last suit, unweathered.
Let me know what you think.
Attachments
Whats with these 2 week builds lately and it took me about 5 hours to do the forearms also, I think they were the hardest part to build on the whole foam MKVI, also I wouldn't worry about smoothing everything out so perfect, as long as you have clean cut lines and you weather the armor good, you won't notice any unsmooth areas on the foam unless your going for the glossy look, when you look at my Busa suit you can't see rough spots and its white with no battle damage
and it took me about 5 hours to do the forearms also, I think they were the hardest part to build on the whole foam MKVI, also I wouldn't worry about smoothing everything out so perfect, as long as you have clean cut lines and you weather the armor good, you won't notice any unsmooth areas on the foam unless your going for the glossy look, when you look at my Busa suit you can't see rough spots and its white with no battle damagei dont believe the laser can i worked with a similar one when i worked at a weapon stock manufacturing plant they dont cut angles
It does not cut the angles. I still have to do those by hand.it may be able to create angles by burning out extra material
I'm glad I wasn't the only one. I do like how the weathering can cover any imperfections.Whats with these 2 week builds lately
Thank you.Everything looks crazy awesome, especially the helmet!
Not a huge update. I didn't get a chance to work on this at all this weekend.
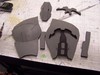
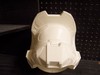
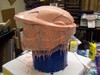
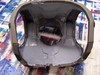
Today I go the helmet in. And it looks absolutely amazing.
I did some minor cleanup around the edges, and super glued the parts together. They fit very well.
There were a few small gaps along the seams, so I did some rondo to help fill them in.
Then I did a coat of filler along the seams, and any spots that were kind of rough.
I was hoping to be able to get it sanded and put into primer tonight, but it is way too late. So I'm going to bed. I'll get more done in the morning.... well a few hours at this point.
Thanks for looking.
Attachments
-
 102_4028_zps7d77ac46.jpg90.6 KB · Views: 150
 -
 102_4026_zpsddcb2dec.jpg113.3 KB · Views: 159
 -
 102_4033_zpsf7400592.jpg44.8 KB · Views: 150
 -
 102_4031_zps53a9b844.jpg94.6 KB · Views: 157
 -
 102_4029_zpsca3932ff.jpg91.4 KB · Views: 139
 -
 102_4027_zps696caa84.jpg76.8 KB · Views: 138
 -
 102_4030_zpse45a8847.jpg80.3 KB · Views: 147
 -
 102_4034_zps278743f7.jpg101.2 KB · Views: 137
Are you going to do anything to reinforce the printed parts? Just curious- I was following Shawn's Iron Man build and saw on his blog that his printed helmet didn't hold up to the molding process because it was somewhat brittle and thin. Not sure if you had similar plans or not.
Looks great either way!
Looks great either way!
That helmet looks really good
I did some rondo to fill in the gaps between the seams. Then I did a slush coat of smooth cast. It really strengthened it well. I accidentally dropped while sanding, and nothing happened.Are you going to do anything to reinforce the printed parts? Just curious- I was following Shawn's Iron Man build and saw on his blog that his printed helmet didn't hold up to the molding process because it was somewhat brittle and thin. Not sure if you had similar plans or not.
Looks great either way!
Thank you.That helmet looks really good
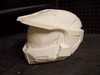
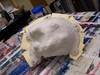
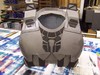
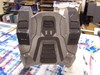
Update time. I spent the last 3 days non stop sanding this bad boy down. It looks absolutely fantastic!
I'll let it dry overnight, and then in the morning the molding begins.....
Attachments

Thank you.That helmet is stunning, it's like it came right out of the game!
I will be doing a double layer visor. Down the road I may even do a vac formed version.that is amazing, i gotta say, if the visor comes out looking nice like the rest of this, then this will be the best build ever, the second one is that red suit that looked exactly like the halo 2 model
I have also reinforced it with smooth cast. It is very sturdy right now. I dropped it while I was sanding it, and nothing happened. But this is just my master. Once the mold is finished, it will go in storage for safe keeping.It looks really nice, but be very careful with it. Rondo is brittle, PLA is WAY more brittle. I've had fairly solid PLA prints snap in half from regular handling, I'd hate to see such a nice cleanup job get cracked!
Thank you.Amazing!!! That helmet is just....beautiful...*clap clap clap*
Not a huge update, but I started the first layer of silicone this morning. Hopefully by the end of the weekend it will be finished.
A friend of mine is a 3D modeler. He set it up for me.How did you get the helmet into 3d printable format? I'd like to print one, that looks great.
Big update from this weekend.
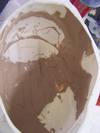
I spent the rest of the week working on the mold for the helmet. Here is the print layer of Rebound 25.
After multiple coats, the thickness is starting to build up.
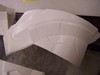
Here it is with the support shell done.
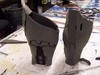
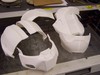
I also got some boot made.
And some shins.
I also used some resin to strengthen some of the parts.
And the chest is now fully detailed.
Sealing and painting comes later today. Only 3 days left to get this thing finished....
Attachments
-
 102_4039_zps5c6589fe.jpg133.1 KB · Views: 138
 -
 102_4041_zps9a3404c9.jpg126.6 KB · Views: 143
 -
 102_4042_zps1f778b95.jpg168.8 KB · Views: 151
 -
 102_4046_zps8b1cfa0b.jpg182.5 KB · Views: 145
 -
 102_4047_zps281d7089.jpg186.5 KB · Views: 134
 -
 102_4043_zpsebe0f78d.jpg135.7 KB · Views: 139
 -
 102_4044_zps84adf884.jpg182.9 KB · Views: 129
 -
 102_4045_zpse9d38f46.jpg122.4 KB · Views: 130
- Status
- Not open for further replies.
Similar threads
- Replies
- 3
- Views
- 266
- Replies
- 1
- Views
- 284
- Replies
- 9
- Views
- 453
- Replies
- 13
- Views
- 952
Similar threads
- Replies
- 3
- Views
- 266
- Replies
- 13
- Views
- 952
- Replies
- 4
- Views
- 413