- Member DIN
- S226
TABLE OF CONTENTS:
Post 1: Foamsmithing
Post 2: Sealing
Post 3: BDU and other bits
Post 4: Hemming BDU and finishing foamwork
Post 5: Fixing textured Leakseal with acrylic
Post 6: Painting part 1
Post 7: Painting part 2 and final details
Post 8: Final build photos
Hello, been awhile friends! Welcome to KaeSpoon’s Marine build thread!
This has been a build in progress since January that I never got around to making a thread for. It was originally planned to be due by HCS Charlotte, but I ran out of time and took a break.
Why the marine? Wasn’t I already building a Spartan?
Some health issues have resulted in a long pause on the Spartan build, so I picked a marine because I thought it would be “easier” to make and fit. It was also a build that would allow me to participate in 405th events while my Spartan is still a work in progress/on hold.
 Mockup and fitting
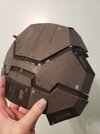
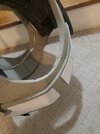
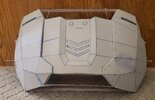
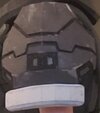
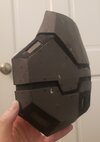
Shoulder


Wish I had more photos of the build progress, this shoulder was a tough and tedious one! You can tell I went a little nuts on the foam clay afterwards, something I'm working on NOT doing. The bolts of the shoulder will be 3d printed.
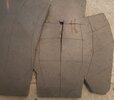
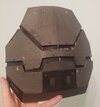
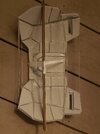
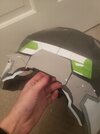
Chest


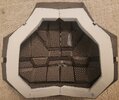
Paper and cardboard holders to keep the foam in the correct shape (using measurements) while I hot glue and shoegoo.
I ended up restarting the chest after this progress due to being unhappy with it and thinking it might be too small.


Doing the same thing with the paper and cardboard as above!


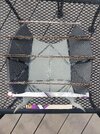
Test gasket with sample upper and lower strapping. I went into Blender and modeled my own gasket and then transferred it into a pattern. Lower strapping and details for that done and then the permanent gasket was installed! All that planning sometimes leads to battle scars...")


Scarring the backplate picked up thanks to the hot glue I used to hold the temporary straps, thankfully foam clay exists and the damaged areas will get covered up anyway! Don't be afraid to use foam clay to save your sanity. I did the backplate details by freehanding a pattern on tape and then using 2mm foam in layers.


An example of how I freehanded some details using painter's tape, tedious and took a few tries but it was worth it!


More details...


STOP. COLLAR TIME. I made it in two parts so it could be magnetic!

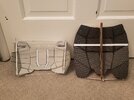
Size comparison between my first Marine's (LA) Lower belt and my newer one.

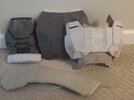
Quick builds of the thigh UA's for the marine, these patterns were made by me. I am not very pleased with how they turned out, but they are good enough for now and I will remake them from the armory files at some point.

Test fit and finishing touches with foam clay, fixing a few seams and imperfections. I was pretty nervous at this stage, things were looking messy and not as clean as I'd hope; but sometimes things can look grim but end up turning out okay at the end.
I made the chest in a span of 5 weeks, but at the cost of extreme burnout and months without touching foam afterwards. Pace yourself friends!
Continuation below....
Post 1: Foamsmithing
Post 2: Sealing
Post 3: BDU and other bits
Post 4: Hemming BDU and finishing foamwork
Post 5: Fixing textured Leakseal with acrylic
Post 6: Painting part 1
Post 7: Painting part 2 and final details
Post 8: Final build photos
Hello, been awhile friends! Welcome to KaeSpoon’s Marine build thread!
This has been a build in progress since January that I never got around to making a thread for. It was originally planned to be due by HCS Charlotte, but I ran out of time and took a break.
Why the marine? Wasn’t I already building a Spartan?
Some health issues have resulted in a long pause on the Spartan build, so I picked a marine because I thought it would be “easier” to make and fit. It was also a build that would allow me to participate in 405th events while my Spartan is still a work in progress/on hold.
Shoulder
Wish I had more photos of the build progress, this shoulder was a tough and tedious one! You can tell I went a little nuts on the foam clay afterwards, something I'm working on NOT doing. The bolts of the shoulder will be 3d printed.
Chest
Paper and cardboard holders to keep the foam in the correct shape (using measurements) while I hot glue and shoegoo.
I ended up restarting the chest after this progress due to being unhappy with it and thinking it might be too small.
Doing the same thing with the paper and cardboard as above!
Test gasket with sample upper and lower strapping. I went into Blender and modeled my own gasket and then transferred it into a pattern. Lower strapping and details for that done and then the permanent gasket was installed! All that planning sometimes leads to battle scars...
Scarring the backplate picked up thanks to the hot glue I used to hold the temporary straps, thankfully foam clay exists and the damaged areas will get covered up anyway! Don't be afraid to use foam clay to save your sanity. I did the backplate details by freehanding a pattern on tape and then using 2mm foam in layers.
An example of how I freehanded some details using painter's tape, tedious and took a few tries but it was worth it!
More details...
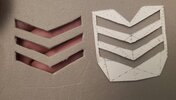
STOP. COLLAR TIME. I made it in two parts so it could be magnetic!
Size comparison between my first Marine's (LA) Lower belt and my newer one.
Quick builds of the thigh UA's for the marine, these patterns were made by me. I am not very pleased with how they turned out, but they are good enough for now and I will remake them from the armory files at some point.
Test fit and finishing touches with foam clay, fixing a few seams and imperfections. I was pretty nervous at this stage, things were looking messy and not as clean as I'd hope; but sometimes things can look grim but end up turning out okay at the end.
I made the chest in a span of 5 weeks, but at the cost of extreme burnout and months without touching foam afterwards. Pace yourself friends!
Continuation below....
Attachments
-
 20230111_215931.jpg1.1 MB · Views: 65
 -
 20230121_125554.jpg1.8 MB · Views: 58
 -
 20230125_224005.jpg3.4 MB · Views: 63
 -
 20230127_213716.jpg992.5 KB · Views: 66
 -
 20230130_190126.jpg1.3 MB · Views: 58
 -
 20230131_152557.jpg1.3 MB · Views: 70
 -
 20230113_014153.jpg2.4 MB · Views: 61
 -
 20230113_014416.jpg1.3 MB · Views: 58
 -
 20230113_014402.jpg1.1 MB · Views: 60
 -
 20230628_162816.jpg26.9 KB · Views: 59
 -
 20230120_155018.jpg1.6 MB · Views: 55
 -
 20230120_184415.jpg1.2 MB · Views: 66
 -
 20230121_151901.jpg2.7 MB · Views: 55
 -
 20230123_151356.jpg2.8 MB · Views: 58
 -
 20230121_151901.jpg2.7 MB · Views: 60
 -
 20230628_162816.jpg26.9 KB · Views: 65
 -
 20230113_014402.jpg1.1 MB · Views: 68
 -
 20230201_183526.jpg1.1 MB · Views: 55
 -
 20230131_152557.jpg1.3 MB · Views: 75
Last edited: