M6G Magnum - Reach - WIP

Rez3D

New Member
Hey everyone,

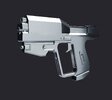
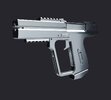
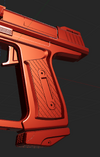
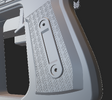
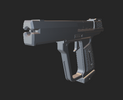
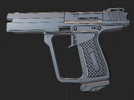
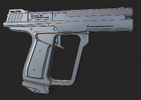
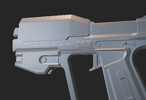
I've been working on a highly detailed and accurate version of the M6G from Reach.

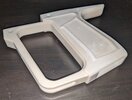
I do want to have some partial functionality like removing the attachments/mag.

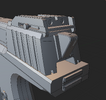
I also have some ideas to make variations of parts to swap in or out such as different grip patterns/barrel details/trigger guard

Ultimately I intend to build some myself and perhaps sell the stl depending on feedback and how my test prints go.

Thanks for viewing!
 

Attachments

  • m6g3.jpg
    m6g3.jpg
    65.9 KB · Views: 59
  • m6g4.jpg
    m6g4.jpg
    60.5 KB · Views: 60
Thanks for the positive reception so far guys! Your interest will help me steer the project and motivate me to get it over the finish line.

Other cool ideas I'll file under stretch goals-
  • A holster of sorts so the prop can be attached to peoples suits.
  • Display stand for when not being handled and in the home.
I also want to take a moment to clarify that all my designs are made from scratch and I do not use ripped models from the games, as someone who may seek employment in the game industry in the future that would be a big no no for me.
 
happy new year!

So I spent some time rebuilding the base shape to the rear of the slide with more complex geometry.
Notice the subtle curvature on the sides and rear. This is how to take a design from cybertruck to porsche. The effect this has to make it easier on the eye and more natural and allows you to depart from overly blocky designs. I thought i'd try it on this section as a small experiment and I like the result a lot.

I've then made the rear sight so that it would function, The sight block can be loosened and slide up and down to zero it at different distances.

I'm currently reworking the lower receiver to correctly capture the harsher chamfers on the back of the grip.
 

Attachments

  • m6g-rearslide1.png
    m6g-rearslide1.png
    555.2 KB · Views: 40
  • m6g-sight-b.png
    m6g-sight-b.png
    421.7 KB · Views: 39
That's a fantastic amount of detail and I love it!!
One thing that I've learned with modeling for 3d printing. Make sure your mindful of how a slicer is going to process your slight curvature for your printer. The way you've done it there will print nicely, but if you do a long gradual change over a large vertical distance, your slicer software is going to turn that into 3 or 4 steps over a long distance and you'll end up with a jagged plane that needs a lot of filling to look smooth.
 
Thanks for your comment!
I have some experience with 3D printers but not so much in terms of filling/sanding props.
But you are absolutely correct, I recognise this will be a torture test for an older FDM printer, I don't think i'd be able to print it on mine at all well. I do also have a resin printer and then the problems of the smaller print bed become an issue and I'd have to cut the model into smaller pieces. A hybrid of the two may work for me but then will not be possible for many people. Many things to consider and balance here...

My current mindset is leaning towards making a higher detail and more difficult to print model because other models already exist and have been available for a while/technology has advanced. So if i'm taking the time to make a version now, it has to raise the bar. Once I have a master model I could merge and simplify components to better suit printing in FDM.
ahhh. That makes sense!!

Edit:

I can’t wait to see how it turns out!
 
I remodelled the rear of the grip to capture that stronger chamfer and have the surfaces blend into each other nicely.

It's not 100% perfect in the sense that it would need to be better if it was on a production car or something but for a model to be 3D printed it is top notch and would take a pro 3D artist to spot small surfacing inconsistencies.

This is all made using Plasticity 3D and I've only had it for a month so I'm happy with the results and would recommend the program over fusion 360, it's also far far cheaper.

Thanks for viewing and please watch this thread / leave a comment.
 

Attachments

  • m6g-gripcham.png
    m6g-gripcham.png
    309.9 KB · Views: 31
A closer look at the grip geometry (nike tick like swoosh), this is the hardest element to model accurately on this asset. I haven't seen a good recreation of this on other models and i'm not surprised, I've attempted it a couple of times and I'm still not happy with it.

Also pictured, you can see some trigger details coming together and the guard has had some finessing.
 

Attachments

  • grip-swoosh.png
    grip-swoosh.png
    399.1 KB · Views: 38
quick update showing grip panel, i was going to make some variations on the patterns as the one in game is kinda limited from low resolution.
I havent been modelling the fasteners anywhere on the asset as i had been toying with the idea of using actual real metal ones as well as providing a printed solution.
 

Attachments

  • m6g-swoosh.png
    m6g-swoosh.png
    694.9 KB · Views: 35
I'm trying some different barrel designs,From left to right as rendered.
the first was how I initially thought the barrel was in the game asset and then extruded for a quick reference to the rest of the model. I really like how this made a cut along the length of the barrel.
Upon closer inspection the second included the off centre barrel and the chamfered side cuts as depicted in other magnum designs from other games, the third shows more detail in the curves modelled off of some better ref pictures. I actually preferred my initial design even though it departs from the game asset and original design. The other designs feel too busy even in this basic state. I will probably make two versions of the barrel, one more game accurate and my variant.
The other image shows an experiment with the grip pattern made from repeating the misriah armoury logo. I'm going to try inverting it so the logo pops out instead of recessed and see how that looks.
Thanks for viewing!
 

Attachments

  • m6g-barrel-ex.png
    m6g-barrel-ex.png
    681 KB · Views: 39
  • m6g-logogrip.png
    m6g-logogrip.png
    1 MB · Views: 37
Loving the model so far! Personally I like the first barrel more (on the left). Number three looks pretty cool too, but I think the first adheres to what I think of a magnum.
 
Loving the model so far! Personally I like the first barrel more (on the left). Number three looks pretty cool too, but I think the first adheres to what I think of a magnum.
Thanks for your input, I saw your comment after I already did some work on this but we must be on the same wave length because the new version of the barrel is a mix of the first and third designs. The barrel is now mostly integrated into the whole model and I have added the cut on the underside. Theres a slight overhang at the front which you only notice on the game asset under close inspection.
Also on top at the front I was thinking of making the forward iron sight.
 

Attachments

  • barrel4.png
    barrel4.png
    301.3 KB · Views: 31
First 2 images show added text elements as shallow engravings, I could maybe provide plain and engraved versions as these details would get lost on a FDM style 3D printer.
Added the rotating latch thingy, is it a firing mode selector or a safety?
Final image shows progress with rebuilding of the upper smart scope and adjusting some details on the lower attachment, are these both a part of the smart scope system?

So we are getting very close to the final design now, only a couple of major areas to finalise and I will have to start printing and physically seeing how things look and feel and function in reality to progress.

I may make another thread showing the build/paint as I think most users don't frequent this 3D modelling side of the forum.

Thanks for viewing!
 

Attachments

  • M6G-TEXT1.png
    M6G-TEXT1.png
    509.1 KB · Views: 30
  • M6GTEXT2.png
    M6GTEXT2.png
    488.7 KB · Views: 30
  • M6GATTACH1.png
    M6GATTACH1.png
    663.5 KB · Views: 27
Print test to see real life scale , printed in resin in 0.1mm layer height.

For me to get the scale of the weapon more correct I modeled the nato bullet casing as there is clear dimensions for that and then scaled everything else to be closer to that.

It happens to be the coldest it's been here in a decade so printing was a hassle, supports sort of failed and it warped, but still helpful to see how it feels in the hand. I suppose it would be advisable for anyone who makes one to print the handle first and scale it for what is comfortable for your hand.

This was also an opportunity to see how Plasticity3D handled the .STL export, which was good enough but topology looks somewhat janky in some areas, this doesn't negatively effect the print in a perceptible way.

To fit parts onto a smaller resin bed I have to cut parts up, increasing complexity/print time/potential failures. To counter this I will consolidate parts on the handle, so instead of having the grip texture inserts and fixture plates with metal screws I will make it into one seamless printed piece.
Next time i think i will print flat to the bed so it is less likely to warp in the cold.

I will keep posting my progress here for now, and then when it's more complete i'll show it off in a new thread.
 

Attachments

  • scaletest1.jpg
    scaletest1.jpg
    1.1 MB · Views: 30
This thread is more than 3 months old.

Your message may be considered spam for the following reasons:

  1. This thread hasn't been active in some time. A new post in this thread might not contribute constructively to this discussion after so long.
If you wish to reply despite these issues, check the box below before replying.
Be aware that malicious compliance may result in more severe penalties.
Back
Top