BHE Photos
New Member
I figured a good way to build up my 50 posts will be a build thread.
I have so far done a full Mando, Thor (Ragnarok), Shinra Security Guard, and am just finishing Soldier Boy. However I have always had my eyes on a set of MJOLNIR. Originally I wanted to go with the Achilles variant, but when Galactic Armory released their Mark IV set I knew it was the one for me. I downloaded the files and started printing them alongside my Soldier Boy parts (not a good idea to mix projects like that, but I'll never learn ).
).
So I'm not new to building armor, but this will easily be my most ambitious project yet. I'm hoping to have the build complete by C2E2, or Kitsune Kon (smaller Con in Green Bay, WI).
I'm currently undecided if I want to go with the Jerome/Red Team color scheme or do a full custom job. I'm leaning towards some kind of blue scheme, but will almost certainly change my mind at some point.
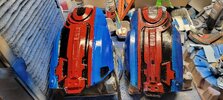
Printers being used: Ender 3 V2 Neo, Neptune 3 Max, Neptune 4 Plus, and Anycubic Photon X.
Some of the unique things I'd like to do is make the helmet lights more "fun" with some kind of projector or laser show for one of the lights alongside a regular flashlight option (could be fun at Convention raves).
As a photographer, I also plan to build in a camera mount to the right thigh to act as a holster for when walking around at Cons, though that may also require a custom case/cage for my camera (Lumix S5M2) to make it easily operable with the gloves (large on/off switch, large focus and shutter buttons, etc).
I'd also like to add a slot on the back of the hand plate thin enough to work with "tap to pay" for when spending way too much money for food and swag at Cons without having to worry about getting to my wallet. I'd also like to add a compartment somewhere for my phone and other stuff, since I don't plan on having any handlers.
Current progress as of Leap Day:
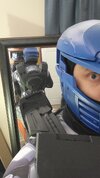
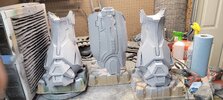
Below is the torso and helmet, as well as a rough fit check of the calf:

Next steps:
Still finishing up my Soldier Boy build for AMKE next weekend, but after I get back from that I intend to go full bore on the Mark IV.
I have so far done a full Mando, Thor (Ragnarok), Shinra Security Guard, and am just finishing Soldier Boy. However I have always had my eyes on a set of MJOLNIR. Originally I wanted to go with the Achilles variant, but when Galactic Armory released their Mark IV set I knew it was the one for me. I downloaded the files and started printing them alongside my Soldier Boy parts (not a good idea to mix projects like that, but I'll never learn
). So I'm not new to building armor, but this will easily be my most ambitious project yet. I'm hoping to have the build complete by C2E2, or Kitsune Kon (smaller Con in Green Bay, WI).
I'm currently undecided if I want to go with the Jerome/Red Team color scheme or do a full custom job. I'm leaning towards some kind of blue scheme, but will almost certainly change my mind at some point.
Printers being used: Ender 3 V2 Neo, Neptune 3 Max, Neptune 4 Plus, and Anycubic Photon X.
Some of the unique things I'd like to do is make the helmet lights more "fun" with some kind of projector or laser show for one of the lights alongside a regular flashlight option (could be fun at Convention raves).
As a photographer, I also plan to build in a camera mount to the right thigh to act as a holster for when walking around at Cons, though that may also require a custom case/cage for my camera (Lumix S5M2) to make it easily operable with the gloves (large on/off switch, large focus and shutter buttons, etc).
I'd also like to add a slot on the back of the hand plate thin enough to work with "tap to pay" for when spending way too much money for food and swag at Cons without having to worry about getting to my wallet. I'd also like to add a compartment somewhere for my phone and other stuff, since I don't plan on having any handlers.
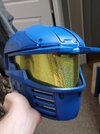
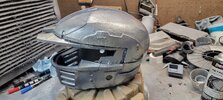
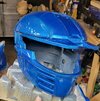
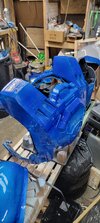
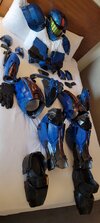
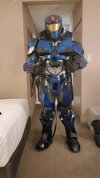
Current progress as of Leap Day:
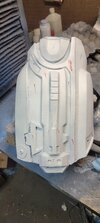
- Helmet: Printed and primed (even a couple coats of blue to test how I feel about it). Working on building my vacuum former so I can make the visor. Will add the ears and mouth mesh last once everything has been painted and electronics are in.
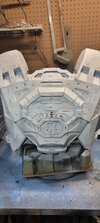
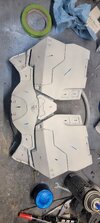
- Torso: Need to finish and attach the abdominal piece, but otherwise the front and back are primed and ready for paint. I am currently planning on having it be a 2-piece assembly, with the back having the shoulder straps and side straps, and will buckle the front plate to the them. Time will tell if I can make that work and look good. There's a slight possibility of needing to scale down the chest piece.
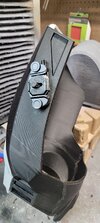
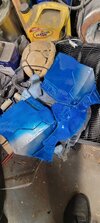
- Cod: All pieces but butt plate have been printed. My current intent is to cast the butt plate out of rubber or use EVA foam to make it flexible so I can sit while in the armor. I have mild scoliosis so standing for very long periods of time does not a happy Spartan make.
- Legs: I have all of the left leg parts printed, but I have to weld/glue them together to verify fitment. I suspect that the legs may need to be adjusted to be slightly shorter.
- Arms: Currently working on printing all of the left arm pieces.
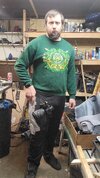
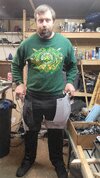
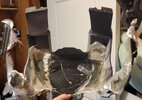
- Undersuit: Purchased a cheap Halloween body suit (shown below) from Amazon that has some "robot" designs to give a bit of "business" to my fitups, but eventually I'll definitely be doing some kind of EVA foam or rubber pieces to give it the proper bulky features.
- Weaponry: Currently have no started on any weapons, though I'll probably eventually go with the OG shotgun, AR, and pistol. I have tried printing the Halo 3 BR on my belt printer a few times but that thing is the most finnicky printer I've ever worked on and I could never go a full print without a hideous layer shift or spaghetti-fication.
Below is the torso and helmet, as well as a rough fit check of the calf:
Next steps:
- Vacuum former build is in progress, that will allow me to form the visor.
- Need to print the rest of the parts for the left arm.
Still finishing up my Soldier Boy build for AMKE next weekend, but after I get back from that I intend to go full bore on the Mark IV.