Zylenko
New Member
Link-
Shirt (this post)
Jacket - 1st Build - Miranda Keyes (Halo Series Uniform) | Halo Costume and Prop Maker Community - 405th
Jacket Panels and shoulders - 1st Build - Miranda Keyes (Halo Series Uniform) | Halo Costume and Prop Maker Community - 405th
Pants - 1st Build - Miranda Keyes (Halo Series Uniform) | Halo Costume and Prop Maker Community - 405th
Details - 1st Build - Miranda Keyes (Halo Series Uniform) | Page 2 | Halo Costume and Prop Maker Community - 405th
Final! - 1st Build - Miranda Keyes (Halo Series Uniform) | Page 2 | Halo Costume and Prop Maker Community - 405th
I think the costumes in the Halo series are a really cool, real world interpretation of the games! I really like how some look simple like Miranda's uniform, but when you start to break them down there is a lot of detail. I want to start a costume and I can't settle on an armor set, but the uniforms I think are very slick!
This is how I go through a process of making a costume. I don't have much skill making a pattern but I have some sneaky ways to get around that.
First, I went through some of the episodes from the show, taking screenshots anytime I saw a new angle of Miranda's costume. Same thing if a scene had a close up with a lot of detail or a distance shot that showed the over all look. Once I had enough I drew out what the layers are, what pieces I will need to make and the detail they will have.


Each colour on the drawing is a different layer of the costume. If it will be made with the same colour of fabric then it is on the same layer. This helps me figure out how much fabric I will need and breaks up the costume so I can single out where I need to start.
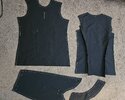
Starting with the under-shirt, I know I want a sleeve that fits fairly snug but isn't baggy and the mid section doesn't really matter. This is where I think I am clever. To start the pattern I look for something I already have in my closet. This sweater fits pretty much the way I want in the arms and the body is a comfy fit. Instead of dismantling it I manipulate around the seams of the piece I want on some mockup fabric. I can then add a seam allowance and sew it together to see how it fits and draw any alterations directly on the mockup.


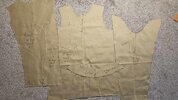
Once I was happy with it, I took it apart, cut off the seam allowance and labeled each piece with the amount I would need to cut out. The arrows tell me which way the pattern piece goes on the weave of the fabric.

Now I can make the shirt!
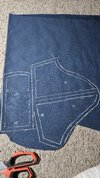
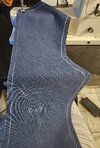
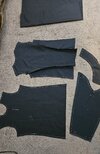
I went for a dark fabric (kinda blue in colour) and traced out all the pieces. When I buy the fabric it is always folded in half with the 'good' side on the inside. So for the pieces that are x2 I could just draw them once and cut them 2 at the same time. If you keep your seam allowance consistent then you don't need to worry about drawing the seam allowance on the folded half of the fabric.

The lines on the collar piece are reminders that I will have to cut in triangles so it will lay flat once folded inside out. Now let's put it all together!


I am happy with the fit! Now I will move onto the next part. What I am calling the Jacket.
Shirt (this post)
Jacket - 1st Build - Miranda Keyes (Halo Series Uniform) | Halo Costume and Prop Maker Community - 405th
Jacket Panels and shoulders - 1st Build - Miranda Keyes (Halo Series Uniform) | Halo Costume and Prop Maker Community - 405th
Pants - 1st Build - Miranda Keyes (Halo Series Uniform) | Halo Costume and Prop Maker Community - 405th
Details - 1st Build - Miranda Keyes (Halo Series Uniform) | Page 2 | Halo Costume and Prop Maker Community - 405th
Final! - 1st Build - Miranda Keyes (Halo Series Uniform) | Page 2 | Halo Costume and Prop Maker Community - 405th
I think the costumes in the Halo series are a really cool, real world interpretation of the games! I really like how some look simple like Miranda's uniform, but when you start to break them down there is a lot of detail. I want to start a costume and I can't settle on an armor set, but the uniforms I think are very slick!
This is how I go through a process of making a costume. I don't have much skill making a pattern but I have some sneaky ways to get around that.
First, I went through some of the episodes from the show, taking screenshots anytime I saw a new angle of Miranda's costume. Same thing if a scene had a close up with a lot of detail or a distance shot that showed the over all look. Once I had enough I drew out what the layers are, what pieces I will need to make and the detail they will have.
Each colour on the drawing is a different layer of the costume. If it will be made with the same colour of fabric then it is on the same layer. This helps me figure out how much fabric I will need and breaks up the costume so I can single out where I need to start.
Starting with the under-shirt, I know I want a sleeve that fits fairly snug but isn't baggy and the mid section doesn't really matter. This is where I think I am clever. To start the pattern I look for something I already have in my closet. This sweater fits pretty much the way I want in the arms and the body is a comfy fit. Instead of dismantling it I manipulate around the seams of the piece I want on some mockup fabric. I can then add a seam allowance and sew it together to see how it fits and draw any alterations directly on the mockup.
Once I was happy with it, I took it apart, cut off the seam allowance and labeled each piece with the amount I would need to cut out. The arrows tell me which way the pattern piece goes on the weave of the fabric.
Now I can make the shirt!
I went for a dark fabric (kinda blue in colour) and traced out all the pieces. When I buy the fabric it is always folded in half with the 'good' side on the inside. So for the pieces that are x2 I could just draw them once and cut them 2 at the same time. If you keep your seam allowance consistent then you don't need to worry about drawing the seam allowance on the folded half of the fabric.
The lines on the collar piece are reminders that I will have to cut in triangles so it will lay flat once folded inside out. Now let's put it all together!
I am happy with the fit! Now I will move onto the next part. What I am calling the Jacket.
Attachments
Last edited: