Multi-Gen Mojlnir armor overhaul (Pep and freehand)

lots of progress this weekend!
The helmet is done! Minus padding to protect my head and electronics that will come later.
20221008_153506.jpg
20221008_153510.jpg
20221008_153514.jpg
20221008_153520.jpg
20221008_153550.jpg
20221008_154603.jpg


From there I moved on to the forearms. And have 1 almost completed:
20221008_150906.jpg20221008_150920.jpg20221008_150856.jpg20221008_163612.jpg
20221010_072928.jpg
20221010_072851.jpg
20221010_072855.jpg


Well. that is all for now! back to being an adult and having a job. might get some mid-week progress. but this is all for now!
 

Attachments

  • 20221007_180711.jpg
    20221007_180711.jpg
    2.6 MB · Views: 74
So here is the Full Update:

I have finished the Cod Piece and the Forearms. The Cod Piece is a free-hand Foam build and uses the MK VI front and the Infinite Chief back.

I have also finished weathering the forearms. and got geared up a bit for Halloween.

20221029_122627.jpg20221029_122629.jpg20221029_131942.jpg20221029_145838.jpg20221029_155333.jpg20221029_155336.jpg20221029_155339.jpg20221029_155348.jpg20221029_183918.jpg20221029_183924.jpg20221029_183931.jpg20221029_183935.jpg20221029_183939.jpg
20221030_172104.jpg
20221030_172111.jpg
20221030_172117.jpg
20221030_172100.jpg
20221030_164959.jpg
20221030_164953.jpg
20221030_164911.jpg
20221030_164848.jpg


I also have some pictures of all 3 generations of my helmets. I am not as happy as I would like with the new helmet as it is too wide at the front, but it will work for a while. Might actually get to the grindstone and actually get a 3d printer.

But this is all for now. probably the last update for a while as this was my goal for the moment. the thighs and shins are probably next, but we will see how I feel.


20221101_075454.jpg
20221101_075500.jpg
 
Last edited:
Well, I am back again.

I know. A long time just for a tiny update but such is life.

I am back into the throws of costume work for some events at the end of the month and it means a little bit of rework on some worn-out armor.

Firstly I am going to be rebuilding my thigh pieces to better match the fit of my legs as I have aged and grown (rounder anyway.)

I am going to use the Halo Infinite model as my basis but I may freehand some extra details as I feel the urge.

Secondly, while I am happy with my skill growth with my newer MK IV helmet I still made a couple of mistakes that I just cannot get past in order to be comfortable wearing it as my full-time helm. (the front "jaw" of the helmet was a little smushed in the hardening process causing it to be significantly wider than it should be)

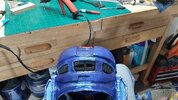
So as a stop-gap, I am finally doing a proper rebuild/repair of my FUD/Legends Helmet.

I made the grand mistake in 2014; my first time flying with my armor, of checking the Helmet with the rest of the suit. This caused some serious trauma to the helmet that required an unhealthy amount of hot glue, and spot painting. and ever since it has been on display in my office. (pictured in my previous post.)

well, I am going to reharden where necessary. and carve some EVA foam to fill in the rest of the gaps.

So on to the pictures so far:

First up the visor bil/shade/cap. This was nearly sheared of entirely but I have managed to save the majority of it and have begun the rehardening and filling:
20231003_073508.jpg


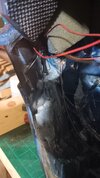
Next, the left side of the helmet received some blunt trauma and separated at the connection of the light mount and the Jawline. And there is another significant break on the top of the helm for the visor/cap/bill. underneath the light housing also sheared off so that will also be getting replaced.

20231003_073514.jpg


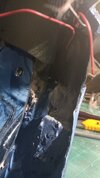
Finally, the entire back of the helmet had separated from a lack of fibers during the hardening process. This caused major breaks and cracks that ultimately required the total removal of the lower section of this part of the helm. This whole section will be replaced with foam. I have rehardened appropriately and included the necessary fibers to hopefully prevent this issue in the future.

20231003_073530.jpg
20231003_073535.jpg
20231003_073545.jpg


That concludes the Update thus far. Depending on how my schedule allows I may also replace the visor itself and form a new one that doesn't use 1/4 inch plexiglass.

I also needed to remove all of my wiring for the installed fans and lights so that may also make a reappearance for this thread when I reinstall those.
 
day 3 of helmet repairs.

I added some extra material to the repaired side of the visor as it appeared to be too thin for me. so now it better matches the other side.

20231004_172056.jpg


I have also started the foam repair work: Starting with the small detailing under the light housing.

20231004_173956.jpg


I know it is a small update but I am working on about a 1 - 2 hour availability of time for this during weekdays. Expect a larger update after the weekend.
 
day 3 of helmet repairs.

I added some extra material to the repaired side of the visor as it appeared to be too thin for me. so now it better matches the other side.

View attachment 336720

I have also started the foam repair work: Starting with the small detailing under the light housing.

View attachment 336721

I know it is a small update but I am working on about a 1 - 2 hour availability of time for this during weekdays. Expect a larger update after the weekend.
Aww man that sucks.
 
Aww man that sucks.
Such is life at 30, married, with a full-time job. I only have so many hours in the day and I cannot sacrifice my family for a hobby.

Not a really big deal though. I am making steady progress on my updates, I am just happy to be back working on the armor. I had gotten too busy over the last year to make anything else. so I am just enjoying the time.
 
Day 4:

All major repairs are completed on the helmet. I have yet to decide if I want to reinstall the old 1/4" plexiglass visor or form a new one.

I will also need to build out the new fan and light-wiring layouts as the old ones were held in by hope and a prayer.

I will probably get the blue paint on tonight and hopefully fully complete the helmet this weekend and get a jump on the new Thigh replacements.

Anyway here are the images:
20231005_183627.jpg
20231005_183642.jpg
20231005_183900.jpg
 
Day 5 She lives!

It was a long day on Saturday but I have the helmet back up to 100%.

I re-installed all the electronics (lights and fans) and rebuilt a new visor to replace the old one.

So without any further adieu. here she is:
20231008_122906.jpg
20231008_122917.jpg
20231008_122921.jpg
20231008_122930.jpg
20231008_122939.jpg


Here are all the remaining progress pictures from Saturday:

20231007_165618.jpg
20231007_151013.jpg
20231007_151002.jpg
20231007_165609.jpg
20231007_140003.jpg
20231007_140036.jpg
20231007_140008.jpg
20231007_185336.jpg
 

Attachments

  • 20231007_185357.jpg
    20231007_185357.jpg
    866.8 KB · Views: 38
  • 20231007_185401.jpg
    20231007_185401.jpg
    1.2 MB · Views: 35
Well, here I am again on a new part rebuild!

The old thigh pieces have seen their share of modifications over the years. and it is finally time to put them to bed.

MK I version:
DSC00730 (1).jpg


MK II Version:
DSC01776_zps34d35f84 (1).jpg


So I have begun the freehand foam build with the scaling corrections required to better fit my frame and to update the piece to be more accurately modeled to the games. (I am basing my build off of the Infinite Chief thighs.)

So I started with a small diagram of the part and cutouts so that I could begin the build process: rough measurements and then buildouts from there. I also have a couple of progress pictures of the work so far.
20231010_065754.jpg

20231010_201923.jpg
20231011_211045.jpg
20231016_192708.jpg


And that is all for now! I will post progress as it comes!
 
well, a bit of a bigger update today.

I am about 85% complete with the thigh rebuild. I made a great deal of progress yesterday and I have images to share so off we go!

The biggest item of note for today's update is the installation of my mounting system for various pistol props. I use decommissioned Hard Disk magnets and it creates a solid connection between my armor and the prop gun. I am able to shake and jerk about and even get bumped against and the prop won't fall from the mounting point. but at the same time, it is easy enough to reach down and grab at a moment's notice for a picture.

Enjoy the pictures:

20231019_184656.jpg

20231019_202743.jpg

20231019_202811.jpg
20231019_203735.jpg
20231019_215920.jpg
20231019_215932.jpg
20231019_215945.jpg
20231019_215956.jpg
 
Alright here is the big one!

The weekend update is here!

I made a lot of progress this weekend! Almost every single piece of the armor has been touched up in some way, from re-weathering in places to minor part replacements. The thighs at this point are 95% complete minus the interior details to mesh with the undersuit.

I have an appearance for a harvest party this Wednesday so be on the lookout for pictures from that event in the future. But in the meantime enjoy the progress pictures:

20231021_113119.jpg
20231021_113125.jpg
20231021_113439.jpg
20231021_113445.jpg
20231021_122548.jpg
20231021_122556.jpg
20231021_122601.jpg
20231021_122606.jpg
20231021_122613.jpg
20231021_122859.jpg
20231021_122905.jpg
20231021_122910.jpg
20231021_122914.jpg
20231021_185651.jpg
20231021_191348.jpg
20231021_190744.jpg
20231023_073413.jpg
 
well, here I am again back for another part overhaul!

This time: Boots!

My old boots have been through the wringer and have generally deteriorated over time and no longer fit or stabilize me properly.

So on to what looks like it may be the single most expensive part of my armor.

First-up reference: I am going to be free handing the design so I needed a pretty good reference set. So here are the images I am working with:
Screenshot_20240205_181102_Chrome.jpgScreenshot_20240205_181031_Chrome.jpgScreenshot_20240205_181219_Chrome.jpgScreenshot_20240205_181045_Chrome.jpgScreenshot_20240205_181157_Chrome.jpgScreenshot_20240205_181143_Chrome.jpgScreenshot_20240205_180952_Chrome.jpgil_794xN.4219321608_csfb.jpghaloarmor_boots_1080x.png

So from there, I needed a shoe to start as the stabilizing part that would hold the entire boot together. So I found these at Walmart for about $17: I then traced out the shoe and then I will need to draw out my bottom pattern for the lifts and tread.

That is all for now. Look forward to more updates!

20240205_205251.jpg


20240205_205257 - Copy.jpg
 
okay more updates: though a small one to be sure.

I have my pattern done for the soles of the boots. And oh boy they are huge. about 14" long toe to heel. almost 8" wide at the wings. and will have about a 2-3" lift that the shoes will mount onto.
20240206_175632.jpg


From there, we have some more material and their respective costs:
Outsole rubber tread sheet: $18
Shoe cement: $13
Latches: $9

20240206_193350.jpg20240206_193357.jpg20240206_193330.jpg

I am getting the minor benefit of not needing to buy wood for the lifts or soles of the boots so that is nice. But good grief I don't think even my helmets have this much cost in them. and I haven't even started on the foam yet.

These things had better be the most darned comfortable, posable, and durable boots I have made to date. Ugh.

I guess that is all for now. looks like woodworking is in my future this weekend.
 

Your message may be considered spam for the following reasons:

If you wish to reply despite these issues, check the box below before replying.
Be aware that malicious compliance may result in more severe penalties.
Back
Top