- Member DIN
- S015
Well, I took on my first commission, and it was for a storm trooper helmet. I have never made a storm trooper helmet before, and never one in foam. Needless to say I took a great big step of faith to go forward with it.
I used rundown 's Pepakura file and modified it to use with foam.
Here are several various pictures of it in various stages of progress.
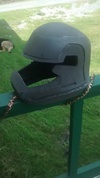
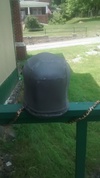
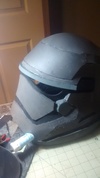
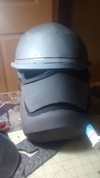
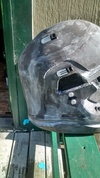
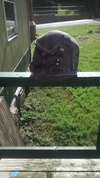
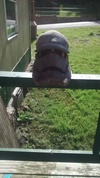
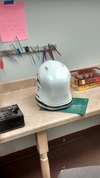
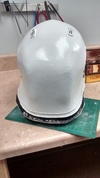
First several are after I had gotten the base form of the helmet done, and the lower jaw. I used 5/16th inch foam for the whole helmet. I also used contact cement to glue it all together.


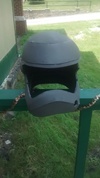
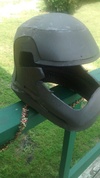
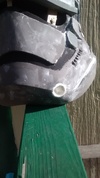
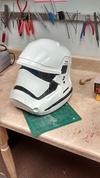
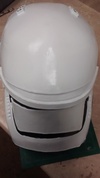
Here I had added the mask part of the helmet. I also had found a small probiotics pill bottle that fit perfectly for the nozzle type attachment in the front corner of the helmet.


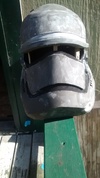
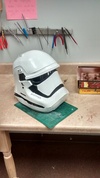
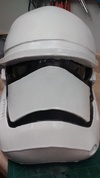
Next i sanded down all the seam lines, with first 80 grit sandpaper, then 120, and finally with 220. After that I used a sand-able, paint-able, white silicone compound to smooth out what ever gaps I might have in the seams, along with any surface flaws left in the foam. I also added all my detail foam pieces, and added the final cut ins along the cheek guards. I also placed in some temporary stays of Popsicle sticks to keep the visor opening spaced propely.


Here you can see where I cut down and sanded down the bottle to sit flush with the rest of the foam.

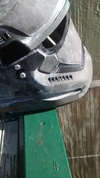
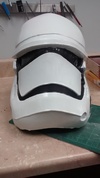
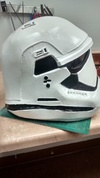
After all of this work, I then added 3 super thin coats of Pour-On Lite resin over the whole helmet, and sanded well between coats to get an ultra smooth slightly hardened exterior. After the third coat it was so smooth that even when it was dry touching it made you think it was wet. At that point I then used a high gloss black spray paint over all the areas that where to be black. I then tapped those areas off after they were dry. Then 3 coats of high gloss white paint went onto the rest of the helmet.
Finally I made my visor with my pattern. i made it so that the visor was a little larger then the area it was supposed to be in. I coated the inside of it with 5% LVT window tint. After taking out the temporary stays, I then put in the visor and glued it into place.
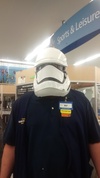
Here is the finished product, and the happy owner.


Oh.. and looking out to the world through the visor


I used rundown 's Pepakura file and modified it to use with foam.
Here are several various pictures of it in various stages of progress.
First several are after I had gotten the base form of the helmet done, and the lower jaw. I used 5/16th inch foam for the whole helmet. I also used contact cement to glue it all together.


Here I had added the mask part of the helmet. I also had found a small probiotics pill bottle that fit perfectly for the nozzle type attachment in the front corner of the helmet.


Next i sanded down all the seam lines, with first 80 grit sandpaper, then 120, and finally with 220. After that I used a sand-able, paint-able, white silicone compound to smooth out what ever gaps I might have in the seams, along with any surface flaws left in the foam. I also added all my detail foam pieces, and added the final cut ins along the cheek guards. I also placed in some temporary stays of Popsicle sticks to keep the visor opening spaced propely.


Here you can see where I cut down and sanded down the bottle to sit flush with the rest of the foam.

After all of this work, I then added 3 super thin coats of Pour-On Lite resin over the whole helmet, and sanded well between coats to get an ultra smooth slightly hardened exterior. After the third coat it was so smooth that even when it was dry touching it made you think it was wet. At that point I then used a high gloss black spray paint over all the areas that where to be black. I then tapped those areas off after they were dry. Then 3 coats of high gloss white paint went onto the rest of the helmet.
Finally I made my visor with my pattern. i made it so that the visor was a little larger then the area it was supposed to be in. I coated the inside of it with 5% LVT window tint. After taking out the temporary stays, I then put in the visor and glued it into place.
Here is the finished product, and the happy owner.


Oh.. and looking out to the world through the visor


Attachments
-
 IMG_20150610_125525838_zpscotnelza.jpg185.6 KB · Views: 212
 -
 IMG_20150610_125535744_zpsk3f9m2tx.jpg175.1 KB · Views: 215
 -
 IMG_20150610_125545127_zpsjmppzvaj.jpg181 KB · Views: 202
 -
 IMG_20150610_125558852_zps4kav9awb.jpg199.7 KB · Views: 217
 -
 IMG_20150615_202951100_zps2pqs20pm.jpg137.6 KB · Views: 211
 -
 IMG_20150615_202959517_zpsu3ewd37j.jpg136.7 KB · Views: 218
 -
 IMG_20150615_203010535_zpsrwtg5a1w.jpg141 KB · Views: 220
 -
 IMG_20150624_174114220_zpsdyq2b5or.jpg207.7 KB · Views: 212
 -
 IMG_20150624_174122745_zpsc5mvhc1o.jpg234.1 KB · Views: 213
 -
 IMG_20150624_174127226_HDR_zpsvy31xjw3.jpg263.9 KB · Views: 220
 -
 IMG_20150624_174137605_zps5q6q9pz7.jpg236.3 KB · Views: 212
 -
 IMG_20150624_174146974_zpsxrafcyrx.jpg251.7 KB · Views: 209
 -
 IMG_20150624_174158110_zps6mkuqzrd.jpg255.3 KB · Views: 234
 -
 IMG_20150624_175140153_zpstx9pdtdf.jpg200.3 KB · Views: 208
 -
 IMG_20150710_104241858_HDR_zpsrlyvhj3r.jpg170.4 KB · Views: 225
 -
 IMG_20150710_104254762_HDR_zps6hktp2p7.jpg182.8 KB · Views: 210
 -
 IMG_20150710_104305858_HDR_zpsibouujcx.jpg200.7 KB · Views: 215
 -
 IMG_20150710_104319836_zps9wqp6qfk.jpg147.3 KB · Views: 220
 -
 IMG_20150710_104330197_HDR_zps97mrqey5.jpg168 KB · Views: 209
 -
 IMG_20150710_104340965_HDR_zpsfxdcyc5c.jpg171.6 KB · Views: 206
 -
 IMG_20150710_104351664_HDR_zpsr2l4duno.jpg170.2 KB · Views: 221
 -
 IMG_20150710_104456144_zpsiul3xyk5.jpg107.3 KB · Views: 232
 -
 IMG_20150710_104512246_zpsl24wagdu.jpg114.7 KB · Views: 213
 -
 IMG_20150712_145552139_zpsxpyysd6y.jpg126.4 KB · Views: 220
 -
 IMG_20150712_145602742_zpsboh5losp.jpg124.8 KB · Views: 214
 -
 IMG_20150710_104401704_zpsdydyykl4.jpg106.8 KB · Views: 204
 -
 IMG_20150710_104415404_zpsn5lferzt.jpg88.7 KB · Views: 201
Last edited by a moderator:
")