VoicingPanda158
New Member
Hi all, I've been snooping around the forum the last few days looking at all the really cool cosplay designs and I'm hoping to make my first ever piece of cosplay armour over the next few months. I've looked at some of the different types of armour in the Halo universe and I've settled on a mostly standard Mark VII armour with a Cavallino helmet (and maybe the cat ears as they do look kinda cool) all in the hazmat (yellow) paint scheme.
I've looked at some of the tutorials and the guides on the forum and I know I want to build it all (apart from the helmet 'cause that seems too difficult) out of foam. So, I bought a copy of armoursmith designer so that I'd be able to scale the pieces of the armour which I've gotten from 'The Armory' and I think I'm pretty happy with how the scaling has gone.
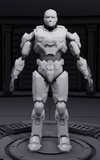
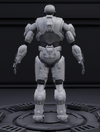
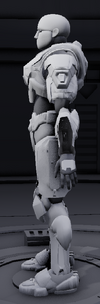
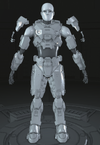
My main problem at the moment is that as I've just spent the last few hours staring at the same stick model I can't really tell whether or not the armour is actually the correct proportions relative to the other pieces (it all fits at the moment reasonably snugly). I was hoping that I could get some fresh eyes to have a look at it to point out which bits look a bit odd and need adjusting (I'll hopefully attach some screen shots from the designer to illustrate this)?
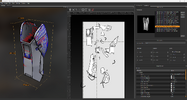
As a little side question, when I look on the patterns tab in armoursmith designer (for some of the patterns) they have a lot of overlapping lines, especially on the shin piece, and I was wondering how I could fix this? (I haven't spent much time researching this problem though as I haven't reached the stage of needing them yet so sorry if it's an obvious fix).
One last thing whilst I remember, my armoursmith window is weirdly low poly compared with what I've seen from others, is there a fix for this (I don't think it matters too much though as I've managed to get it done without)?
Lastly, thank you for reading my post (I know its a bit long winded) and I'm really looking forward to seeing what you all have to say!
I've looked at some of the tutorials and the guides on the forum and I know I want to build it all (apart from the helmet 'cause that seems too difficult) out of foam. So, I bought a copy of armoursmith designer so that I'd be able to scale the pieces of the armour which I've gotten from 'The Armory' and I think I'm pretty happy with how the scaling has gone.
My main problem at the moment is that as I've just spent the last few hours staring at the same stick model I can't really tell whether or not the armour is actually the correct proportions relative to the other pieces (it all fits at the moment reasonably snugly). I was hoping that I could get some fresh eyes to have a look at it to point out which bits look a bit odd and need adjusting (I'll hopefully attach some screen shots from the designer to illustrate this)?
As a little side question, when I look on the patterns tab in armoursmith designer (for some of the patterns) they have a lot of overlapping lines, especially on the shin piece, and I was wondering how I could fix this? (I haven't spent much time researching this problem though as I haven't reached the stage of needing them yet so sorry if it's an obvious fix).
One last thing whilst I remember, my armoursmith window is weirdly low poly compared with what I've seen from others, is there a fix for this (I don't think it matters too much though as I've managed to get it done without)?
Lastly, thank you for reading my post (I know its a bit long winded) and I'm really looking forward to seeing what you all have to say!