Outlaw-Tiger's Mk VI wip

Status
Not open for further replies.
ok so i'm having a hard time figuring out why i can no longer post attachments so bare with me, and please excuse the links.

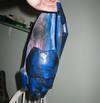
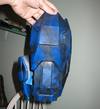
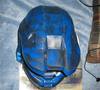
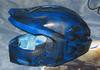
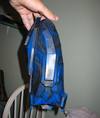
but sense i last posted something, i have made a bit of progress. and have almost finished rondo'ing all the different armour pieces, the only things left to rondo are the chest, cod, and helmet. but sadly i hit a snag with the boot coverings, and need to re-build the heel and top of the foot part. this time i think i'm going to go the easier rout and just build the two piece boot.

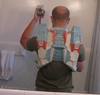
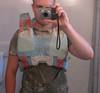
but for now, here is a picture of my first test fit for both thighs and shins (just about ready for the bondo work on the outside). keep in mind that the pants i'm wearing in the pictures is NOT what i'm going to be wearing for the under armour when my suit is all done.

linkages:
test fit 1 : http://s588.photobucket.com/albums/ss328/Pvt_duck/?action=view&current=legstestfit.jpg
test fit 2 : http://s588.photobucket.com/albums/ss328/Pvt_duck/?action=view&current=legstestfit2.jpg <-- sorry for the darkness of the picture, lighting kinda really sucked for that picture.
 
Lookin' good! Nice cardstock colors, too. :D

Also, as far as I know, attachments are disabled, so you'll have to use links or put the direct link into the "insert image" button above the text editor.
 
Lookin' good! Nice cardstock colors, too. :D

Also, as far as I know, attachments are disabled, so you'll have to use links or put the direct link into the "insert image" button above the text editor.

thanks ^_^ and yeah, the staples that is near me only sells 110lb card stock in packs of multiple colours lol. and good to know ! thanks for confirming that for me ^_^
 
Awesome!!!! glad to see you still working on your armor! its looking great, keep thos updates coming.=]

haha hey there, and thanks ^_^. its hard to get a bunch of work done on the armour build like some of the people here on the 405th, but i try to take advantage of nice weather in between shifts at work and sleeping haha
wink.png


and sense i had the other day off, i figured i would get some much needed armour work done ^_^, so here are two pictures of the progress thus far:

http://s588.photobucket.com/albums/ss328/Pvt_duck/?action=view&current=ohyeah.jpg <-- should and forearm with glove
http://s588.photobucket.com/albums/ss328/Pvt_duck/?action=view&current=itcomestogether.jpg <-- everything i worked on yesterday put together ^_^
 
nice! im loving the multi-coloured look you've got going there .. ahaha :D
its looking awesome!
 
thanks guys ^_^. and acenat, gotta keep things fresh and fun right ? ;) lol

and bulldogresler, thanks a tone, some of the pieces actually fit a little too well... lol its kinda brutal to get my right hand in and out of the forearm piece... but once its on, it sits soooo well lol. i'm hoping that the chest piece turns out as good a fit though... on the next day off i have that is decent i will be able to finish hardening the chest and back, so hopefully that will be soon ^_^

aaaaand an other quick update !! ^_^

http://s588.photobucket.com/albums/ss328/Pvt_duck/?action=view&current=almostthere.jpg <-- so a lot of my armour pieces are ready to have body filler used on the outside, therefore i started that phase today ^_^
http://s588.photobucket.com/albums/ss328/Pvt_duck/?action=view&current=finalhandplate.jpg <-- hand plate pretty much 99% finished. all that is left to do to it is the silver battle damage, but i'm going to hold off on that till more pieces are nearly done ^_^
 
first off, sorry for the double post... almost positive that my last update got buried almost as soon as i posted it... so here is to hoping this one lasts long enough for people to check it out haha.

first off, its the hand plates. both are all done save for the battle damage, and then mounting them on the gloves:
Pvt_duck
thehandplates.jpg


secondly, is the left bicep. i only had enough time today to paint it, but not weather it... so its pretty blue lol:
itsblue.jpg

itsblue2.jpg


third, i managed to get a fair amount done on the helmet as well ^_^:
helmetwellonitsway.jpg

i decided i wanted to go with the "totally used and abused" look with the armour, so i purposely left some areas rough, or pitted so it will look more realistic once i do the battle damage paint ^_^

this next one is just of all the pieces together:
evenmoreprogres.jpg


i managed to get some work more work done on other pieces, but i had put them away for the evening before i took those pictures... might take some tomorrow and post them later... only time will tell ^_^

O.T.
Pvt_duck
 
any other update ! the last two days have been supper productive for me ^_^. so here is what i have done these last two days:
http://www.405th.com/[ATTACH=full]98928[/ATTACH][ATTACH=full]98928[/ATTACH]
[ATTACH=full]98929[/ATTACH]
[ATTACH=full]98930[/ATTACH]
[ATTACH=full]98932[/ATTACH]
[ATTACH=full]98933[/ATTACH]
[ATTACH=full]98934[/ATTACH]
[ATTACH=full]98935[/ATTACH]
[ATTACH=full]98937[/ATTACH]
 

Attachments

  • leftbicepalmostdone2.jpg
    leftbicepalmostdone2.jpg
    68.2 KB · Views: 208
  • leftbicepalmostdone.jpg
    leftbicepalmostdone.jpg
    70.5 KB · Views: 209
  • helmetalmostdone.jpg
    helmetalmostdone.jpg
    88.3 KB · Views: 215
  • helmetalmostdone3.jpg
    helmetalmostdone3.jpg
    106.2 KB · Views: 216
  • helmetalmostdone2.jpg
    helmetalmostdone2.jpg
    71.8 KB · Views: 211
  • leftbicepalmostdone3.jpg
    leftbicepalmostdone3.jpg
    75.3 KB · Views: 207
  • backpackphase2complete.jpg
    backpackphase2complete.jpg
    48.7 KB · Views: 216
  • chestpiecephase2complete.jpg
    chestpiecephase2complete.jpg
    56.5 KB · Views: 209
hey guys, got an other update... been supper busy with work, so i haven't been doing THAT much work on my armour... but i have a couple pictures to share anyway ^_^
here are a couple pictures of me with just about everything one... i'm missing the right arm armour cause i couldn't figure out how to hold everything there for the picture.... but rest assured the right arm is at the same point of completion as my left arm ^_^
fulltestfitfront.jpg


and this is a picture of the back:
fulltestfitback.jpg
 
Yea! That does look good. Can't wait to see what it looks like when its completed.

Cheers!
 
did you use spray paint for your armor? or better said, how did you get that color effect in it, more of the black fading to blue and back again, I don't know if you just smear mixed paint, or did something tricky with the spray.....just curious
 
i did use spray paint ^_^. what i did was: lay down a good base of primer, then sprayed everything regal blue, then let that dry over night, then i took some black spray pain, sprayed some on then wiped it once with a cloth; what ever was left i let dry. if i saw a spot that had too much black i would spray some more blue and then wipe again with the cloth. takes a bit of time, but the end result is for sure worth it in my opinion lol ^_^ with the silver, i just sprayed that onto a paint brush and brushed it on.
 
haha thanks. its for sure a 'figure it out as you go' type of thing as to the pattern but the end result is pretty damn sweet... though i find the pattern really doesn't pop unless you have that silver battle damage. so you really don't know exactly what it will look like till you are almost finished lol.

and zackrack, i answered your question prolly just before you posted it ^_^ but thanks for asking ^_^
 
awesome suit colours! its looks awesome :D cant wait to see it finished!
i totally need to get a undersuit thing like you've got.. the stretchy black material..
 
Status
Not open for further replies.
Back
Top