glasscutter Mark V build (Fiberglass/Aqua-Resin)

Status
Not open for further replies.

glasscutter

Jr Member
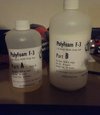
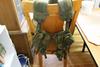
Hi 405th! After researching here and building a helmet for my kids Halloween costume, it's time for my full suit. This build will be a Mark VI armor set from Halo 3. The goal is to use Aqua-Resin to replace epoxy/polyester resin and Bondo. This will not be a fast build. I am guessing 10 months to 1 1/2 years. I'm not in any hurry to finish and the usual excuses apply (family/job/part time school/laziness lol).

I couldn't even begin without thanking everyone on here for posting information. All the hard work by 405th members have made this build possible.

During this build if anyone has comments, criticism, or tips/hints to make something better, please don't hesitate to say so. All feedback is good, both negative and positive. Just be forewarned, I like to ask lots of questions lol.

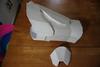
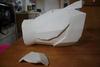
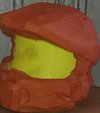
First piece up will be: MKVI_HD_RightHandPlate_ROBOGENESIS

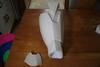
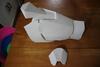
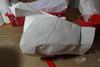
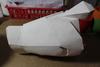
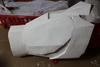
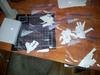
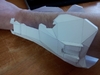
Edit (1/30/2014): Change in plans. The plague has hit home in the form of a nasty cold. Things have definitely slowed a bit. Also I planned to use chip board for the hand plate indents, but its backordered. Second problem is the edge id's overlap the fold lines too much on the HD files so far. Moved to the forearm and turned off edge id. The prospect of assembly without them makes me kind of nervous. Anyway, I have moved to MKVI_HD_FOREARM_RIGHT_NUGGET_LETTER. Parts are cut and folded for assembly hopefully this weekend!

Edit2 (2/16/2014) Another change in plans. Switching from Mk VI to a Halo:CE Mk V build. I feel the need to go old school.

20140130_224914_zpsjlkra4m7.jpg

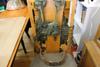
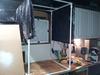
Also managed to get a collapsible paint booth set up.

20140127_200434_zpsbe1gruho.jpg
 

Attachments

  • 20140130_224914_zpsjlkra4m7.jpg
    20140130_224914_zpsjlkra4m7.jpg
    87.5 KB · Views: 243
  • 20140127_200434_zpsbe1gruho.jpg
    20140127_200434_zpsbe1gruho.jpg
    104.3 KB · Views: 240
Got the forearm partially built and found it was too small. The wrist to elbow length is about right, but the opening for my hand is too small. Good thing is the really small parts will get bigger! Had to change the scale from 394 to 507. I was quite a bit off for the hand hole size. So glad Pepakura lets you measure from point to point.

For anyone wondering about the paint booth, the black plastic was just a test. I will be using clear .7 mil plastic all around. Also will be using only acrylic paint so no explosion worries from the electric fan motor.

20140201_105900_zpsjsrgn9aw.jpg
 

Attachments

  • 20140201_105900_zpsjsrgn9aw.jpg
    20140201_105900_zpsjsrgn9aw.jpg
    70.7 KB · Views: 242
Not sure if you will read this before you decide to make a new forearm or not, but if the length is right from wrist to elbow then its probably not to small. When i built mine i had to cut out some of the front for my hand to fit into it as well. I also know many others have done the same.
If you want to check my first thread (not one in the signiture) out and see what i did. Also here is a link of a video that i think will help you out more than reading :)
the reason i suggest this video is because he uses a forearm in the video. :) Watch the whole thing, but if you just want to watch the part where he talks about the small openeing then its around the 11 min and 50 second mark.
hope this helps. if you have any questions feel free to ask myself or anyone else.
 
Last edited by a moderator:
Not sure if you will read this before you decide to make a new forearm or not, but if the length is right from wrist to elbow then its probably not to small. When i built mine i had to cut out some of the front for my hand to fit into it as well. I also know many others have done the same.
If you want to check my first thread (not one in the signiture) out and see what i did. Also here is a link of a video that i think will help you out more than reading :)
the reason i suggest this video is because he uses a forearm in the video. :) Watch the whole thing, but if you just want to watch the part where he talks about the small openeing then its around the 11 min and 50 second mark.
hope this helps. if you have any questions feel free to ask myself or anyone else.

Thanks I totally forgot Cereal Kill3r specifically talks about the forearm in that video.

I have decided to switch to the low and mid definition models for this armor build. At some later date I can always go back and replace parts with HD if desired. Doing a first build plus using HD files is proving to be more than annoying. It's taking away the fun of building. Will update later next week. It's time to go grab some more pep files.
 
Last edited by a moderator:
Best of luck :)

Thanks I appreciate it!

Update:
Got the LD version printed and pepped. It's at 300mm right now. The end is about 1-1/2 to 1-3/4 inches past the elbow. I think that should be about right.

IMG_0596_zps603baa72.jpg

Since this was a test piece for size, I decided to make it a test piece for sealing using Aqua-Resin also. This is the piece after first light coat without any acrylic sealer applied. This batch was at a 1 part liquid – 2 parts powder ratio.

IMG_0597_zps29e3712a.jpg

After the first coat, I decided to really push it. Instead of applying coats and letting cure I kept applying them until the whole batch was used (1 ounce liquid – 2 ounces or ¼ cup powder). Never let the resin fully cure and the paper ended up feeling damp and cool from the moisture. If anything was going to warp the piece this would be it. After finishing the batch off I really didn’t see any major warping or even wavy individual pieces.
IMG_0598_zps034a4bee.jpg
IMG_0599_zpsf7f61a31.jpg

There was still an expectation of seeing a warped and mangled piece after sitting overnight. This did not happen. The next morning it was harder than the same number of poly resin coats. Also there still was not major warping or waves in the piece. Thanks goes to RYNO_666 for the suggestion of trying the aqua-resin to seal it instead of acrylic sealer. I tried to mess it up and still didn’t.

Another big plus was no fumes. Western Washington state got a cold snap this week and I could not keep the garage warm enough. With aqua-resin, I simply put some cardboard on the kitchen table and applied it inside the house. No fumes and no respirator required. Another plus is my daughter got to help apply it to the piece. I think she had way more fun helping to build armor than I did. Being able to include her in the process was awesome.
IMG_0600_zps8fcbb7f7.jpg
IMG_0601_zpsa06d3721.jpg

The batch was still a little powdery. I think this is most likely due to hand mixing it. Hopefully a trip to the local thrift store will find me with an old hand held kitchen mixer to use next time. Also going to experiment with a ratio closer to 1 part liquid – 1.5 powder next time. It will make the piece more elastic and increase the cure time but hopefully comes out with a smoother finish on the outside. Going to make two LD hand plates to test out the differences with the lower powder ratio and one for the hand held mixer batch at 1-2 ratio.

The red flexible silicone mixing bowl was another experiment. It worked very well. The resin dried in the bowl overnight and in the morning popped right out. No more using throwaway solo cups. I used this method using polyester resin and it worked there also. The silicon does not get damaged from the heat of curing. With the poly resin though, I always had a tiny bit of uncured resin at the bottom and edges. This uncured resin wiped right out using some of my wife’ acetone for removing nail polish.

IMG_0596_zps603baa72.jpg


IMG_0597_zps29e3712a.jpg


IMG_0598_zps034a4bee.jpg


IMG_0599_zpsf7f61a31.jpg


IMG_0600_zps8fcbb7f7.jpg


IMG_0601_zpsa06d3721.jpg
 
Last edited by a moderator:
Tried out the aqua resin some more. Built 2 hand plates and tried each with a 1(liquid):2(powder) ratio and a 1(liquid):1.5(powder ratio). Also found a kitchen hand mixer for 5 dollars at the thrift store. The difference between hand mixing and power mixing is amazing. From now on I will not be hand mixing.

First picture is at the 1:2 ratio, two coats (unsealed card stock). It was okay but a little warping of small pieces and had a rough texture.
IMG_0605_zps4db23563.jpg
IMG_0606_zpsa616e8a7.jpg

Next I tried two coats (unsealed card stock) with a 1:1.5 mix. This went on nice and was a great improvement over the 1:2 ratio. However, the reduction in powder meant the mixture was thinner. This resulted in deeper soaking of the cardstock and some more warping. I also tried pushing the hand plate flat while still curing. If whole piece warping did happen, I wanted to see if I could fix it if caught in the curing stage. The aqua resin while dry to the touch was still able to be adjusted without chipping etc.
IMG_0607_zps9d989f8e.jpg

Since the 1:1.5 came out better I am back to sealing it first with acrylic sealer. Hand plate is built and sealed, with resin hopefully happening tomorrow or this weekend. I will be trying one coat of 1:1.5 on the outside and inside.
IMG_0609_zps70047eb4.jpg
IMG_0610_zps6e33f36d.jpg

Also have a question about the edge lines when gluing. Is the edge line supposed to be just visible or just covered by the other piece when gluing together?


IMG_0605_zps4db23563.jpg


IMG_0606_zpsa616e8a7.jpg


IMG_0607_zps9d989f8e.jpg


IMG_0609_zps70047eb4.jpg


IMG_0610_zps6e33f36d.jpg
 
Last edited by a moderator:
Also have a question about the edge lines when gluing. Is the edge line supposed to be just visible or just covered by the other piece when gluing together?

I cover the edge line when gluing. I feel it makes the piece a little more neat [can't explain how] but whichever you choose is up to you. Good luck! It looks great, I'm doing the same project as you, too!
 

The xacto blade represents about the same thickness of the lines. So I glue them to invisible. But it may be splitting hairs though.

The texture is called the tooth. It makes the surface like a wick to draw in whatever you put on top, paint, bondo, fillers, more Aqua Resin, casting resins, etc. etc.


You're doing a fantastic job. I struggled way more than you did.


Sent from my HTCONE using Tapatalk
 
Last edited by a moderator:
Thank you both. I think the lines just covered will look better. The feedback is definitely appreciated.

Change in plans for the build. The Mark VI seemed to be the most popular so I first went with that. I just haven't been able to get really excited about it though. So the build is now changing to the Mark V from Halo:CE. After a lot of searching I managed to find some good files. A lot of the Rhinoc files from the 405th database for Halo 1 seem to be corrupted. Tried downloading them as a set and individually several times. All attempts only had less than half that didn't either crash Pepakura or come up as blank. Luckily after a few days of searching and scrolling through the creation thread, I found this: http://www.405th.com/showthread.php...rsary-Pepakura-Files-Thread?highlight=halo:ce. Thanks to everyone in that thread for posting the information. Found a couple videos on YouTube in HD that show every cut scene from Halo:CE. These will be my references:
,
. More updates later, its time to start cutting some cardstock.
 
Last edited by a moderator:
Best of luck, hope to see some pictures soon :)

Ask and you shall receive! :)

Hand plates and forearms pepped and ready for sealer/resin.
IMG_0611_zpsbb9e88ff.jpg

IMG_0615_zps2d5e5f1e.jpg

IMG_0614_zpsf471c71c.jpg

IMG_0612_zps9a223a03.jpg


I think the length should be about right. The end sits just above my wrist bend point. The upper part is just past the elbow.
IMG_0617_zpsd7050684.jpg

IMG_0616_zpsfc86f778.jpg


Hand plate model/unfold by Rhinoc
Forearm: model by Rhinoc, unfold by I_Am_Forgiven, and unfold edit by HaloGoddess
Thanks again for your work!

IMG_0611_zpsbb9e88ff.jpg


IMG_0615_zps2d5e5f1e.jpg


IMG_0614_zpsf471c71c.jpg


IMG_0612_zps9a223a03.jpg


IMG_0617_zpsd7050684.jpg


IMG_0616_zpsfc86f778.jpg
 
Last edited by a moderator:
The two outer coats are done on both forearms and hand plates. All pieces were sealed with acrylic sealer (3 coats). For the resin, I ended up going with a 1:2 mixture (1 Tablespoon Liquid, 2 Tablespoon Powder). The batch was mixed till smooth with the hand mixer. After that one drop of THX-6 Thickener was put in and mixed again with the mixer for 30-40 seconds. That combo worked really well. The resin had more strength than the 1:1.5 mix ratio. Also adding the THX-6 gave it more of a polyester resin / syrup consistency.

Another bonus is it got cold last weekend in Western Washington. The garage heater couldn't quite keep up so I just moved inside!
IMG_0621_zps00a7bc4b.jpg
IMG_0620_zps5a15af26.jpg
IMG_0619_zps1c39055f.jpg
IMG_0618_zps2a714c6f.jpg

I was thinking of doing 1 inner coat of resin, then a coat with loose cut fibers (mix of 3 ½ and .5 inch, then if needed a layer of aqua veil. Has anyone worked with loose cut fiberglass strands before?

Correction: The loose chopped strand Aqua-Glass is a 3 1/2" and 1" mix, not 3 1/2" and .5".
 

Attachments

  • IMG_0620_zps5a15af26.jpg
    IMG_0620_zps5a15af26.jpg
    38.6 KB · Views: 234
  • IMG_0619_zps1c39055f.jpg
    IMG_0619_zps1c39055f.jpg
    45.3 KB · Views: 235
  • IMG_0621_zps00a7bc4b.jpg
    IMG_0621_zps00a7bc4b.jpg
    47.8 KB · Views: 246
  • IMG_0618_zps2a714c6f.jpg
    IMG_0618_zps2a714c6f.jpg
    49.5 KB · Views: 227
I am loving this technique! Looking forward to see how it proceeds from this point :)
 
The two outer coats are done on both forearms and hand plates. All pieces were sealed with acrylic sealer (3 coats). For the resin, I ended up going with a 1:2 mixture (1 Tablespoon Liquid, 2 Tablespoon Powder). The batch was mixed till smooth with the hand mixer. After that one drop of THX-6 Thickener was put in and mixed again with the mixer for 30-40 seconds. That combo worked really well. The resin had more strength than the 1:1.5 mix ratio. Also adding the THX-6 gave it more of a polyester resin / syrup consistency.

Another bonus is it got cold last weekend in Western Washington. The garage heater couldn't quite keep up so I just moved inside!
IMG_0621_zps00a7bc4b.jpg
IMG_0620_zps5a15af26.jpg
IMG_0619_zps1c39055f.jpg
IMG_0618_zps2a714c6f.jpg

I was thinking of doing 1 inner coat of resin, then a coat with loose cut fibers (mix of 3 ½ and .5 inch, then if needed a layer of aqua veil. Has anyone worked with loose cut fiberglass strands before?

Correction: The loose chopped strand Aqua-Glass is a 3 1/2" and 1" mix, not 3 1/2" and .5".

This is looking great!

I use the chopped fiber mix and veil. It's very strong. My only gripe is it is pokey on the handling. I mean I've stuck myself quite a few times working post hardening. Make sure that you lay glass flat and use the resin to tack it down. Then go over it with veil strips to blanket it. It's only necessary for a very strong build. I use poly foam f3 on top of it as well to give a instant inside padding. It is very light and comfortable. Can be cut or molded to contours filling all those annoying voids simply by pouring it in. Same material as automotive seats has different densities. Plus it's really fun to use!

tazy8edu.jpg


ypumagaz.jpg
 

Attachments

  • IMG_0620_zps5a15af26.jpg
    IMG_0620_zps5a15af26.jpg
    38.6 KB · Views: 232
  • IMG_0621_zps00a7bc4b.jpg
    IMG_0621_zps00a7bc4b.jpg
    47.8 KB · Views: 238
  • IMG_0619_zps1c39055f.jpg
    IMG_0619_zps1c39055f.jpg
    45.3 KB · Views: 244
  • IMG_0618_zps2a714c6f.jpg
    IMG_0618_zps2a714c6f.jpg
    49.5 KB · Views: 218
  • tazy8edu.jpg
    tazy8edu.jpg
    66.2 KB · Views: 233
  • ypumagaz.jpg
    ypumagaz.jpg
    79.7 KB · Views: 241
Thanks everyone. Means a lot considering I read all of your builds for tips/advice/motivation.

RYNO_666 I saw how you did the PolyFoam in your thread. Great idea. Did you need to coat the balloon with release agent first? Also any idea if it would stick to saranwrap or maybe waxpaper? I was thinking it might be a good way to pad out all the armor pieces. Basically making a duct tape dummy, mounting the armor piece in place using clamps or sticks with low-temp hot glue, then pouring the foam inside. Afterward cutting channels for the LED's and wiring, then covering with a black colored cloth. I am thinking that might be a easy way to make form fitting padding. I am not really sure what could be used to seal the bottom end and stop the foam from sticking to the dummy though.

Also ran the trial kit of resin out. Hopefully my order for a bigger batch will be here tomorrow!
 
WOW, great work! Never thought about doing it with aqua resin! Great Idea! I am looking forward to see your finished build! MARK V FOR THE WIN!
 
Thanks everyone. Means a lot considering I read all of your builds for tips/advice/motivation.

RYNO_666 I saw how you did the PolyFoam in your thread. Great idea. Did you need to coat the balloon with release agent first? Also any idea if it would stick to saranwrap or maybe waxpaper? I was thinking it might be a good way to pad out all the armor pieces. Basically making a duct tape dummy, mounting the armor piece in place using clamps or sticks with low-temp hot glue, then pouring the foam inside. Afterward cutting channels for the LED's and wiring, then covering with a black colored cloth. I am thinking that might be a easy way to make form fitting padding. I am not really sure what could be used to seal the bottom end and stop the foam from sticking to the dummy though.

Also ran the trial kit of resin out. Hopefully my order for a bigger batch will be here tomorrow!

Yes I think those are great ideas. I'm still experimenting with it myself. I will be using it again on the CQC helmet but as a final step. I used the balloon and it stuck to the foam. I'm imagining that mold release would work though. I thought it was kinda cool how it makes a smooth rubber liner inside.
usa7e3u3.jpg


na8yguhu.jpg


It peels off any smooth surface like magic so it's better for me to install visor first then cut out viewing area then peel off. That way it's secure and sealed. I will also prewire.
 

Attachments

  • usa7e3u3.jpg
    usa7e3u3.jpg
    106.6 KB · Views: 228
  • na8yguhu.jpg
    na8yguhu.jpg
    13.9 KB · Views: 229
Update time. More experiments, some good, some bad.
The new batch of resin came in. For some reason the batches come out a little thicker now. Not really sure if it’s because the powder is more packed down or not. I suspect that is the cause though. Anyway, I tried putting in the loose chopped strand mix into a batch of 1:2 resin. I took this and applied it to the inside without a resin only coat first. The stuff dried really hard, but I wasn’t happy with the way it applied or the warping that occurred. Here is a picture of the inside after hand putting it in.
IMG_0622_zpsc83600dc.jpg

Like I said it was pretty hard all over. But backlighting showed just how uneven the coating was.
IMG_0623_zps4778422c.jpg

After that I tried a few pieces of 10mil Aqua-Veil, also without first applying an inside coat of resin. The Aqua-Veil was cut into squares then laid on a paper plate to coat both sides. The coated piece was then applied inside the forearm.
IMG_0628_zpsa758a367.jpg

I have to say I like the Aqua-Veil much better. It will probably take two layers to match the strength of the loose chopped strand mix though. I like the results after much better though. Another bonus is the Aqua-Veil sheets are coated to promote better adhesion with the resin. This also makes the strands stick to each other! When cutting it into squares it never started to unravel like fiberglass cloth did. I did end up with some warping of the piece after. The warping wasn’t nearly as bad as the loose chopped strand though.
IMG_0626_zps345cbfbf.jpg
IMG_0627_zps106d6125.jpg

I decided to do the first inside coat of just resin in the second piece. The same mix as outside (1:2 with 1 drop of THX-6 thickener) went on the inside. I will hopefully apply some Aqua-Veil to this forearm tonight. IMG_0625_zps42275894.jpg
IMG_0624_zpsdd25ba2c.jpg
Tonight I am going to try using spray adhesive to hold the Aqua-Veil in place and then apply resin over the top. This method worked pretty well with fiberglass cloth. I think with the thinness of the 10mil Aqua-Veil and the coating applied it from the manufacture, it should work. Hopefully I will post results tonight or tomorrow.

On another note, the wife helped me score a load bearing vest and belt today for 20 dollars! It’s in a green woodland camouflage pattern. I am hoping a few rounds of black dye will change that.
IMG_0629_zps7b7f441a.jpg
IMG_0631_zps0b600cb5.jpg
 

Attachments

  • IMG_0622_zpsc83600dc.jpg
    IMG_0622_zpsc83600dc.jpg
    46.9 KB · Views: 216
  • IMG_0628_zpsa758a367.jpg
    IMG_0628_zpsa758a367.jpg
    54.7 KB · Views: 227
  • IMG_0623_zps4778422c.jpg
    IMG_0623_zps4778422c.jpg
    55.5 KB · Views: 224
  • IMG_0624_zpsdd25ba2c.jpg
    IMG_0624_zpsdd25ba2c.jpg
    66.3 KB · Views: 223
  • IMG_0626_zps345cbfbf.jpg
    IMG_0626_zps345cbfbf.jpg
    62.6 KB · Views: 215
  • IMG_0625_zps42275894.jpg
    IMG_0625_zps42275894.jpg
    54.2 KB · Views: 215
  • IMG_0627_zps106d6125.jpg
    IMG_0627_zps106d6125.jpg
    60.6 KB · Views: 231
  • IMG_0631_zps0b600cb5.jpg
    IMG_0631_zps0b600cb5.jpg
    64.6 KB · Views: 231
  • IMG_0629_zps7b7f441a.jpg
    IMG_0629_zps7b7f441a.jpg
    75 KB · Views: 219
Status
Not open for further replies.
Back
Top