glasscutter Mark V build (Fiberglass/Aqua-Resin)

Status
Not open for further replies.
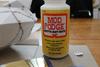
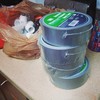
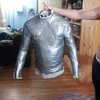
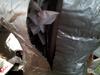
This update is going back to the sealing stage for a new test. After seeing some of the warping my wife suggested using Mod Podge to seal the cardstock instead of Acrylic spray sealer. She uses it in scrapbook/jewelry making. So I figured what the heck, it couldn’t hurt. I used a LD version of the Mark V CE forearm for the test victim. Nice big pieces of cardstock just begging to warp lol. Hoping it works out because it is non-toxic, washes off with soap and water, and doesn’t ruin brushes.

IMG_0640_zpsf921dec1.jpg

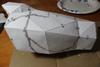
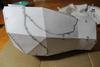
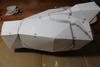
The first few coats were very light almost like dry brushing.
IMG_0632_zps598d2910.jpg
IMG_0633_zpsa73cd57f.jpg

After the first coat the only warping was from me handling it while coating. Oh and my daughter poking at it and declaring, “My imperial helmet is harder and better”, and then walking off. I love the way little kids think lol. Anyway, the first two coats were very light and mostly covered the piece. The below close ups are after the first light coat.
IMG_0634_zps183580ab.jpg
IMG_0635_zpsf6bf726e.jpg

And then the second light coat.
IMG_0638_zps4563b8b6.jpg

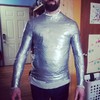
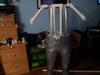
After that a full light coat was put on the entire piece.
IMG_0639_zpsd4ac32fa.jpg

No real warping to speak of yet. Another full coat has been applied on the outside and 1 really light and 1 full coat on the inside. Pics of that with some outside resin later this week.
 

Attachments

  • IMG_0640_zpsf921dec1.jpg
    IMG_0640_zpsf921dec1.jpg
    58 KB · Views: 161
  • IMG_0632_zps598d2910.jpg
    IMG_0632_zps598d2910.jpg
    51.7 KB · Views: 156
  • IMG_0639_zpsd4ac32fa.jpg
    IMG_0639_zpsd4ac32fa.jpg
    43.3 KB · Views: 163
  • IMG_0638_zps4563b8b6.jpg
    IMG_0638_zps4563b8b6.jpg
    39.9 KB · Views: 162
  • IMG_0635_zpsf6bf726e.jpg
    IMG_0635_zpsf6bf726e.jpg
    36.7 KB · Views: 177
  • IMG_0634_zps183580ab.jpg
    IMG_0634_zps183580ab.jpg
    28.1 KB · Views: 151
  • IMG_0633_zpsa73cd57f.jpg
    IMG_0633_zpsa73cd57f.jpg
    45.2 KB · Views: 164
Make sure you have good fresh product. One of my first supplies of Aqua Resin had to be refunded. The place it was shipped from kept it on the shelf too long and I'm sure the liquid froze at one point. My pot times where only 5 minutes and the batches came out ridiculously thick . Also craft sticks or scrap cardstock are your friend on any large surfaces.

Modge podge is good stuff.
 
I didn't even think about the product being old. Next batch will get timed to see the difference in pot times. The powder tub did have a layer of dust on the top. Scrap cardstock and craft sticks is a good idea. Give those large flat areas some extra reinforcement. Thank you.
 
If ever I can afford this alternative to epoxy, I will be all over it for sure! I really appreciate all the testing you are doing (something I love doing too!). Thanks!!!
 
Put a couple coats of 1:2 ratio resin on the outside yesterday. The Mod Podge worked like a charm. Good adhesion of the Aqua resin and no warping. I didn’t even need to apply the first lightly.

Also got time to try some of the 10mil and 30mil Aqua Veil. Thanks to RYNO_666 for letting me know spray adhesive works with the Aqua resin. Both spraying adhesive on the part and the individual pieces of Aqua Veil worked great. Both achieved full wet through after being adhered to the pep piece! Another bonus is the resin didn’t melt the adhesive like poly resin. The parts stayed in place the whole time. Small movements to the veil were possible by using my finger if needed.

The 10mil is definitely my favorite. It was able to conform to all the angles I threw at it and stay that way. Using 10mil will require two layers in high stress areas, but I think it’s worth it. This morning the strength of the hardened 10mil felt equivalent to the fiberglass cloth sold in Walmart for poly resin. I’m not going to test that with a force meter or anything though lol.
IMG_0641_zpse2f85880.jpg
IMG_0644_zps4c295726.jpg


30mil veil was super strong. It felt stronger than two coats of fiberglass cloth. Not quite as good to conform around bends as the 10mil. I ended up with some small gaps at the 90 degree bends. The 30mil also tended to fray apart more when using the adhesive. My current plan is using the 10mil for everything but the boots. I think the boots will get a layer of 10mil, then a layer of the 30mil for added strength.
IMG_0643_zpsf336b2d4.jpg

Next up is playing with using Aqua Resin as a bondo replacement. I will be going with the suggestions RYNO_666 gave. Thanks again RYNO for all the information! A 1:2 resin mix with 2 Teaspoons Poly Fiber II per half cup, and THX-6 thickener as needed for consistency. On the list is also trying to get a paste consistency. This might be nice if possible to smear on and sculpt for details or a glazing compound replacement. My ultimate goal is make everything in the build but painting and sanding indoor safe. Well that and actually have a full suit of armor at the end!
 

Attachments

  • IMG_0643_zpsf336b2d4.jpg
    IMG_0643_zpsf336b2d4.jpg
    45 KB · Views: 187
  • IMG_0644_zps4c295726.jpg
    IMG_0644_zps4c295726.jpg
    32.5 KB · Views: 189
  • IMG_0641_zpse2f85880.jpg
    IMG_0641_zpse2f85880.jpg
    33.6 KB · Views: 182
Well the bondo replacement was a pretty big failure. The first batch came out way to thick and grainy. The second was too thin and viscous. Further testing will definitely be needed. For now the plan is going with bondo. Going to keep playing with getting the mix right but I need to actually start getting something built.
 
Your welcome. I'm so glad to see somebody else using Aqua Resin. Trust me when I say I've almost used everything. And this is by far the most superior product.

I did a 10 ft drop test and my son's helmet didn't break. I also had a slush of Aqua Resin in the bucket as a final step.


Your build is coming along terrific!

What if it broke?
 
Well after that praise now I feel bad about quitting after just two tries. Maybe I will think about it and try again this coming weekend.
 
Thanks the video definitely helped. Lots of light coats is very true with bondo. I learned that the hard way making an Imperial Guard helmet. After thinking it over, I am going to try the Aqua-Resin again for bondo replacement. Introducing several variables at once did not help things. According to the tech sheets, just using THX-6 should get me to bondo consistency. The tech sheets also mentioned mixing the thickener with an equal amount of water first then incorporating into the resin mix. That will be my next test on Friday or Saturday.

Added bonus the dollar store here had thin flexible plastic kitchen cutting sheets. One dollar for a pack of two. The bottoms are smooth and will be my new mat for mixing and holding the resin in bondo consistency.
 
Took a break from armor building and bought some stuff today.

cc_zps6774eca8.jpg

Can you guess what pvc pipe and duct tape have in common? Well here is what they equal, at least the top part so far. Bottom half will be tomorrow. Much thanks to my wife for patiently taping me up.
bb_zps47acfd16.jpg
aa_zps5803919a.jpg
 

Attachments

  • cc_zps6774eca8.jpg
    cc_zps6774eca8.jpg
    111.2 KB · Views: 192
  • aa_zps5803919a.jpg
    aa_zps5803919a.jpg
    97.6 KB · Views: 184
  • bb_zps47acfd16.jpg
    bb_zps47acfd16.jpg
    107.7 KB · Views: 184
It’s done. Thanks to everyone on here that posted the instructions on making it and a couple random dress form videos on YouTube.
20140316_161021_zpsakeuxyab.jpg
20140316_192029_zpshfzngamw.jpg
20140316_203334_zpsvkmvb739.jpg
a_zpscda995b5.jpg
 

Attachments

  • 20140316_161021_zpsakeuxyab.jpg
    20140316_161021_zpsakeuxyab.jpg
    89.6 KB · Views: 188
  • 20140316_203334_zpsvkmvb739.jpg
    20140316_203334_zpsvkmvb739.jpg
    81.5 KB · Views: 174
  • a_zpscda995b5.jpg
    a_zpscda995b5.jpg
    77.7 KB · Views: 181
  • 20140316_192029_zpshfzngamw.jpg
    20140316_192029_zpshfzngamw.jpg
    73 KB · Views: 183
That came out fantastic! So, when you coming to my place to help me make mine? :) (my wife does not have the patience nor the capability -torn arm ligaments- to do it)
 
Thanks for the compliments. I appreciate it!

It was fun to make. The only boring part was stuffing it. 3 1/2 packs of 70 sheet each packing paper to fill it. I used 1" pvc pipe (about 27' total), 8 T adapters, 8 90 degree adapters, and 4 45 degree adapters. I think the 1' pvc was overkill though. The 3/4" or maybe even 1/2" would have been fine. They would have given me room to put another tee in for a neck pipe also. I might pull out some of the stuffing and put a double rolled cardboard tube in the neck later. Something sturdy enough to hold a helmet. Oh and I would highly recommend a pair of medical bandage removal scissors like first responders or first aid kits have. Also test them on a scrap of the cloth plus duct tape first. My blunt end scissors ended up not cutting through the thermal underwear very well. The sharp point ones did, but a few little scabs on my arms and legs prove it wasn't a painless process.

EVAkura that could happen. Would be a few weeks before I got a couple free days to do it though.
 
That must have bin a fun time " honey can you tape me up?" looks awesome keep it up
 
This has been really interesting to read so far! I have a dressform dummy but a duct tape one is a great idea for the legs and arms! Looks like i need to go get me some PVC and some duct tape! Nice job!
 
That must have bin a fun time " honey can you tape me up?" looks awesome keep it up

Yeah that was pretty funny. I got the "you want to do what?" look. lol

This has been really interesting to read so far! I have a dressform dummy but a duct tape one is a great idea for the legs and arms! Looks like i need to go get me some PVC and some duct tape! Nice job!

Might want to get a few rolls in different colors. Trying to get an even second layer of tape the same color was hard. A few spots blew out a little when stuffing because they only got one layer of tape. Had to fix as I went. Making the second layer a different color would be a lot easier.
 
Status
Not open for further replies.
Back
Top