REDSTAR's Titanfall pilot build

Status
Not open for further replies.
It's just the pep model. I wasn't thinking about keeping it in the final paint scheme but do you think its a good idea?
 
Last edited:
Update!

Day 6:

IMG_3086_zps45757493.jpg

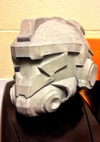
It may not look like it but I've poured liquid plastic into the helmet and slush casted it. I also gave it a coating of primer. Tomorrow I'll sand the thing smooth.
 

Attachments

  • IMG_3086_zps45757493.jpg
    IMG_3086_zps45757493.jpg
    82.9 KB · Views: 302
Last edited:
Really good job so far! are you gunna use the default pilot helmet paint scheme from the game, or are you gunna design your own?
 
Really good job so far! are you gunna use the default pilot helmet paint scheme from the game, or are you gunna design your own?

I was going to give all the armor a custom paint scheme similar to the Titanfall controller.

titanfall_controller1_zps80831a87.jpg

Black, orange, and white with some grey.
 

Attachments

  • titanfall_controller1_zps80831a87.jpg
    titanfall_controller1_zps80831a87.jpg
    56.8 KB · Views: 212
You helmet looks great so far! Are you planing on molding it? I'm keeping my ear muffs detached because I'm planing on making a separate mold for them.

Edit: Did you remove the paper around the edge where the top attachment slides into place to make it fit, or did you just force glue it in?
 
You helmet looks great so far! Are you planing on molding it? I'm keeping my ear muffs detached because I'm planing on making a separate mold for them.

Edit: Did you remove the paper around the edge where the top attachment slides into place to make it fit, or did you just force glue it in?

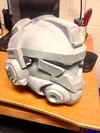
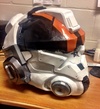
I don't plan on making a mold, I had to do a little cutting to make the ear sections fit but the helmet is one piece now. I just removed a little bit from them so that they fit around the air intake and glued them in place. If you look closely you can see where I used large amounts of hot glue to fill the void between the intakes and the ear pieces. I think I'll buy a cheap pair of headphones, gut them, and put them inside when I'm done.
 
Last edited:
Update!

Day 7:

IMG_7222_zps440226a3.jpg

All smooth! well, at least smooth enough for me... Can't wait to start painting!
 

Attachments

  • IMG_7222_zps440226a3.jpg
    IMG_7222_zps440226a3.jpg
    101.5 KB · Views: 207
Last edited:
Update!

Day 8:

IMG_2359_zpscd2dd19f.jpg

Basecoat of white....
you can also see that I added in additional details. I used thin EVA foam for these.
 

Attachments

  • IMG_2359_zpscd2dd19f.jpg
    IMG_2359_zpscd2dd19f.jpg
    109.1 KB · Views: 188
Last edited:
Update!

Day 8:

IMG_2260_zps89c9f6c9.jpg

Almost there...

IMG_8234_zpsbf36d0ba.jpg

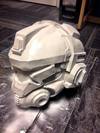
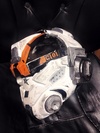
Mostly done with the paint, still a few little details I want to add here and there though. Thanks for all the comments everyone! next, I put in the visor.
 

Attachments

  • IMG_8234_zpsbf36d0ba.jpg
    IMG_8234_zpsbf36d0ba.jpg
    93.7 KB · Views: 170
  • IMG_2260_zps89c9f6c9.jpg
    IMG_2260_zps89c9f6c9.jpg
    76.9 KB · Views: 193
im kinda new to pepakura, i already built the pilot helmet, bondo and sand, then im going to add primer when im done sanding but, is there another way that you might have done it to make it smooth?
 
This looks very well done especially for your turn around time. It looks like Jico made a great model to use as a base and good job smoothing the paper.
 
I can't believe how quickly this build has progressed. I can only hope to be as skillful as you. Keep up the good work.
 
Valector:
Nope, not really. Any method that creates a good final product works just fine!

Satchmo III:
I love your pep models! Thanks for the support!

Ppapered:
8 days...including a day off.... :)
 
Last edited:
Status
Not open for further replies.
Back
Top