Okay it's been a while, but I have good news!
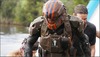
Suit is completed and was taken out to it's first race at South west mudfest in Margaret river.
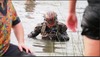
Man that was stressful to tread water in.
Running the race wasn't as hard as I would've thought. I kept up a decent trot for most of the course, but as is the common for obstacle course races, if you don't get out on the first wave, you will be bogged down with bottlenecks as slower people queue on the obstacles. My watch gave me a time of 1:06:12, and my race time came out to 1:52:32.
I started out the day with the 3 hour drive down to the event. I arrived with plenty of time to spare for the event bus to get me down to the course. So I thought. I spent another half hour in the queue till I got picked up.
I arrived to see my league mates already halfway through the course. Since I figured my league placing was already ruined from missing out on the wave, my suit was only slated for a quick 5km at the end of the day, but what the hell I suited up for the next 12km wave.
I have trained with body armor and weighted vests before, so I could deal with the weight. The real issue was the helmet, and the shins.
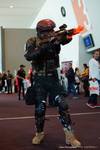
Instead of installing a visor in the helmet I used some heavy gauge flyscreen wire which I padded over so I wouldn't get stabbed by loose wiring. That helped not fog up the visor, but it still made breathing difficult as my breath splashed up onto the foam padded mandible. After a while it got distracting having to deal with tasting my own breath every time I was trying to suck down fresh air.
My shins were not pepped well to begin with. They were scaled to my shin height, but not my calf width or depth. I ended up cutting them in half and strapping the front onto a mx knee/shin brace.
As seen here.
Imagine not having boots to stop that bottom part from rubbing/smacking on your shin every time you took a step.
As seen, I also opted out of the thigh and forearm pieces, just for the simple fact that they impeded my range of motion too much to be practical.
I do have a thigh rig on though, which doesn't exclude a thigh piece from future projects.
Damage to the suit was minimal, the shoulders kept getting caught on netting as we leopard crawled through mud, I managed to snap off a few layers brute forcing through the nets, nothing major the F.glass is showing through but it's a minor patch job.
The shin pieces took a harder hit, considering they got off light in terms of reinforcing. They got the composite backing, but nothing for an external shell. Just painted straight over the paper, as a result, all contact sites have stripped paint, and a few cracks have appeared on the bottom part of the piece.
(will upload photos later)
Now a word on the actual construction of the suit.
It was fairly straight forward on the design, you just needed to understand each property of the materials you were working with.
Polyurethane has a fair amount of flex and is an excellent first layer to the initial pep.
F.glass can be bought in varying strengths, much cheaper than kevlar, and gives a rigid bond to the polyurethane.
Kevlar is ridiculously hard to work with, you need bloody shears to cut it, and just sucks up epoxy, and loses most of it's properties if you sandwich it between multiple layers of F.glass. But properly applied, the stuff's amazing.
Metal tech filler destroys detail on pep models, but no other filler gives better impact resistance.
Silicone is great, but it comes in many forms, and it is important to choose the right crate full.
I said that I would use expanding foam in the past, but that got shot down as soon as I saw it in action. Low adhesion rates, low density, low impact absorption. On a whim I used silicone sealant (you know, the stuff you use to seal the cracks in your bathroom) Which immediately gave me everything I wanted in a gel layer.
My workflow for a piece would go like this:
- Rotocast inside of resined piece with polyurethane casting mix
- Apply layers of F.glass stepping up from smallest to highest weight.
- Apply Kevlar to stress points of piece.
- Use leftover kevlar and heavy F.glass to secure mounting system,
- Apply metal tech filler to exterior of piece.
- Sand down and lament all the detail I lost.
- Apply normal filler and try to build up details again.
- Ditch project for several months.
- Smear a silicone paste on the inside of pieces to waterproof.
- Fill any voids with more Silicone.
- Run out and switch to backups I found in a caulking supply box in the shed.
- OH GOD THIS WHITE STUFF IS HORRIBLE
- Paint.
- Mount to undersuit.
- More silicone.
Fix, Improve, Sustain.
Fix:
- Patch up shoulders, and shin.
- Work on the paintjob.
Improve:
- Use ABS plastic to replace resin paper and polyurethane
- , use epoxy for F.glass and Kevlar, rather than just for kevlar
- , Make sure you have enough CLEAR silicone sealant because silicone is impossible to get out completely
- Liquid nails works, but it sets too hard for my liking.
- Get better at recovering detail from metal tech filler
- Avoid pain by pepping pieces to scale
Sustain:
I dunno keep running I guess.
Rig points: For pieces Attached to the chest rig I would make a molle pattern with leftover strapping weave, secure it down, and secure it to the rig with zip ties.
The helmet is the guts of an imitation mich helmet that I had lying around, the straps lined up perfectly, everything bolted into place, even the padding just needed to be dropped in. The rails are serviceable, so I'm thinking of attaching a camera or a flashlight to it.
")