ahhh the assault rifle -
many a time have i sat and wondered if there was a way of making one that did more than be a huge paperweight - Johnson Arms usually manage a quality example and iv seen a few floating about on the net (mostly here) but for most of us its not so easy...
so here is my WiP so far; when starting i was undecided between a BR or AR- another reason for the recon is it can be modded to both (the stock & gun shape actually fit the BR alot better)
firstly i used a Recon... the rayvern fits the shape better and would be full auto - but 1) you cant fire it at conventions anyway 2) there not as easy to find on the cheap and 3) you need the barrel etc from the recon too, so i decided to cheat and just use that instead.
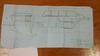
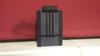
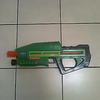
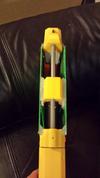
step 1) The Stock - Shorten and box in;
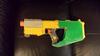
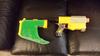
I first removed the stock and shortened it by about 3-4cm... basically you take it apart and cut a section out, then glue the remaining parts back into the first yellow section after where the stock attaches (pic 1). If you do this correctly the back of the gun will now sit flush up to the yellow section that you just glued and put back together (see pic 2)
this little mod makes the stock almost the correct length as the AR.
box in using any material you want (i used plastic from an old tray), and add detail - which i havent done fully yet (pic 3). sweep the boxing forward to meet the grip, you can have it slot in if you wish (pic 4)
Step 2) the flashlight;
the factory light in the grip below the barrel is pretty useless so i removed and fitted a simple LED torch that fitted pretty easily after some work with the dremel. make a hole at the back of the torch and run 2 wires down to the switch on the grip - solder and glue it all in place. the other option is remove all the innerds and slide a maglight with a magnet on the end in, whichever you prefer.
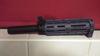
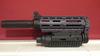
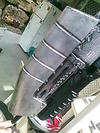
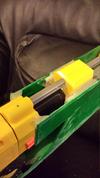
step 3) the under barrel grip;
i pretty much scratch built this from some old salt and pepper pots cut in half and a few bits of pipe laying round - inside these i made a tactical rail slide that fits onto the bottom rail of the light housing allowing it to be removed if i choose (pic 5) but theres nothing stopping you from simply gluing a grip on permenantly, again just personal preference. just be sure it fits flush to the gun, but doesnt get in the way of the twisting barrel removal.
to make it all seamless i used some scraps of rubber window seal that were left over. very useful if you want to cover those hard to fit gaps.
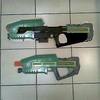
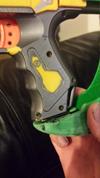
step 4) de-badge the entire gun;
sand and tidy any bits you want removed e.g. the name or the nerf logo (pic 6).
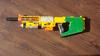
a good picture of mid way through the mod (pic 7)
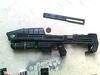
step 5) the top barrel housing
this part im yet to get to grips with - my 3 choices are build using foam/plastic, find a cheap kids gun with the top section (make of buzz bee i believe?) or vacuum form from a mould.
im leaning towards the latter - partly for ease once i make the mould and partly because i can make more - once iv built a vacuum former ill give it a bash and see what it comes out like - if its half decent i might put together a kit that people can purchase, so you wont have to go through it yourself.
step 6) disassemble, paint,reassemble and distress;
pretty simple - just make sure you give it a good coat of laquor all over - especially on the sliding sections to stop the paint rubbing off or chipping.
i also added a peice of piping onto the end of the barrel so it will extend past the top section when its fitte, purely decoratiknal but remwmber to use a significantly larger diamater then the actual barrel or ull effect the darts range.
more pics to follow and details when iv finished.
pic 1 -
Pic 2 -
Pic 3 -
Pic 4 -
Pic 5 - incoming later
Pic 6 -
Pic 7 -
many a time have i sat and wondered if there was a way of making one that did more than be a huge paperweight - Johnson Arms usually manage a quality example and iv seen a few floating about on the net (mostly here) but for most of us its not so easy...
so here is my WiP so far; when starting i was undecided between a BR or AR- another reason for the recon is it can be modded to both (the stock & gun shape actually fit the BR alot better)
firstly i used a Recon... the rayvern fits the shape better and would be full auto - but 1) you cant fire it at conventions anyway 2) there not as easy to find on the cheap and 3) you need the barrel etc from the recon too, so i decided to cheat and just use that instead.
step 1) The Stock - Shorten and box in;
I first removed the stock and shortened it by about 3-4cm... basically you take it apart and cut a section out, then glue the remaining parts back into the first yellow section after where the stock attaches (pic 1). If you do this correctly the back of the gun will now sit flush up to the yellow section that you just glued and put back together (see pic 2)
this little mod makes the stock almost the correct length as the AR.
box in using any material you want (i used plastic from an old tray), and add detail - which i havent done fully yet (pic 3). sweep the boxing forward to meet the grip, you can have it slot in if you wish (pic 4)
Step 2) the flashlight;
the factory light in the grip below the barrel is pretty useless so i removed and fitted a simple LED torch that fitted pretty easily after some work with the dremel. make a hole at the back of the torch and run 2 wires down to the switch on the grip - solder and glue it all in place. the other option is remove all the innerds and slide a maglight with a magnet on the end in, whichever you prefer.
step 3) the under barrel grip;
i pretty much scratch built this from some old salt and pepper pots cut in half and a few bits of pipe laying round - inside these i made a tactical rail slide that fits onto the bottom rail of the light housing allowing it to be removed if i choose (pic 5) but theres nothing stopping you from simply gluing a grip on permenantly, again just personal preference. just be sure it fits flush to the gun, but doesnt get in the way of the twisting barrel removal.
to make it all seamless i used some scraps of rubber window seal that were left over. very useful if you want to cover those hard to fit gaps.
step 4) de-badge the entire gun;
sand and tidy any bits you want removed e.g. the name or the nerf logo (pic 6).
a good picture of mid way through the mod (pic 7)
step 5) the top barrel housing
this part im yet to get to grips with - my 3 choices are build using foam/plastic, find a cheap kids gun with the top section (make of buzz bee i believe?) or vacuum form from a mould.
im leaning towards the latter - partly for ease once i make the mould and partly because i can make more - once iv built a vacuum former ill give it a bash and see what it comes out like - if its half decent i might put together a kit that people can purchase, so you wont have to go through it yourself.
step 6) disassemble, paint,reassemble and distress;
pretty simple - just make sure you give it a good coat of laquor all over - especially on the sliding sections to stop the paint rubbing off or chipping.
i also added a peice of piping onto the end of the barrel so it will extend past the top section when its fitte, purely decoratiknal but remwmber to use a significantly larger diamater then the actual barrel or ull effect the darts range.
more pics to follow and details when iv finished.
pic 1 -

Pic 2 -

Pic 3 -

Pic 4 -

Pic 5 - incoming later
Pic 6 -

Pic 7 -

Attachments
-
 20141020_033145_zps7so4nnsj.jpg49.3 KB · Views: 196
 -
 20141020_033309_zpsyxaiwc9d.jpg54.2 KB · Views: 198
 -
 20141010_135127_zpsfpus3lgi.jpg102.1 KB · Views: 221
 -
 20141020_033230_zpsl7wgqtkd.jpg49.8 KB · Views: 200
 -
 20141020_033129_zpseyasslrh.jpg48.8 KB · Views: 195
 -
 20141020_033104_zpsd0nmhk7b.jpg55.6 KB · Views: 221