TonyBoy's Halo 4 Air Assault Armor Project

Status
Not open for further replies.
Normally I sport armor with a Sky Blue main color with Yellow accents, but for detail purposes the accents can be red or dark red. Seriously Chernobyl, you are a life saver.

That's fine. Unfortunately, 3DS Max wasn't playing ball with me, but RobTC has promised to help me out with a similar process for Blender later, so I may be able to provide you with a better version of this file at some point. For now. I've included a basic screenshot of the file, plus the texture itself for your own use - the texture map should work with the raw game-ripped Air Assault torso file in either Pepakura Designer or Blender. Black indicates primary colouring, the white indicates secondary colouring.

If you need anything else, please don't hesitate to get in touch.

EDIT: regarding your thighs, I'm surprised that you're assembling the buckles and not cutting them off to use your own. Having real straps there could be extremely useful when it comes to mounting weaponry or extra equipment.
 

Attachments

  • TB AA Torso V1.JPG
    TB AA Torso V1.JPG
    229.5 KB · Views: 317
  • Bitmaptexture_Composite copy.jpg
    Bitmaptexture_Composite copy.jpg
    56.2 KB · Views: 298
That's fine. Unfortunately, 3DS Max wasn't playing ball with me, but RobTC has promised to help me out with a similar process for Blender later, so I may be able to provide you with a better version of this file at some point. For now. I've included a basic screenshot of the file, plus the texture itself for your own use - the texture map should work with the raw game-ripped Air Assault torso file in either Pepakura Designer or Blender. Black indicates primary colouring, the white indicates secondary colouring.

If you need anything else, please don't hesitate to get in touch.

EDIT: regarding your thighs, I'm surprised that you're assembling the buckles and not cutting them off to use your own. Having real straps there could be extremely useful when it comes to mounting weaponry or extra equipment.

Thank you very much, and sorry I hadn't responded sooner. I have been studying the texture very thoroughly and shall continue to do so. As for the thigh details you mentioned, I kind of like how they are raised out of the model and decided to keep them. I plan to attach straps to those parts as you and Cpl Shepard had suggested. I always have ideas running through my head about this project, its just all the matter of working up to them :3


Pseudo Update?

Hey everybody! I am deeply sorry for my lack of work since my last post. Since I've gotten a full time job, I have been putting most of my time and effort into saving money to buy a car and a years worth of car insurance. I've even picked up some odd jobs around the town like mowing people's lawns, baby sitting, and even pest control with my trusty rifle..... Squirrels are a major nuisance around where I live.... Besides that, I had gone to the doctor for a routine checkup and didn't have the best bill of health. In short, I have to exercise more than I already do and with everything else on my plate I've had little to no time to sit down and actually put together the other parts of the armor....

But here is a silly set back to lighten things up. So I sat down and printed out the left ODST Leg armor pieces. At the end of the printing, my printer finally ran out of black ink and I started cutting out some pieces. Half way through putting together the knee cap, the little voice in the back of my head popped up and said "Did you mirror the pieces before printing?"...... Short answer. No.... So I ended up printing out the right ODST Leg again and just started laugh like a maniac. Fortunately I can just score the opposite side of the paper and pep as you normally would and eventually I'll have the left leg done. Of course this will take a bit longer since I don't have guide lines to score on, but it will get done nonetheless.

So let my silly little mistake be a lesson to anyone new at pepakura or building armor. Mirror your file before printing out the opposite side of your legs/arms/shoulder pieces!

Again, I appologize for my absence as of late but do still feel free to drop me a private message or reply here in the thread if you have any questions, comments, or concerns. Until next time, which I hope is within a week, take care and stay golden :p
 
Last edited by a moderator:
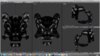
Good evening ladies and gentlemen. I have returned again with good news, bad news, and better news. Good news is that I'm back again and ready to get down to business. Bad news is that during a thunderstorm, someone opened the window in my working area and caused all of the armor to get damp and become warped. And the better news is that I have already started on fibreglassing/rondoing my first piece of armor! Its a small piece of armor but its better than nothing :3

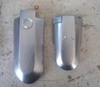
I'm going to start with the smaller pieces because if I happen to mess up, then it won't be too hard to make the piece again. Anyways, I took today to harden up this piece of the Air Assault Shoulder piece. I applied a moderate coat of fiberglass resin to the outside and used my trusty hair dryer, set it to hot with a low speed setting, and kept making passes over the piece to aid in the curing process. I did this for about 15 minutes and it was nice and dry. After the surface had no stickiness to it, I mixed up some Rondo (a 1:1 fiberglass resin and bondo mixture) and spread it around the inside of the armor piece. I repeated the same process with the blow dryer and decided to let it sit in the garage near an open door to fully cure overnight.

IMG_20150826_194345.jpg

This is most of the stuff that I used to harden the armor piece. I forgot to include it in the picture, but you should always wear gloves, goggles, and a respirator when using fiberglass resin. I measured with a liquid measuring cup how much an ounce was and marked plastic cups accordingly before pouring in the the resin. The last thing anyone wants to do is waste material so measure your stuff carefully. When applying the resin coat, I guessed 1 ounce would be just enough... I was wrong. I ended up using almost 1/4 of what i had in the cup. The same thing happened with the rondo as well, so learn from my oopsie doodles that way you don't waste your own material XD.

IMG_20150826_194500.jpg

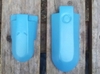
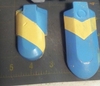
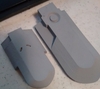
In the end, the resin and rondo cured pretty gosh darn well. I gave my work bench a couple good taps with the armor piece and it held up well. I even stacked some stuff on top of it as an added stress test and of course it passed, which made me happy. This was my first time rondo-ing anything and I'm pretty excited to continue with this project. Tomorrow I will clean up any bumps caused by the resin curing on hot glue bumps and do my first round of smoothing. The only thing I'm going to have to fix is the top bit from bending forward as seen in the picture below. This happened in both pieces that I had to throw away so I must dive into the blender and fix this.
IMG_20150826_195449.jpg

I'm super excited to be back and can't wait to get the ball rolling again on this project. I knew it would take a while, but I got the patience to take it on :D. As always, comments and criticisms are welcome and never be afraid to ask a question or drop me a pm. Thank you everyone to viewing this ongoing project and have a wonderful rest of your day.
 
Update Time!

Good evening everyone, I come bearing gifts in the form of sweet, sweet progress. Today I went to the store and picked up some much needed needle files, assorted grits of sandpaper, filler primer, and the biggest container of bondo I could afford; so it is safe to say I won't need to buy anything else aside from pray paint of the color I want my armor to be.

1441245676899_zps84rwgvko.JPG 1441245766889_zpsjni0gf7a.JPG

After about halfway through the smoothing process, I realized the piece I was working on would be too big and inhibit some arm mobility/flexibility once I put on any type of forearm armor. That being said, I scaled down the bicep piece, printed, assembled, and almost fully smoothed and sanded it before the end of the night. I would say the one thing that had me concerned the most was the the rectangular protrusion at the top of the piece always wants to bend after resining it, but it seems a well done first layer of bondo and sanding evens it out and makes it look like it wasn't warped in any way, so that is a relief. Besides that, there were no other complications with building this part so far. I will have to sand down the primer, do another coat of spot putty, re-primer it to check for any more imperfections and then I can call this piece done until I mark the pattern to paint it in the future.

That's it for the update for now. Thank you everybody for coming to stop by and viewing this thread, have a wonderful rest of your day and best of luck on all your own projects. :D

1441245676899_zps84rwgvko.JPG


1441245766889_zpsjni0gf7a.JPG
 
Last edited by a moderator:
This looks fantstic! Can't wait to see the final product in all it's glory.
Subscribed!

Thank you very much! Even if it takes me another year to make it, it will eventually get done :D

Aaaaaaand Update!

IMG_20150908_174827_zpscrudej3p.JPG

Since the last update I have sanded and smoothed all three parts of the shoulder armor. Huzzah! Now all that is left to do, at least with these pieces, is to fix tiny details and detail them. What I plan to do with all the pieces after the detailing is finished is to make a mold of them. This will allow me to reproduce them should any of the pieces break when I eventually wear my suit to cons and what not. However, I have never made a mold before and I have zero experience with smooth on products so this project just got a whole lot more interesting for me. I know the type of mold I want to make is the one where its basically two slabs of silicone sandwiched together, but again, i have no experience with this stuff so I'll have to research a whole bunch about it.

IMG_20150903_122521_zpsg7odopei.JPG --------> IMG_20150906_193433_zpszbxbv9en.JPG

The little piece here is the part that goes on the back of the arm, or the triceps. It didn't pep out as nicely as I wanted it to, but I got it to a place I felt comfortable in the end. Unfortunately I'll have to edit this part of the model because it would be hard to mold since the back is hollow and it is oddly shaped as well. I also added the "button" on the bicep piece. It was rough at first and it still needs some clean up.

IMG_20150906_193419_zpswqk3t46h.JPG --------> IMG_20150908_174827_zpscrudej3p.JPG

This main piece was annoying, mainly because I don goofed and put bondo straight onto the resin before giving it a quick sanding. Long story short, most of the bondo I put on peeled off effortlessly since the surface was too smooth to adhere to. You may be able to tell in the last picture that the primer in the inset bits is crackled and doesn't look too good. That is what happens if you don't sand the resin coating first :p.
IMG_20150908_175053_zpsvz7nqdwr.JPG

For now I will go on to fix up some bits and detail for a while. Thank you for stopping by and have an awesome rest of your day :D

IMG_20150908_174827_zpscrudej3p.JPG


IMG_20150903_122521_zpsg7odopei.JPG


IMG_20150906_193433_zpszbxbv9en.JPG


IMG_20150906_193419_zpswqk3t46h.JPG


IMG_20150908_175053_zpsvz7nqdwr.JPG
 
Last edited by a moderator:
This is the first progress post that i've read that is actually informative and detailed enough to completely understand your process! Good job and keep up the good work!
 
This is the first progress post that i've read that is actually informative and detailed enough to completely understand your process! Good job and keep up the good work!

Thank you :D I try my best to convey how/why I do things. I also try to point out whenever I mess up as a way of having others learn from my own mistakes. Trust me, it really stinks having to re-make the Air Assault Helmet for a 6th time XD
 
This is fantastic! I'm still sort of new to this so my helmets haven't really turned out well, but I can't wait to see what this will look like when finished!
 
Keep up the great work! Can't wait to see the final product!

This is fantastic! I'm still sort of new to this so my helmets haven't really turned out well, but I can't wait to see what this will look like when finished!

Although it has been a while since I have posted anything, I do still read through the replies and I appreciate each one every time.

Well, since I am posting something, ya'll better believe I made some progress! Although the progress I made doesn't at all make up for the time I have been away, I got a couple pieces finally painted and finished out. However, I do plan to be getting a 3D printer sometime next month so hopefully the building/assembaly stage will be a bit smoother and less.... how should I say.... fume-y? Cuz the fumes from fibreglass resin like to linger around like the smell of a skunk. Anyways, time for the pictures.

So, when I was looking at these two pieces I said to myself "Why not give it the old black and silver washes and see how it looks from there?" Long story short... I did, hahaha. When I saw the shine of the silver I just knew I had to do the rest of the paint job.
1f5ba930-95d7-4c9e-b837-4aaee00b9918_zpszeudblae.jpg


IMG_20160331_173842_1_zpskalmxbux.jpg
IMG_20160331_185512_1_zpsuawnwq43.jpg


After hours of scouring the interwebs for a image/video that shows the back of the Air Assault shoulders with the VISN skin, I managed to stencil out a pattern, give it a wash of blue, and lastly tape off the stencil areas and give it a nice spray of yellow. The paint job didn't come out as clean as I wanted it to, but I think that's because I tried to spray the yellow on the blue paint which had no grip-able surface. You can see the messiness better on the longer/bicep piece. Although, I could always pass it off as weathering ;3

As for the other pieces, I will be redoing the main shoulder bit as a 3D print and I will be starting on rebuilding the leg pieces soon. I'm redoing the main shoulder bit as a 3D print mainly because I had some pretty bad breakthroughs while I was trying to dremmel out some grooves.... Also the cat decided to smack it around and then down the stairs to the basement. Anyways, I will be posting back with updates on the leg pieces as I complete the stages. Until then, thank you everyone for viewing and posting, and have yourselves a wonderful rest of your day :D
 

Attachments

  • 1f5ba930-95d7-4c9e-b837-4aaee00b9918_zpszeudblae.jpg
    1f5ba930-95d7-4c9e-b837-4aaee00b9918_zpszeudblae.jpg
    64.7 KB · Views: 122
  • IMG_20160331_173842_1_zpskalmxbux.jpg
    IMG_20160331_173842_1_zpskalmxbux.jpg
    57.4 KB · Views: 141
  • IMG_20160331_185512_1_zpsuawnwq43.jpg
    IMG_20160331_185512_1_zpsuawnwq43.jpg
    90.7 KB · Views: 147
Good evening ladies and gentlemen, so I had a change of plans. Since I got my 3D printer before I could finish putting together my ODST legs, I went ahead and printed out the Bicep and Tricep pieces to see how they compare with previous ones. I have come to a conclusion that I very well prefer the 3D printed pieces more. I mangaged to get important details into the prints that I previously could not with the pepakura method.

IMG_20160604_013853_zpscgp0hfya.jpg


I went two ways of trying to smooth out the 3D prints. The left piece I did an acetone wash and then spraying the filler primer on it to fill in little holes. The right piece however, I thought I could skip the acetone wash and just say the primer on and let it do its job of filling in cracks and hopefully smooth over little peeks and valleys. This is however not the case as you can obviously see the print lines still, so acetone wash first it is.... Oh, I learned a neat little way to make armor look like it has taken heat/plasma damage; this only works with 3D printed plastic pieces however. Anyways, since acetone sort of chemically melts the plastic it allows the softened plastic to be moved around a little bit, so I used a Q-Tip and dipped it into the acetone and pressed against the softened area. It'll take a few tries to get it down right but it actually looks pretty decent.

And so, I must go to bed since it is like 3am over here on the east coast, but at least I get the day off tomorrow so I can work on this a bit more. Until the next update, take care everyone and thank you again for stopping by.
 

Attachments

  • IMG_20160604_013853_zpscgp0hfya.jpg
    IMG_20160604_013853_zpscgp0hfya.jpg
    81.4 KB · Views: 143
Congrats on the 3D Printer, what kind did you get? I've got one myself and am still working with PLA but I've got to get a handle on Bed Leveling before i can really get to printing! Fantastic Build, Thanks for all the great tips in Blender!
 
Mwaha! more printers.. Looks good dude! . Acetone and ABS is soo slick once yoiu get the hang of it.
 
Congrats on the 3D Printer, what kind did you get? I've got one myself and am still working with PLA but I've got to get a handle on Bed Leveling before i can really get to printing! Fantastic Build, Thanks for all the great tips in Blender!

Thank you very much! Buying the printer put a dent in my savings but it is well worth the expense. The family was getting annoyed with the chemical smell from the fiberglass resin and the bondo :p. The 3D printer I bought is the DaVinci 1.0A and it has been reliable so far. As for bed leveling, I believe it to be a patience tester as even I started to get a wee bit frustrated after the 20th failed calibration @.@

Mwaha! more printers.. Looks good dude! . Acetone and ABS is soo slick once yoiu get the hang of it.

Thank you Peter! I've put too much time into this project to print out pieces that look like potatoes :lol . I recently got a large air tight container to properly vapor smooth my pieces in now. Using q-tips to dip into the acetone was my previous method which was more time consuming and less effective than I would like.
 
I have a WanHao i3 Right now which is killing my patience for bed leveling. I am looking into the Lulzbot Taz 6 in a few months because it does easy dual head extrusion and automatic bed leveling. Plus with a larger printing surface i can print bigger pieces and have a quality infill. Just my two cents, but I love the quality of your pieces. Can't wait to see it finished!
 
I have a WanHao i3 Right now which is killing my patience for bed leveling. I am looking into the Lulzbot Taz 6 in a few months because it does easy dual head extrusion and automatic bed leveling. Plus with a larger printing surface i can print bigger pieces and have a quality infill. Just my two cents, but I love the quality of your pieces. Can't wait to see it finished!

Thank you again, I can't wait either :D Having dual extrusion heads would be great for printing in the accent colors on the armor, or at least I think so. One of the reasons I got the one I did is because my cats and dogs are wonderfully curious about anything (especially cats) and having the printing machinery enclosed and out of reach of the curious kitty noses and hair.
 
Status
Not open for further replies.
Back
Top