1st build (mark VI pepakura)

Status
Not open for further replies.

dude00117

New Member
Hey my name is Conor, and I am fairly new at this whole thing. I began this project sometime late last year, but I have been slow to progress on it at all. So far, I have familiarized myself with the pepakura process, and have pepped out six pieces, two forearms, three hand plates, and the codpiece. However, most of them are sized incorrectly. So far only one of the hand plates fit properly. My codpiece is too small, but I am debating a few ways to still be able to utilize it before I just scrap it completely, as it was the most complicated and time consuming piece I have made up to date.

As for my goal for this project, I want to create a mark VI spartan armor, still debating if I want master chief paint, or my own design.
planning on a cheap pressure suit for under suit.
Currently going pepakura route, using bondo to clean up.
Thinking about doing led's
Not sure how to do visor (cross that road when it comes).

Future project: weapon carving using extruded polystyrene foam, inspired by Andrew Cook DFT DaFrontlineTrooper (eventually)

Any questions, please ask away!
 
did you size the pieces or print out as is? do you have a deadline date or just to have?
 
did you size the pieces or print out as is? do you have a deadline date or just to have?

I tried to size them, but I both over and underestimated my dimensions, but for my future peps, I'll measure better. learned that the hard way.
As for dates, I don't have a real deadline yet, Maybe by the end of the year, but no real rush
 
Pictures Dude. This way we can trash your work......Joking. Everyone loves to see other's work to either emulate or aspire to do the same for themselves. There are many ways to get your sizes. Here is ONE, from HaloGoddes, and this one you can scale off a picture by Xtreme TACTICS 101. I've used his method to great success. I've used both actually and there are several more out there. No one way of doing something is "The End All Be All" of building. Your scale may not be the exact fit even though it would fit someone of your size......but it would fit that person.......Making this as clear as mud.........read through the tutorials, then read them again. Hell, read them a 3rd time just for the sake of the one who wrote it. Try one or both methods, build test pieces and you'll figure out what works best for you. I've built entire pieces, knowing full well after only assembling a few of the templates, that the end piece will be too small or too big......didn't matter, because the next time I did it.......I knew what went where and the build went much faster and I had a physical blueprint to follow right in front of me.......
 
Last edited by a moderator:
Pictures Dude. This way we can trash your work......Joking. Everyone loves to see other's work to either emulate or aspire to do the same for themselves. There are many ways to get your sizes. Here is ONE, from HaloGoddes, and this one you can scale off a picture by Xtreme TACTICS 101. I've used his method to great success. I've used both actually and there are several more out there. No one way of doing something is "The End All Be All" of building. Your scale may not be the exact fit even though it would fit someone of your size......but it would fit that person.......Making this as clear as mud.........read through the tutorials, then read them again. Hell, read them a 3rd time just for the sake of the one who wrote it. Try one or both methods, build test pieces and you'll figure out what works best for you. I've built entire pieces, knowing full well after only assembling a few of the templates, that the end piece will be too small or too big......didn't matter, because the next time I did it.......I knew what went where and the build went much faster and I had a physical blueprint to follow right in front of me.......

Hey thanks a lot! Just show how much more I need to read on this site. I had been trying to tape measure my body, which hasn't been very accurate, but with these references, hopefully I will improve. I'll probably average the measurements using both methods.

Next I'll post pictures of my failed pepakura pieces when I get a chance to show you guys what I've done a while back
 
Last edited by a moderator:
If you are trying to measure yourself.......you will always get the wrong size......you need someone to measure for you........and then keep that measurement for future reference....
 
Hey guys, kind of got grounded, so I couldn't sneak on and post (sneaking on xbox to play halo was priority 1 lol). But now I'm back, so here's an update:

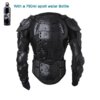
I just ordered a motocross suit for my spartan under suit, so I can get back to sizing when it finally gets here.

This is the one I bought:
51mwW3avgWL._SX425_.jpg

It's supposed to get here on the 25th, so in the meantime, im going to find my old failed pepakura builds to show what I've been doing
 
So, after digging around, I found most of my pepakura pieces, minus a couple. I think I trashed them a while back because they were crushed or something, but thats ok because they werent going to be a part of my build anyway. Like I said before, nothing is sized properly, except for one of my hand plates (the only thing likely to be part of my final build).

Forearm (too small):

8lYEDdwHuYB5GUNj1PYu27l7vD4r-w4cDZJHtx0RoVErQeRSA5rSNIcvQvP_JLdrlv02Ercp7-umhTgRcRQcxN2_x_nwwbrP.png
iWOlWR8JLdvlzUgld85RHHBMaS5YFFNH72GuFb8RNf2qlSMfqL1jIFEhXxB4DrayY8PM8u9x5UrmalAb4ynHgGRgelDDe_z1.png


Codpiece (also too small):

bZBfQgzoAyA1MSdhRpgS4WCnGrY941SyujWo-CJfW2acNWSz-oQQN1ktGAf7CJ-ir9xAfQxmqSxPz9kggALTHrSgWUiSKhJm.png
jxOAsHAI0TgnhUHvB3H9eZi5fQXTGChScpMW4JNoH2pW_Qs_vHHjLQvMeciT3u2PVMWZXESA52WkbjDG8nt9oqxvBfg6rQf6.png


Handplate (too big):

b_AgcZNPTofDVZKPCIPHD_IOxK7C5RLoyjkyQJkqamgwc29o70_hjGQf2IaEiOpx-4iO76028n83rpXkishAH9veFdwqkSa_.png


Handplate (properly sized):

uDuWdwE0RxyN-jlR_4D78iP_fw9KvZAbQifiVJOrEpwaAdWBvdYgjasW-fpRMk9FEUINnnCNajQbOPdT6WaOUCZF-flqZphd.png


For those who were curious, there you go.

For now, I might just do my other handplate until my undersuit comes in the mail, because I cant size anything without it. We'll see, I'm going to be pretty busy in the next few weeks, so maybe.


- - - Updated - - -

Wtf how do I get rid of this stupid beach picture, I accidentally put it there when I was inserting my pictures

CHAIR-ON-BEACH.jpg


8lYEDdwHuYB5GUNj1PYu27l7vD4r-w4cDZJHtx0RoVErQeRSA5rSNIcvQvP_JLdrlv02Ercp7-umhTgRcRQcxN2_x_nwwbrP.png


iWOlWR8JLdvlzUgld85RHHBMaS5YFFNH72GuFb8RNf2qlSMfqL1jIFEhXxB4DrayY8PM8u9x5UrmalAb4ynHgGRgelDDe_z1.png


bZBfQgzoAyA1MSdhRpgS4WCnGrY941SyujWo-CJfW2acNWSz-oQQN1ktGAf7CJ-ir9xAfQxmqSxPz9kggALTHrSgWUiSKhJm.png


jxOAsHAI0TgnhUHvB3H9eZi5fQXTGChScpMW4JNoH2pW_Qs_vHHjLQvMeciT3u2PVMWZXESA52WkbjDG8nt9oqxvBfg6rQf6.png


b_AgcZNPTofDVZKPCIPHD_IOxK7C5RLoyjkyQJkqamgwc29o70_hjGQf2IaEiOpx-4iO76028n83rpXkishAH9veFdwqkSa_.png


uDuWdwE0RxyN-jlR_4D78iP_fw9KvZAbQifiVJOrEpwaAdWBvdYgjasW-fpRMk9FEUINnnCNajQbOPdT6WaOUCZF-flqZphd.png
 
Last edited by a moderator:
Especially now that the weather is getting warmer......Ok I'm leaving work and heading to the beach......Good work on the peping.......just think of those are test pieces. Now use the formula/technique I gave you for sizing and get cracking.....and stop getting grounded!!!!
 
My pressure suit came in the mail the other day, and it fits great.
g6wynmnswuC1Ql3S2-sm1tGwK18dyme8GvrUP_Vz-2b6e5tFwRBSLcs7NQnwIKASDHQLYHmwfuw9vsANNjRuFMI96u-LJfr5.png


Before it arrived, i started on the helmet, since I didnt need the undersuit in order to size, so far, ive done the top and the brim. I forgot how long this process takes. I know there is no way around this, and ive read a bunch of pepakura before i started, but are there any tips on expediting this stage? anything is appreciated.
Anyways, heres my work station with my helmet progress:
3lo5Z3sxXxFdvHy7-pBEOrzxpdCN3fvR2XpBWv1lrwvXrTvo-ao-liWjXlUO9-hguHzPWYG1uHs_miHlBEzdLvdy7tt1ieF2.png


g6wynmnswuC1Ql3S2-sm1tGwK18dyme8GvrUP_Vz-2b6e5tFwRBSLcs7NQnwIKASDHQLYHmwfuw9vsANNjRuFMI96u-LJfr5.png


3lo5Z3sxXxFdvHy7-pBEOrzxpdCN3fvR2XpBWv1lrwvXrTvo-ao-liWjXlUO9-hguHzPWYG1uHs_miHlBEzdLvdy7tt1ieF2.png
 
Last edited by a moderator:
Not bad. Also, don't get grounded. I'm going to have to do some research on scaling and sizing before I start on my builds although I have no clue how to do it in pepakura. I'll be frank, I'm a noob. I have experience making fabric costumes and such but armour I've only ever done once.
 
Looking good dude00117, and unfortunately there is no fast way to do this....some tips to make things easier:

A) Score the tabs before you cut from the paper.....it makes it easier when you have more of the paper to hold on to

B) Cut out pieces only when you are going to attach them to the body of work.......if you cut everything out first you'll waste time searching through dozens of pieces for the one you are looking for.

C) This is a marathon not a sprint......take your time. More mistakes can be avoided and corrective measures, sometimes even drastic ones, can be forestalled. This will cut down on the completion time towards the end.

D) Try not to "Hang" your pieces on anything, like you did w/ the cod piece. It would tend to warp the piece itself, requiring more attention and /or repair, adding more to the completion time.
 
Last edited by a moderator:
Looking good dude00117, and unfortunately there is no fast way to do this....some tips to make things easier:

A) Score the tabs before you cut from the paper.....it makes it easier when you have more of the paper to hold on to

B) Cut out pieces only when you are going to attach them to the body of work.......if you cut everything out first you'll waste time searching through dozens of pieces for the one you are looking for.

C) This is a marathon not a sprint......take your time. More mistakes can be avoided and corrective measures, sometimes even drastic ones, can be forestalled. This will cut down on the completion time towards the end.

D) Try not to "Hang" your pieces on anything, like you did w/ the cod piece. It would tend to warp the piece itself, requiring more attention and /or repair, adding more to the completion time.

If you don't mind my asking, what do you mean by score the tabs? Could you give a photo example? What I have in my head and what you really mean are probably two very different things.
 
Last edited by a moderator:
If you don't mind my asking, what do you mean by score the tabs? Could you give a photo example? What I have in my head and what you really mean are probably two very different things.

Score the fold lines before cutting a piece out. The tabs are the most common place for folds (every tab is folded), but you want to score your fold lines before you cut just so that it's easier to do. You score the lines by using various methods some of the most popular being to use the back edge of an x-acto blade to somewhat cut the piece (although not all the way through) or to use 2 differently colored pens (one for mountain and another for valley) to trace over the fold lines multiple times. Scoring the folds (using a straight edge to keep the line crisp) allows you to fold the pieces more easily and cleanly.
 
Prior to folding the tabs on each of the individual pieces you run the back of your blade across the fold line. This way when you do fold the paper....it follows the "grove" created by the knife which in turn gives you a straighter edge than if you just folded it alone. This is called scoring. Some people use pens. Different colors to indicate mountain of valley fold but the result is the same.....cleaner folds.
 
Score the fold lines before cutting a piece out. The tabs are the most common place for folds (every tab is folded), but you want to score your fold lines before you cut just so that it's easier to do. You score the lines by using various methods some of the most popular being to use the back edge of an x-acto blade to somewhat cut the piece (although not all the way through) or to use 2 differently colored pens (one for mountain and another for valley) to trace over the fold lines multiple times. Scoring the folds (using a straight edge to keep the line crisp) allows you to fold the pieces more easily and cleanly.

Prior to folding the tabs on each of the individual pieces you run the back of your blade across the fold line. This way when you do fold the paper....it follows the "grove" created by the knife which in turn gives you a straighter edge than if you just folded it alone. This is called scoring. Some people use pens. Different colors to indicate mountain of valley fold but the result is the same.....cleaner folds.

Thanks, you two. So i was thinking of the same thing after all. Just the initial wording threw me off.
 
Looking good dude00117, and unfortunately there is no fast way to do this....some tips to make things easier:

A) Score the tabs before you cut from the paper.....it makes it easier when you have more of the paper to hold on to

B) Cut out pieces only when you are going to attach them to the body of work.......if you cut everything out first you'll waste time searching through dozens of pieces for the one you are looking for.

C) This is a marathon not a sprint......take your time. More mistakes can be avoided and corrective measures, sometimes even drastic ones, can be forestalled. This will cut down on the completion time towards the end.

D) Try not to "Hang" your pieces on anything, like you did w/ the cod piece. It would tend to warp the piece itself, requiring more attention and /or repair, adding more to the completion time.

Thanks for the tips man.
This is the first piece that I am cutting out the parts as I go; all my prior pieces I cut everything out first, and it was a nightmare especially with that codpiece. Speaking of the codpiece, the only reason that I am hanging it there is because it was sized wrong and is useless. But being me, If I spend a while on something and it doesn't turn out the way I wanted, I usually keep it around for the work I put into it. I just hung it there because it is convenient and out of the way. Otherwise, I wouldnt hang it there cuz it is already warped like you said.

But I havent been scoring before I cut the parts out, and I will definitely do that from here out.
 
Last edited by a moderator:
Not bad. Also, don't get grounded. I'm going to have to do some research on scaling and sizing before I start on my builds although I have no clue how to do it in pepakura. I'll be frank, I'm a noob. I have experience making fabric costumes and such but armour I've only ever done once.

It took me a while to figure out that I had to also downoad pepakura designer (not pepakura viewer) in order to rescale the pieces. Also, because the full version costs money, it wont let you save the edited pepakura files, so I made a document with all the scaling info on it.

If you have any specific questions, feel free to ask!

As for the grounding thing, Im working on that :)
Thanks for the offer. I'll likely be taking you up on it. I'm mostly trying to get used to the interface right now and what's what. I think I have the pep 3 designer but i'm not 100%
 
Status
Not open for further replies.
Back
Top