RvB Felix build

Status
Not open for further replies.

Fllschrimjager

Jr Member
So I started a Felix build a while ago but the helmet and chest plate where not right so I decided to scrape the project then but now I am going to try this again with the stuff I have learned form all the mistakes i made the last time.
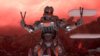
reference pictures
RvB12_TeaserTrailer_Felix.pngFelix_betrays_Reds_and_Blues.png

Helmet- in bondo process
IMAG1730.jpgIMAG1729.jpgIMAG1728.jpgIMAG1727.jpgIMAG1732.jpg
chest- NA
arms- NA
Cod- NA
legs- NA
boots- NA
weapons

DMR- Being printed
IMAG1723.jpgIMAG1724.jpg IMAG1202.jpgIMAG1200.jpgIMAG1199.jpg
Pistol- needs a re-print
IMAG1725.jpg
combat knife- needs re-print
IMAG1726.jpg

This thread is a building process of this build and all critics good and bad and any questions about what I am doing. I actually welcome any advice on what you think i can inprove so i can do so to make it better.
thanks and hope it turns out good

What the old helmets look like
1st attempt
IMAG1721.jpgIMAG1722.jpg
2nd attempt
IMAG1719.jpgIMAG1720.jpg
 

Attachments

  • images.jpg
    images.jpg
    7.1 KB · Views: 342
finished up the helmet at last but this is not the end for it


IMAG1737.jpgIMAG1739.jpgIMAG1741.jpgIMAG1742.jpgIMAG1744.jpgIMAG1738.jpgIMAG1736.jpg

now since I have finished this part I move on to make the mother mold of this helmet so that I can make more and it will be lighter to wear and so I can also have replacements plus take this one and add all sorts of fun details to it.

will know tomorrow more on what exactly i'm going to be using to cast this and will share that process too.
 
This is what the helmet looks like now with the first couple layers of silicon on it
Oh and my mess I have made!

IMAG1745.jpgIMAG1746.jpgIMAG1747.jpgIMAG1748.jpgIMAG1749.jpg
 
almost done with this mold!

IMAG1758.jpgIMAG1759.jpgIMAG1760.jpg

Im on to the fiberglass part and as you can see I have added the keys in which will hopefully stay stuck to the fiberglass shell that I have on it

with the first half needing only one more layer I will find out soon and will then move on to making the other half and making the first cast within the week which i'm exited for. cant wait to find out how it turns out and exited to move on from this to the chest.

a little on the chest. I did start on one but spent all that time cutting it out only to realize that it was too small and would not work so back to cutting for me hopefully it is close to the right size this time.
 
well of course another set back for me! just took off the shell part to see if it would go back on and guess what it did not. The ridges on the helmet are too much so have to try to save this and split it front and back not in half.
 
Well up for another update. After the nice weather I have been having I finished up remaking the mother shell for the mold. Today I took all afternoon to work one making the first cast and it actually turned out pretty well! Along with that I got a good deal of work done on my DMR. Started to put the bondo on to fill in the gaps and smooth out the 3d printers lines it made.


assembling the part of the DMR I have printed
IMAG1768.jpgIMAG1767.jpg


bondo on those parts
IMAG1778.jpgIMAG1777.jpgIMAG1775.jpgIMAG1776.jpgIMAG1774.jpg


The mold
IMAG1781.jpgIMAG1779.jpgIMAG1780.jpg


First cast
IMAG1772.jpgIMAG1771.jpg


along with this I previously 3d printed a halo 3 sniper and I messed it up since at the time I was new to bondo and instead of using that I used air dry clay and lots of resin. Lets just say it did not turn out well. I have recently gone back to look at this fail since it is just sitting in my basement and thought I may be able to re build it. This will require lots of sanding and other adjustments but I think I can save that build with the information and skill I now have.

Also again I know a lot in this update but I have begun work on my chest plate. The chest plate I am using is the soldier chest plate from halo 4 and unfolded by missingspartan7. Also will be trying to finish the helmet soon so I can work on making the neck seal for that.

thanks for reading and following this build
Michel/Fllschirmjager
 
Ok so its been quite a bit. been busy with other projects classes and lots of training but its time for something of an update.

Ok so first i'm back and continuing with this build so it is not dead.

Second the helmet mold that I posted about awhile back is now garbage for on the cast I could see all the little mistakes so that brings be to number 3.

Third the helmet has now been modified from the old version it is now a lot smoother and has details on it to make it not look so plain.

IMAG2439.jpgIMAG2440.jpgIMAG2441.jpgIMAG2444.jpgIMAG2445.jpg
 
well so here is the next step in building. since the chest plate takes so long to do everything that pep involves I have skipped it for now and went for the twin plated forearms.

here are the finished pep of the first one
IMAG2446.jpgIMAG2447.jpgIMAG2448.jpgIMAG2449.jpg

I have also put supports on the inside to help the part hold its shape while resining and the bondo phase.
 
Just finished peping the second one of these. All thats left is to add the supports resin bondo and paint. Will keep this updated and will add work in progress photos soon.
 
Let's hope the 3rd time is the charm. Look Fantastic so far. Good work.
 
Status
Not open for further replies.
Back
Top