Hello friends, a year ago I created a thread of my first Halo/ODST build. Since then I went inactive on the forums, but I certainly didn't stop progress on my armor. Here's pics of October of last year and October of this:


I am very far from done, but I would like to document my journey in between then and now and then keep updates going forward.
For now I will show how I redid the chest piece, since I'm most proud of it and have the most progress pictures.
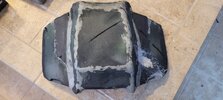
I didn't make a new chest piece, I just significantly altered it:
First I cut the front panel out and expanded it with some foam clay to get a more accurate shape


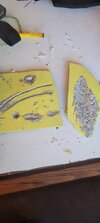
I tested out weathering and painting techniques with some scraps of foam. I used Wexylex's old tutorial she made for her hunter where she recommended cutting out bits of foam and adding hot glue for plasma burns. Testing it definitely helped me decide some things for how I was going to make it on my armor!

I cut out a significant amount of foam in a pattern I thought was realistic for a plasma burn, added more cuts and carefully added hot glue around the burn area. I also added screws and some foam clay around the edges, which I did not do very well but it looked kind of like welds so its okay (I would like some tips for smoothing out foam joins!):


I sealed the foam with 4 layers of plastidip and the first coat of paint was white aluminum:


I used masking fluid on all of the surfaces I wanted to be scratched off then painted it with the color 343 recommended in the cosplay guide (which didn't work out but I'll get to that):


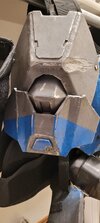
I started masking off different areas and added sky blue and dark grey which came out really well


I pealed off the masking tape and some of the masking fluid beneath all the layers to come to the horrifying realization that either 343 or the paint company got the colors wrong and the armor was green instead of grey, but I would have to fix that later.

I went into illustrator and put logos I wanted to print on the already proportioned printing files so they would fit perfectly, including a fully custom ODST logo that I'm really proud of which follows my personal bull theme I've used in many projects (please ask me if you want to use my emblem):

I had no idea how to make stencils so I tried just cutting them out and taping them, but it didn't come out well.


Instead, I kept cutting them out but used spray adhesive on the otherside of the paper and used a few layers to get the whole skull, which mostly worked:


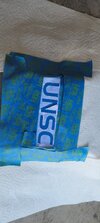
I had to mask off all the damage carefully to repaint the wings so it didn't clash terribly, redid the unsc logo, added the other logos and scratched off the rest of the masking fluid, so it started looking really good:

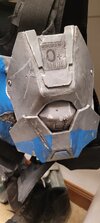
Finally, I painted a scratch mark over the left side horn which brings it in line with my personal theme. I sanded the skull slightly which I thought would take away the overspray but instead let the brown and black acrylic paint I used for weathering seep into the the paint in an extremely cool way:

I used some cool packing foam I found to create the leather plate carriers and painted and weathered it the same way with some slashes from a grunt claw. The ammo pouch I was going to add to my thigh plate but I haven't made that yet and also I am not confident enough in my foam working to make the real middle plate of the ODST so I substituted. The pouch is resin printed by a friend of mine and hinges so it fits a wallet! Or will, when I fix the hinge...

I had never worked with foam before this project; mistakes were made, and lessons were learned; it's been a long journey, and there's much longer to go but I'm really proud of what I've made so far! Thank you mountain for encouraging me in this endeavor, and I hope to see you all again soon!

Until next time, Mistah Fox out!
I am very far from done, but I would like to document my journey in between then and now and then keep updates going forward.
For now I will show how I redid the chest piece, since I'm most proud of it and have the most progress pictures.
I didn't make a new chest piece, I just significantly altered it:
First I cut the front panel out and expanded it with some foam clay to get a more accurate shape
I tested out weathering and painting techniques with some scraps of foam. I used Wexylex's old tutorial she made for her hunter where she recommended cutting out bits of foam and adding hot glue for plasma burns. Testing it definitely helped me decide some things for how I was going to make it on my armor!
I cut out a significant amount of foam in a pattern I thought was realistic for a plasma burn, added more cuts and carefully added hot glue around the burn area. I also added screws and some foam clay around the edges, which I did not do very well but it looked kind of like welds so its okay (I would like some tips for smoothing out foam joins!):
I sealed the foam with 4 layers of plastidip and the first coat of paint was white aluminum:
I used masking fluid on all of the surfaces I wanted to be scratched off then painted it with the color 343 recommended in the cosplay guide (which didn't work out but I'll get to that):
I started masking off different areas and added sky blue and dark grey which came out really well
I pealed off the masking tape and some of the masking fluid beneath all the layers to come to the horrifying realization that either 343 or the paint company got the colors wrong and the armor was green instead of grey, but I would have to fix that later.
I went into illustrator and put logos I wanted to print on the already proportioned printing files so they would fit perfectly, including a fully custom ODST logo that I'm really proud of which follows my personal bull theme I've used in many projects (please ask me if you want to use my emblem):
I had no idea how to make stencils so I tried just cutting them out and taping them, but it didn't come out well.
Instead, I kept cutting them out but used spray adhesive on the otherside of the paper and used a few layers to get the whole skull, which mostly worked:
I had to mask off all the damage carefully to repaint the wings so it didn't clash terribly, redid the unsc logo, added the other logos and scratched off the rest of the masking fluid, so it started looking really good:
Finally, I painted a scratch mark over the left side horn which brings it in line with my personal theme. I sanded the skull slightly which I thought would take away the overspray but instead let the brown and black acrylic paint I used for weathering seep into the the paint in an extremely cool way:
I used some cool packing foam I found to create the leather plate carriers and painted and weathered it the same way with some slashes from a grunt claw. The ammo pouch I was going to add to my thigh plate but I haven't made that yet and also I am not confident enough in my foam working to make the real middle plate of the ODST so I substituted. The pouch is resin printed by a friend of mine and hinges so it fits a wallet! Or will, when I fix the hinge...
I had never worked with foam before this project; mistakes were made, and lessons were learned; it's been a long journey, and there's much longer to go but I'm really proud of what I've made so far! Thank you mountain for encouraging me in this endeavor, and I hope to see you all again soon!
Until next time, Mistah Fox out!