Billbill’s Revised Noble Six Build (3D Print)

Status
Not open for further replies.

Billbill36

New Member
Hey all!

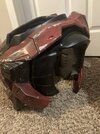
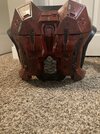
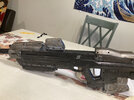
I figure I should probably keep you all in the know on my current project. I’ve been dabbling with Pepakura and Foam builds but never really got anywhere unfortunately. However since getting a 3D printer my build has finally started taking shape.
Using Moesizzlac’s Noble Six files I’m starting out with a default Noble Six build.

92D3CFD0-B56B-49EC-93EB-C139B9D36368.png

I used ABS plastic on my Ender 3 to start but since I didn’t have an enclosure many of the pieces warped, causing many gaps I had to fill with Wood Putty. After much sanding and trial and error I was able to get it to a more usable state, and put on the first coat of sandable primer.
BABA94B0-E8FF-4FE2-9571-089CE7D6FF31.png

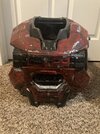
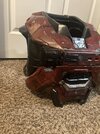
Onto the painting, I straight up had no idea what I was doing, but I wanted to use a silver base coat so I could scratch off the outer layer and show the “metal” beneath. Then I applied a black coat, but it was much to dark. I kept messing with the amounts and probably put way to many layers, including an extra layer off primer after sanding it all mostly off at one point. But finally I got it roughly how I want it.
226980E4-41AE-452F-800A-F9A872883D1F.png


I’ll be sure to post more as I go. Thanks everyone who’s ever posted their builds they’ve been so helpful in figuring it all out!
 
Last edited:
Progress update, about half way through the chest. Forearms built and painted, reprinted a new helmet and carved in missing details.
8A4C96F8-76FE-4E9E-AA6B-6A62E87AAC33.jpeg

4480A9E5-8D7A-45FC-8FF5-B4CB416AE2FB.jpeg

Speaking of missing details, I noticed that the files I used are missing details for the forearm, does anyone know if there are more detailed files out there, with the bolts, screws and other detailing? Most builds seem to be missing them but they do pop up from time to time. If not I’m going to try and freehand them out of foam.
arm.PNG
 
Last edited:
Been plugging for the past few months despite no updates. Around June I decided I wasn't happy with the Grey default Mark V B I had been working on, and started over. Reprinting the helmet wasn't the most fun thing in the world but I've gotten a lot better at minimizing splittings on this.

On my new CR 10 I can print most things in one piece, or just split it vertically to prevent failures on long prints

Behold my wonderful pile of armor!
IMG_2466.jpg

The helmet is printed in two pieces and I'm tempted to reprint as one solid chunk once the rest is finished. Again this is Moesizzlac's base Mark V B with the extra lines carved in. I found copies of the game models from Reach somewhere I can't remember and managed to make printable models of the details that go on the side vent area of the helmet.
IMG_2474.jpgIMG_2473.jpgIMG_2472.jpg

The biceps I completed today, sans some decal work I'll add at some point down the line. I worry I may be over weathering but I'd like to make this look as used as I can, I've always been a fan of the grit in the live action trailers which are my biggest inspiration on this build.
IMG_2471.jpgIMG_2470.jpgIMG_2469.jpgIMG_2468.jpg

I've gotten both legs printed, one calf is currently being primed so it's missing from the pile above while it dries. I ended up purchasing a model on Etsy from NerdForgeDesigns which had some of the extra details I was looking for. The models are great and I recommend checking them out if you're willing to drop a few dollars on it
 
Last edited:
Looks like you're achieving the desired level of grit, looks like it's very worn and seen some battles. (Of course I'm speaking from my almost nonexistent level of experience.) But it looks good.
 
IMG_2448.JPG
Managed to get my hands on one of the Nerf ARs. It's not a one to one replica to the Reach model but it's close enough for my purposes. I'm going to buff out the Nerf and Halo logos, try and drill in two holes to put neodymium magnets in and then paint it closer to the Reach model. My goal is to have the magnets be able to attach to the back plate once that's done.
 
Cool! I'm looking forward to seeing it all together.

I had to go download all those files after seeing this. I'm starting Noble 6 as well. They really helped me visualize how I'm going to attack this project.
 
67141C2C-6469-464F-AA05-3748CE2A8E9B.png
Life has been incredibly hectic the past few weeks but I’m starting to get back into the swing of things. Anyway’s, here’s a leg.

Tomorrow I’m expecting to get some decal paper to print out smaller details and labels I’m not super confident in freehanding or stenciling. Going to need to look into the best way to hide the edges however.
 
Moesizzlac's Mark V B Detailed Front.PNGMoesizzlac's Mark V B Detailed.PNGMoesizzlac's Mark V B Detailed Side.PNG
I've been unhappy with the details I had carved into my last helmet, so I've pulled together as many reference images of the helmet from MCC, Outpost Discovery and from a cast I've seen on Etsy and used by some people here and tried to learn some stuff about modeling so they could be printed on. Big thanks as always to MoeSizzlac for the model he posted over on Thingiverse.

As things stand now I'm two weeks into my move cross country and without my pieces and my printer, so in the mean time I'll keep tinkering away at this until I'm happy, and until literally everything else I own arrives.

Hopefully I'll find out this is actually printable soon when my printers arrive : )
 
Last edited:
First things first, credit to Tvanhele for the shoulder gasket files! They came out great in my opinion :D

I'm hoping to reinvigorate my motivation for this project with another photo dump. I moved across country earlier in the year and ended up scrapping most of the build and letting it sit for awhile. After coming back to it I decided to tackle the biggest hurdle I've had, the chest. In the past it never was sized how I liked, or the files were missing details I wanted like the "shoulders" (thanks again to Tvanhele, not sure how to mention on here)

I wasn't planning on having quite as much "battle damage" on this as their is, but I messed up peeling off the tape at parts so I have to live with it. You don't fall to Reach and come out unscathed. The parts at the shoulders and neck are coated in Plastidip, which gives them a more rubbery texture compared to the rest of the suit which I like.

My issue now is how to do the under arm section, I might have scaled the suit a bit too small and it was incredibly difficult to get past my shoulders with them attached permanently. I'm looking at ideas to make them removable so if anyone has any recommendations for a way to do that shoot them my way (magnets or clips maybe?)

I've redone the thighs and have the shins on the printer so hopefully I'll eventually finish this this time.


Attachments

  • IMG_4112.jpg
    IMG_4112.jpg
    2.2 MB · Views: 201
  • IMG_4113.jpg
    IMG_4113.jpg
    2.1 MB · Views: 209
  • IMG_4114.jpg
    IMG_4114.jpg
    2 MB · Views: 174
  • IMG_4115.jpg
    IMG_4115.jpg
    2.4 MB · Views: 176
  • IMG_4116.jpg
    IMG_4116.jpg
    1.3 MB · Views: 199
Status
Not open for further replies.
Back
Top