gazihsah
New Member
Yo! I thought I'd leave this here to see if it helps anyone out in the future, but here's my notes and process for my Hunter and Burial Blade build, since I'd read up on some of the additive painting techniques that were shared here under the tutorials.
I ended up starting this build after playing Bloodborne just Once™ for the first time , and then proceeded to crunch the entire build in about a month or so this past summer, and I'm super proud of how it turned out, as my first competitive craftsmanship cosplay entry that won Best Armor & Props at Animethon 2025.


Hunter Set
A good chunk of the patterns for the clothing I had to sew were from TrinesTreasury's build guide. I also ended up making the pants and shirt myself, following patterns/guides from MarisArmoury & Sew Happy [pattern by Unfettered Patterns] respectively. The gloves were just hand turkey'd pretty last minute out of fake leather (since I figured they'd be more flexible in the hand), and I just cut up some scrap cotton I had laying around for the face mask, and sewn in the bridge of a medical face mask.
Cloak, Trench Coat, Vest, & Shirt
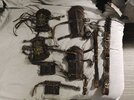
The cloak and trench coat are both a rayon/spandex blend, the vest was a cotton pant lining with leather straps with 3D printed buckles in the front and a zipper in the back (since the straps aren't functional). All the belts and straps are also leather! I had to cut them to size, burnish the edges, and add buckles. Any buckles that would be load-bearing or be potentially stressed were metal buckles, but buckles that were purely decorative were 3D printed!
The pants have a gusset, and are gathered around the calves — I was able to get away with darting up and down stairs without any issues! Notably, I did add a jean button enclosure, and velcro; the guide for the pants had it secured with a rope, but, I didn't want to take any risks with that, so yeah.
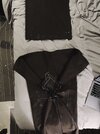
After having made the trench coat and its sleeves, I...never wanted to make sleeves again. So. I found a patter for a button-up shirt with fake sleeves that had a collar that'd look close enough; the fake, short sleeves wouldn't matter, since you can't see them under all the layers. Plus, with the shirt being a short sleeve, it would help deal with heat with everything else still.


Hat, Bracers, & Greaves
The hat, greaves, and bracers all have a base with 8mm foam, and are wrapped in genuine leather. I wrapped the face of the foam that'd be visible, glueing it with contact cement, and then cut after wrapping the leather around the foam. The foam cores had raised "edges" with 2mm foam, that I then scratch the leather to try and exaggerate the nooks and crannies of the leather, along with Angelus black paint lightly washed. Speaking of, the leather wasn't dark enough for my liking for the hat, so I ended up adding Angelus leather paint, to get a blend that I liked.


The bracers in particular, have gold plates on top that were 3D printed. The method I used for getting a brushed, aged, gold/brass-y look was:


[Unfortunately, I didn't grab a photo of the plates in just their black base coat before I applied the pigment powder].
Burial Blade
The model for the Burial Blade was sourced Aguilar Workshop, a familiar name!
I 3D printed it off with regular ol' PLA, and haven't had any issues with it so far (it survived a photoshoot in Banff)! I just did 2 passes of spot putty and filler primer; the blade portion of the scythe had a texture I didn't want to smooth out too much, but I still wanted to minimize the visibility of any layer lines.
To achieve the fake wood grain finish of the handle:
For the blood, I mixed wood glue + stage blood, to get it to thicken up, so it was easier to splatter, without being too runny had I not added the wood glue, and then sealed it all with satin clear coat. I also splattered this on the clothes too; I had my sister dip a paint brush in it, and fling it at me while I wore it, and then touched up any spots that were missed.
For the blade metal parts, I basically did the same process that I did with the bracers above, but instead of gold pigment powder, I used very small amounts of graphite powder instead, and used even lighter amounts of silver rub n buff, with a black wash of acrylic paint overtop that was wiped off a bit.


In closing, while I've made the odd prop or some plates here and there for cosplays (most have either been bought or partial closet), I've never done an entire build, head-to-toe like this before, nor have I worked with foam til this project, so it was a great way to see the pros and cons between foam vs. 3D printing, and was definitely a huge confidence booster to get me get started on a Rakshasa build Soon™, before Calgary Expo....Probably.
I ended up starting this build after playing Bloodborne just Once™ for the first time , and then proceeded to crunch the entire build in about a month or so this past summer, and I'm super proud of how it turned out, as my first competitive craftsmanship cosplay entry that won Best Armor & Props at Animethon 2025.
Hunter Set
A good chunk of the patterns for the clothing I had to sew were from TrinesTreasury's build guide. I also ended up making the pants and shirt myself, following patterns/guides from MarisArmoury & Sew Happy [pattern by Unfettered Patterns] respectively. The gloves were just hand turkey'd pretty last minute out of fake leather (since I figured they'd be more flexible in the hand), and I just cut up some scrap cotton I had laying around for the face mask, and sewn in the bridge of a medical face mask.
Cloak, Trench Coat, Vest, & Shirt
The cloak and trench coat are both a rayon/spandex blend, the vest was a cotton pant lining with leather straps with 3D printed buckles in the front and a zipper in the back (since the straps aren't functional). All the belts and straps are also leather! I had to cut them to size, burnish the edges, and add buckles. Any buckles that would be load-bearing or be potentially stressed were metal buckles, but buckles that were purely decorative were 3D printed!
The pants have a gusset, and are gathered around the calves — I was able to get away with darting up and down stairs without any issues! Notably, I did add a jean button enclosure, and velcro; the guide for the pants had it secured with a rope, but, I didn't want to take any risks with that, so yeah.
After having made the trench coat and its sleeves, I...never wanted to make sleeves again. So. I found a patter for a button-up shirt with fake sleeves that had a collar that'd look close enough; the fake, short sleeves wouldn't matter, since you can't see them under all the layers. Plus, with the shirt being a short sleeve, it would help deal with heat with everything else still.
Hat, Bracers, & Greaves
The hat, greaves, and bracers all have a base with 8mm foam, and are wrapped in genuine leather. I wrapped the face of the foam that'd be visible, glueing it with contact cement, and then cut after wrapping the leather around the foam. The foam cores had raised "edges" with 2mm foam, that I then scratch the leather to try and exaggerate the nooks and crannies of the leather, along with Angelus black paint lightly washed. Speaking of, the leather wasn't dark enough for my liking for the hat, so I ended up adding Angelus leather paint, to get a blend that I liked.
The bracers in particular, have gold plates on top that were 3D printed. The method I used for getting a brushed, aged, gold/brass-y look was:
- Prep the plates (spot putty + filler primer) and sand it til it's smooth, start with a base coat of black, glossy paint.
- Cover it in gold pigment powder; I found it easiest to apply with a fine tip paint brush. (if you wanted a silvery look, I've seen other people use graphite powder, and buffed it in),
- Seal the pigment powder with a layer of satin clear coat.
- With the clear coat freshly dried, apply some rub n buff in small amounts — less is more, if you want a more aged, rustic look.
- Seal it off with one more light layer of satin clear coat to finish!
[Unfortunately, I didn't grab a photo of the plates in just their black base coat before I applied the pigment powder].
Burial Blade
The model for the Burial Blade was sourced Aguilar Workshop, a familiar name!
I 3D printed it off with regular ol' PLA, and haven't had any issues with it so far (it survived a photoshoot in Banff)! I just did 2 passes of spot putty and filler primer; the blade portion of the scythe had a texture I didn't want to smooth out too much, but I still wanted to minimize the visibility of any layer lines.
To achieve the fake wood grain finish of the handle:
- I spray painted it with a caramel brown base coat, and let it fully dry.
- Then, I applied some drops of Copic INK (not the standard markers, these are an alcohol-based ink) onto it, and with a wide paintbrush, brush it in even, straight strokes, doing this multiple times in layers to let it darken. (if you mess it up, you can take rubbing alcohol to it, and restart!)
- Finally, seal it with satin clear coat.
For the blood, I mixed wood glue + stage blood, to get it to thicken up, so it was easier to splatter, without being too runny had I not added the wood glue, and then sealed it all with satin clear coat. I also splattered this on the clothes too; I had my sister dip a paint brush in it, and fling it at me while I wore it, and then touched up any spots that were missed.
For the blade metal parts, I basically did the same process that I did with the bracers above, but instead of gold pigment powder, I used very small amounts of graphite powder instead, and used even lighter amounts of silver rub n buff, with a black wash of acrylic paint overtop that was wiped off a bit.
In closing, while I've made the odd prop or some plates here and there for cosplays (most have either been bought or partial closet), I've never done an entire build, head-to-toe like this before, nor have I worked with foam til this project, so it was a great way to see the pros and cons between foam vs. 3D printing, and was definitely a huge confidence booster to get me get started on a Rakshasa build Soon™, before Calgary Expo....Probably.