BLOXX3R’s Spartan-III build, 3D Printed

Also, I’d really appreciate some input here, after printing the calf and it’s attachment, and looking at some reference photos, I can’t really tell if the attachment is too big or not. I think it looks alright, but what to y’all think?
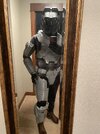
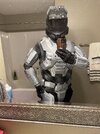
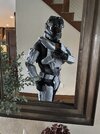
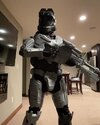
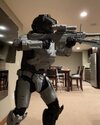
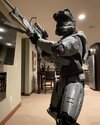
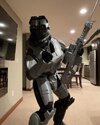
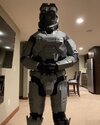
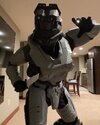
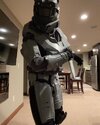
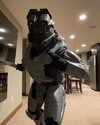
First of all, those are some clean prints, nice job. As for your knees, I think they look ok, very well sized in my opinion, but they do look like they sit up too far on the thigh. It may just be the way everything was sitting in the picture, as I can see very clearly that you have no rigging or anything. In game reference shows that the kneepad doesn't come up to the thigh, stopping just shy of the bottom. (pic related) This is a nitpicky detail, but just in case you're ever so slightly OCD, thats a thing. All in all though, your armour looks absolutely amazing, and i'm super excited to see your finished suit!
HTMCC_HR_Spartan_FJ_PARA.png
 
Last edited:
first of all, those are some clean prints, nice job. as for your knees, i think they look ok, very well sized in my opinion, but they do look like they sit up too far on the thigh. it may just be the way everything was sitting in the picture, as you can see very clearly that you have no rigging or anything. in game reference shows that the kneepad doesn't come up to the thigh, stopping just shy of the bottom. (pic related) This is a nitpicky detail, but just in case you're ever so slightly OCD, thats a thing. All in all though, your armour looks absolutely amazing, and i'm super excited to see your finished suit!
View attachment 316169
Thank you so much! I really appreciate your feedback. I’ve definitely got a bit of OCD and I think I’m gonna attempt to resize that thigh, as unfortunate as it is. That sucker cost me a whole roll of filament
 
To those who 3D printed their armor: How'd you size the boot covers? Armorsmith makes it a little difficult to get a decent guesstimate.
What I did for mine was I put the original size into mesh mixer and just cut the bottom few mm off and printed that to see how close it would be compared to my shoe size and then scaled up from there. I made mine fit pretty tight and would definitely recommend a mm or 2 breathing room on each side so it doesn't shift into a weird position as you walk.
I showed an example of how I do my test sizes in my build thread.
 
Hello! It’s been a while once again! Not too much going on in terms of construction except for my little printer chugging away, the weather hasn’t been too kind to us up in the midwest. Once it finally starts to warm up and the snow goes away for good I’ll be posting more progress of painting, rigging, etc. All that’s left to print at the moment is the right thigh and calf, and both boot covers! We’re getting close!!! I managed to get what I have on my body for a couple progress pics. Excuse the rigging, since it’s non-existent at the moment (the belt is literally duct taped together lol)
 

Attachments

  • 280C6709-18FF-44EC-A4F1-D2859739CF21.jpeg
    280C6709-18FF-44EC-A4F1-D2859739CF21.jpeg
    1.8 MB · Views: 175
  • 0B8FB45F-5969-4302-8AB9-319B6F161338.jpeg
    0B8FB45F-5969-4302-8AB9-319B6F161338.jpeg
    1.9 MB · Views: 173
  • B373698A-1A8C-4CA3-AA8E-C6BFAD7276E3.jpeg
    B373698A-1A8C-4CA3-AA8E-C6BFAD7276E3.jpeg
    1.9 MB · Views: 167
Very nice work, the scaling looks spot on! And the print quality (as some mentioned a few times before lmao) really is beautiful! Those mirror selfie photos are such a great motivation boost, seeing all the parts come together! keep up the good work, im looking forward to followng the rest of the build!
 
I've got to be the Ten millionth person to say this, but those prints look clean!
Very nice work, the scaling looks spot on! And the print quality (as some mentioned a few times before lmao) really is beautiful! Those mirror selfie photos are such a great motivation boost, seeing all the parts come together! keep up the good work, im looking forward to followng the rest of the build!
Thank you so much for your kind words! It really means a lot to me! The wonderful feedback and comments I’ve received from all of you guys has really helped keep my motivation and excitement towards this project going! I don’t think I could’ve stumbled across a more wonderful group of people than those in this community!
 
Update!! Besides the boot covers, the base armor is all printed! I managed to use some more duct tape to get some ideas for rigging and get some decent pics of the full armor! Still no Mk. V helmet, I know. I’ll finally be able to get to it here soon!
 

Attachments

  • 84D9F502-4BEF-4ACC-A459-3630C2E32D94.jpeg
    84D9F502-4BEF-4ACC-A459-3630C2E32D94.jpeg
    327.8 KB · Views: 130
  • 7C0D64C4-23C3-4ABE-A03F-6DE2798D496F.jpeg
    7C0D64C4-23C3-4ABE-A03F-6DE2798D496F.jpeg
    337.7 KB · Views: 111
  • DBDCF95F-69E2-4B18-A455-47A9ACB1E9F4.jpeg
    DBDCF95F-69E2-4B18-A455-47A9ACB1E9F4.jpeg
    354.2 KB · Views: 113
  • 947084A8-9DB4-475A-97FF-EF145E89EDB7.jpeg
    947084A8-9DB4-475A-97FF-EF145E89EDB7.jpeg
    343.8 KB · Views: 105
  • 90EAAB77-10B0-4B56-8CD6-483459DE99BB.jpeg
    90EAAB77-10B0-4B56-8CD6-483459DE99BB.jpeg
    314.7 KB · Views: 105
  • 03362D2F-8F89-4CC7-8978-E2A67BA031D6.jpeg
    03362D2F-8F89-4CC7-8978-E2A67BA031D6.jpeg
    329.6 KB · Views: 103
  • 7268798A-0C9A-4E85-9BC8-F9E8B89C7CCF.jpeg
    7268798A-0C9A-4E85-9BC8-F9E8B89C7CCF.jpeg
    335.1 KB · Views: 99
  • FEE9E7A2-0637-4C2A-91B6-25BE11A2EAC4.jpeg
    FEE9E7A2-0637-4C2A-91B6-25BE11A2EAC4.jpeg
    314.7 KB · Views: 126
Also, speaking of rigging, does anybody with 3D Printed armor have any tips/suggestions on how to rig up the individual parts (arms, legs, boots, etc.)?
 
Also, speaking of rigging, does anybody with 3D Printed armor have any tips/suggestions on how to rig up the individual parts (arms, legs, boots, etc.)?
For the arms/shoulders I made a harness that I put on before everything then I clip the biceps into place with some buckles. Elastic nylon is helpful it you're putting it on by yourself but it will start to droop after a bit of wearing (a safety pin fixes that). The forearms are just held in place by friction for mine.

For the thighs I used a round buckle so it can rotate while walking. Shins are also a friction held (kinda), I use 5.11 black apex pants and use Velcro straps to wrap the excess of my pants around my leg and the bulk around my shin holds the armor in place.

Boots are held in place by just being really tight to my shoes and some elastic nylon to allow me to slip them on and hold them together. I think I have examples on my build thread but I can take some picture of everything if you need them.
 
Thanks for the advice! I'll definitely go check out your thread again and take a look at what you were referencing. If you're willing to take the time though, a couple more photos would definitely be helpful!
 
Thanks for the advice! I'll definitely go check out your thread again and take a look at what you were referencing. If you're willing to take the time though, a couple more photos would definitely be helpful!
I can some more later since most some things are still need to be put back together to show how they work but here is what I did for the underside of the boot covers.

20220510_214236.jpg


The elastic straps keeps them in a single piece and from separating from your shoes, also allows for it to stretch to be put on.
 
Thank you, I really appreciate your help! Could I also ask you how you mounted your belt? I've been trying to brainstorm ways of how I can do that.
 
Thank you, I really appreciate your help! Could I also ask you how you mounted your belt? I've been trying to brainstorm ways of how I can do that.
For the belt I used a gun belt from a company I used to work for called blade tech. It's a 2 layer belt with a velcro under belt so its easy to put on and take off. Add a bit of velcro to the back of your parts and easy on/off belt complete.

20220512_084358.jpg
20220512_084418.jpg


I originally put velcro straps on the back of each piece and then looped them through my belt. It wasnt a good method because I couldn't get a consistent tightness to my belt and cut up my fingers in cold weather when trying to put them on a few times.
 
So as I said before, I am using NerdForge's files for my armor. In his files he has included some models to use as molds for some rubber under suit parts. I've been gaining a basic understanding of how to mold/cast stuff in rubber through YouTube, and I'd like to give it a try, but one model in particular that is confusing me is the one for the gasket on the chest piece. Does anybody have any experience in making a piece like this, or now anybody who has? View attachment 313864
im using the same armor and i think the same printer but i outsourced the chest piece cause i wanted it a higher quality, you seem to have done a great job tho keep it up!
 
For the belt I used a gun belt from a company I used to work for called blade tech. It's a 2 layer belt with a velcro under belt so its easy to put on and take off. Add a bit of velcro to the back of your parts and easy on/off belt complete.

View attachment 318059View attachment 318060

I originally put velcro straps on the back of each piece and then looped them through my belt. It wasnt a good method because I couldn't get a consistent tightness to my belt and cut up my fingers in cold weather when trying to put them on a few times.
im copying you fyi. this is great.
 
This thread is more than 10 months old.

Your message may be considered spam for the following reasons:

  1. This thread hasn't been active in some time. A new post in this thread might not contribute constructively to this discussion after so long.
If you wish to reply despite these issues, check the box below before replying.
Be aware that malicious compliance may result in more severe penalties.
Back
Top