- Member DIN
- S128
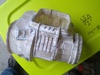
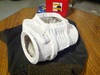
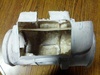
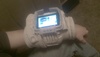
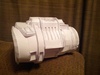
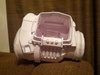
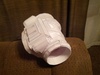
After several pepakura attempts, I've decided I would start somewhere less sacred than the MJOLNIR Mk. VI. So with the coming of Fallout 4 and the ridiculous selling out of the legendary edition, I have decided to make my own Pipboy 3000! (Hopefully a mod can move my thread to the appropriate category, being Non-Halo.) Thanks PlayByMyOwnRule for the file!!
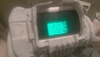
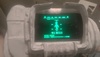
 altered file to height 190mm to better fit my phone and arm
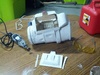
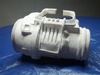
Materials Used (so far):
24 pages 110lb cardstock
15 glue sticks
2 Xacto knives
1/8 gallon Polyurethane Resin
bit of Spray Adhesive
2 sq ft Fiberglass Cloth
5- 3/4" Paintbrushes
6 pairs Disposable Gloves
10 clear plastic Cups
a few Popsicle sticks
1/10 gallon Bondo Body Filler
1yd of 4-1/2" x 80grit PSA Sanding Roll
1ft of 4-1/2" x 120grit PSA Sanding Roll
1ft of 4-1/2" x 320grit PSA Sanding Roll
Manila folder
Krylon MAXX Gray Primer
Krylon MAXX Italian Olive Satin Spray Paint
Krylon MAXX Silver Metallic Spray Paint
Krylon MAXX Crystal Clear Acrylic Flat Enamel
Small artist's paint brushes
Tiny Cabinet Hinges
Clasps from a toy lunchbox
Various Small Electrical Knobs, Gauges, Lights and Switch
Packing Foam
Cushioning Foam
5mm 3.2V LED white light bulb
1 - 270W Resistor 1/4"
Black Wire
Red Wire
9V connector pad
9V Battery
Silver Solder
1 - 10Ohm x 1/4" Resistor
Tools Used:
Xacto Knife
Mini (lowtemp) Hot Glue Gun
Space Heater
Dremel
Utility knife
Spray Can handle
Power Drill w/ several size drill bits
Needle nose pliers
Ohm Meter
Soldering Tool
Hours in:
43 hours (as of 11/25/15)

 altered file to height 190mm to better fit my phone and arm
Materials Used (so far):
24 pages 110lb cardstock
15 glue sticks
2 Xacto knives
1/8 gallon Polyurethane Resin
bit of Spray Adhesive
2 sq ft Fiberglass Cloth
5- 3/4" Paintbrushes
6 pairs Disposable Gloves
10 clear plastic Cups
a few Popsicle sticks
1/10 gallon Bondo Body Filler
1yd of 4-1/2" x 80grit PSA Sanding Roll
1ft of 4-1/2" x 120grit PSA Sanding Roll
1ft of 4-1/2" x 320grit PSA Sanding Roll
Manila folder
Krylon MAXX Gray Primer
Krylon MAXX Italian Olive Satin Spray Paint
Krylon MAXX Silver Metallic Spray Paint
Krylon MAXX Crystal Clear Acrylic Flat Enamel
Small artist's paint brushes
Tiny Cabinet Hinges
Clasps from a toy lunchbox
Various Small Electrical Knobs, Gauges, Lights and Switch
Packing Foam
Cushioning Foam
5mm 3.2V LED white light bulb
1 - 270W Resistor 1/4"
Black Wire
Red Wire
9V connector pad
9V Battery
Silver Solder
1 - 10Ohm x 1/4" Resistor
Tools Used:
Xacto Knife
Mini (lowtemp) Hot Glue Gun
Space Heater
Dremel
Utility knife
Spray Can handle
Power Drill w/ several size drill bits
Needle nose pliers
Ohm Meter
Soldering Tool
Hours in:
43 hours (as of 11/25/15)
Last edited by a moderator:

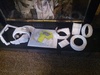


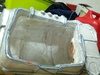
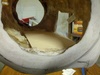
") See my first photo to see the sections, then I glue them together slowing and individually. My question is what kind of gluing technique would you have use (ie. what glue, how would you apply it). I've made my own patch tabs before, but I thought that this would take to long with how many sections there were.
See my first photo to see the sections, then I glue them together slowing and individually. My question is what kind of gluing technique would you have use (ie. what glue, how would you apply it). I've made my own patch tabs before, but I thought that this would take to long with how many sections there were.