- Member DIN
- S128
You are using an out of date browser. It may not display this or other websites correctly.
You should upgrade or use an alternative browser.
You should upgrade or use an alternative browser.
Duke's Rakshasa (3d print) **WIP
- Thread starter PerniciousDuke
- Start date
- Status
- Not open for further replies.
- Member DIN
- S128
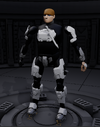
I’m starting my next build; a Rakshasa core. I don’t want to show you all the goal yet since some of it should be a fun surprise. Deep cut, but I did showcase this Spartan as my ID picture in Roll20 when we played Halo Mythic TTRPG on the Extralife stream two years ago… and I’m finally ready to start documenting my progress!
Finish date is Halo World Championship in October 2024.
6 months ago, I did a ton of research and planned out most of this build in tandem with SubXzeroXhero. We both purchased Aguilar’s Rakshasa (3D Modeling & Printing | Aguilar Workshop) files and I have to say I am impressed. Not only are they very accurate to the game but thought as a costume went into the design as well with things like: channels for webbing and a modular shoulder system.
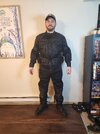
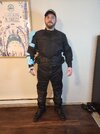
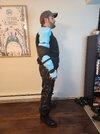
I always start a costume the same way… shopping! I love to buy as many pieces as I can to get stuff that looks and feels the part. In this core, you have to really figure out what colors you are going to use (if you are going for Teir 3) because it will change the textures and colors of the undersuit as well. In my case, the undersuit is all black and some parts have sheen and some parts have mesh.
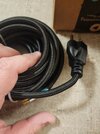
I narrowed down the undersuit as looking very similar motorcycle pants and jacket. The next thing was the belt and pouches. I found a 3” wide military belt and cigarette army pouches that I think (once modified) will be the exact size of the in game ones. I also tried to source other bits like some chords seen on the arms and I found this braided power chord to be almost identical.
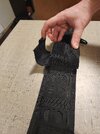
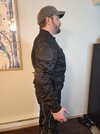
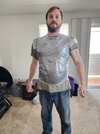
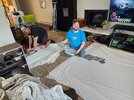
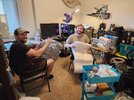
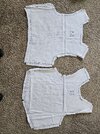
The first crafting stage was the flak jacket. It is very prominent and unique looking so likely will need to be made from scratch. So, Sub and I got together to make duct tape templates and fabric patterns. I like to buy $4 sheets from goodwill to use as a mock up.
Then comes the printing. I wanted to focus on the scaling so I stuck to one spot, in this case the arms. I think it came out pretty good at 100% scale. I’m using Inland PLA on a Creality Ender 5 Plus. Doing 5 walls with 18% infill.
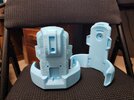
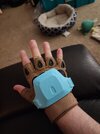
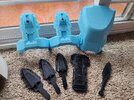
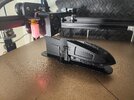
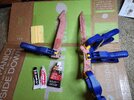
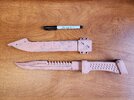
Next I wanted a piece “finished” to look at and motive me to keep going so I thought to start on the accessories. In this case there is the brace of blades and Wolf’s Fang. Aguilar gave me some pointers on printing the sheaths like this so that I can avoid interior supports. I assembled Wolf Fang using 5-minute two-part epoxy and clamps then smoothed it using bondo spot putty and 320 grit sandpaper.
The project is on a temp hold due to the Booth Expansion I am building for the Pacific Regiment. But, come April I am going to be 100% committed to this build.
Finish date is Halo World Championship in October 2024.
6 months ago, I did a ton of research and planned out most of this build in tandem with SubXzeroXhero. We both purchased Aguilar’s Rakshasa (3D Modeling & Printing | Aguilar Workshop) files and I have to say I am impressed. Not only are they very accurate to the game but thought as a costume went into the design as well with things like: channels for webbing and a modular shoulder system.
I always start a costume the same way… shopping! I love to buy as many pieces as I can to get stuff that looks and feels the part. In this core, you have to really figure out what colors you are going to use (if you are going for Teir 3) because it will change the textures and colors of the undersuit as well. In my case, the undersuit is all black and some parts have sheen and some parts have mesh.
I narrowed down the undersuit as looking very similar motorcycle pants and jacket. The next thing was the belt and pouches. I found a 3” wide military belt and cigarette army pouches that I think (once modified) will be the exact size of the in game ones. I also tried to source other bits like some chords seen on the arms and I found this braided power chord to be almost identical.


The first crafting stage was the flak jacket. It is very prominent and unique looking so likely will need to be made from scratch. So, Sub and I got together to make duct tape templates and fabric patterns. I like to buy $4 sheets from goodwill to use as a mock up.


Then comes the printing. I wanted to focus on the scaling so I stuck to one spot, in this case the arms. I think it came out pretty good at 100% scale. I’m using Inland PLA on a Creality Ender 5 Plus. Doing 5 walls with 18% infill.


Next I wanted a piece “finished” to look at and motive me to keep going so I thought to start on the accessories. In this case there is the brace of blades and Wolf’s Fang. Aguilar gave me some pointers on printing the sheaths like this so that I can avoid interior supports. I assembled Wolf Fang using 5-minute two-part epoxy and clamps then smoothed it using bondo spot putty and 320 grit sandpaper.


The project is on a temp hold due to the Booth Expansion I am building for the Pacific Regiment. But, come April I am going to be 100% committed to this build.
- Member DIN
- S128
What’s the color pattern gonna be, trying not to be twins (spoiler)
Silver and Black
- Member DIN
- S128
It's about time I update my progress! I've been working on it, I swear.
So first, I bought a Bambu X1C. I was struggling too much with the Ender 5+ and my life doesn't need more struggles.
The Bambu has been a godsend. It prints 4x faster and produces a better finish and only had one failure out of my entire costume (that I opted to keep). All in all, spirits are up, plastic costs are down and everything except for the helmet (still needs to be modeled) has been printed. Woo!
Most things I scaled to 100% (yes I reprinted the pieces previously shown to be 100%). But, I did scale the cod piece to 118% because I find most people undersize it, based on the proportions I see in the game. Underscaling would improve mobility, but SubXzeroXhero and I plan to rubber cast this piece which should help instead.
I have also coated 90% of the pieces in their first layer of spot putty. I'll sand with 320 grit, apply tiny patches of more spot putty, sand, then glue, spot putty, sand, primer, sand, paint, sand. You know the story.

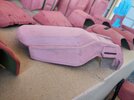
Here is a piece after it's first sanding.
It has been a struggle to get out there. My dad retired and sold his company. A company that I pretty much run the day-to-day of. So everything changed for me. Went from 40 hrs a week to 65 hrs for the last 3 weeks with no increase in pay. But, things are getting better and anytime I think about doing my costume, I tell myself, "you can do 5 minutes." Five turns into twenty, into an hour and it is progressing.
The biggest hurdle is the helmet. Everything else I can do or learn, but I am not mentally prepared to learn how to model atm. So hopefully that will work itself out soon.
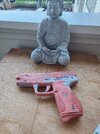
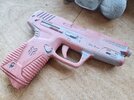
I've also been focusing on the weapons. I've completed Wolf's Fang and now purchased Skookum Props Sidekick with Striker variant. (I think it's just a flashlight). His files were intelligently broken down into movable parts, but I just wanted a prop so I printed the entire gun and flashlight as one piece with 5 layer walls in 19 hours.
That's all for now!
So first, I bought a Bambu X1C. I was struggling too much with the Ender 5+ and my life doesn't need more struggles.
The Bambu has been a godsend. It prints 4x faster and produces a better finish and only had one failure out of my entire costume (that I opted to keep). All in all, spirits are up, plastic costs are down and everything except for the helmet (still needs to be modeled) has been printed. Woo!
Most things I scaled to 100% (yes I reprinted the pieces previously shown to be 100%). But, I did scale the cod piece to 118% because I find most people undersize it, based on the proportions I see in the game. Underscaling would improve mobility, but SubXzeroXhero and I plan to rubber cast this piece which should help instead.
I have also coated 90% of the pieces in their first layer of spot putty. I'll sand with 320 grit, apply tiny patches of more spot putty, sand, then glue, spot putty, sand, primer, sand, paint, sand. You know the story.
Here is a piece after it's first sanding.

It has been a struggle to get out there. My dad retired and sold his company. A company that I pretty much run the day-to-day of. So everything changed for me. Went from 40 hrs a week to 65 hrs for the last 3 weeks with no increase in pay. But, things are getting better and anytime I think about doing my costume, I tell myself, "you can do 5 minutes." Five turns into twenty, into an hour and it is progressing.
The biggest hurdle is the helmet. Everything else I can do or learn, but I am not mentally prepared to learn how to model atm. So hopefully that will work itself out soon.
I've also been focusing on the weapons. I've completed Wolf's Fang and now purchased Skookum Props Sidekick with Striker variant. (I think it's just a flashlight). His files were intelligently broken down into movable parts, but I just wanted a prop so I printed the entire gun and flashlight as one piece with 5 layer walls in 19 hours.


That's all for now!
- Member DIN
- S128
I got to use my new plastic welder/stapler!
For $30 it is not a bad tool to add to the 3d printing arsenal and it looks like it will eliminate having to fiberglass seams.

For $30 it is not a bad tool to add to the 3d printing arsenal and it looks like it will eliminate having to fiberglass seams.
- Member DIN
- S829
I got to use my new plastic welder/stapler!
For $30 it is not a bad tool to add to the 3d printing arsenal and it looks like it will eliminate having to fiberglass seams.
View attachment 348108
Or you could go for ultimate strength - Glue, Staple, and then fiberglass :-D
This is looking awesome PerniciousDuke and can't wait to see it keep progressing.
As a busy person myself I love your approach to even getting little bits of progress when you can. It all eventually leads to a finished product!
- Member DIN
- S128
As a busy person myself I love your approach to even getting little bits of progress when you can. It all eventually leads to a finished product!
I keep my sanding pajamas right by the balcony door.
- Member DIN
- S080
I got the same one: I love it.. mine wasn't 30.00 though .. I do like the versatility of it though.I got to use my new plastic welder/stapler!
For $30 it is not a bad tool to add to the 3d printing arsenal and it looks like it will eliminate having to fiberglass seams.
View attachment 348108
- Member DIN
- S128
I got the same one: I love it.. mine wasn't 30.00 though .. I do like the versatility of it though.
More or less?
I got the kit that had the stapler, iron and little extra pieces.
- Member DIN
- S080
More, it was like 63.00 came w a cool kit and patch stuffMore or less?
I got the kit that had the stapler, iron and little extra pieces.
- Member DIN
- S128
Nice, well this is the one I got if anyone is in the market
I work full time and part time WFH and I feel this so much.As a busy person myself I love your approach to even getting little bits of progress when you can. It all eventually leads to a finished product!
I live and die by that thing.I got to use my new plastic welder/stapler!
For $30 it is not a bad tool to add to the 3d printing arsenal and it looks like it will eliminate having to fiberglass seams.
- Member DIN
- S128
One thing I noticed missing from Aguilar's file pack was some fairly prominent buckles on the sides of the chest piece. I asked a mechanical engineer friend to model me a fake buckle and his response was why not make it a real buckle and one no one has seen before. Lol.
It works!
It works!
- Member DIN
- S128
No, the Rakshasa is still a pretty new armor and I do not think there are free files out there at the moment.Wow man looks great! Do you know where i can find the files for free? Im not exactly in a position to drop 80$ on the files
Dang alr :/No, the Rakshasa is still a pretty new armor and I do not think there are free files out there at the moment.
- Status
- Not open for further replies.
Similar threads
- Replies
- 19
- Views
- 991
- Replies
- 1
- Views
- 112
- Replies
- 1
- Views
- 118

