First Build- Galact Armory's ODST Rookie Armor

Morphumax

New Member
This is my first ever cosplay build, all 3D printed. Let me know if you have any advice! Currently trying to figure out how to attach the upper body. I would love some advice or photos from people who have also done their kit! To be clear, it’s their own ODST file kit, not the Sean Bradley one.
 

Attachments

  • 854364DC-6BAA-4C7A-9A08-058CD411C35E.jpeg
    854364DC-6BAA-4C7A-9A08-058CD411C35E.jpeg
    9.6 MB · Views: 98
  • 5F27FD6D-271D-4C8B-9B21-C60E919AEF19.jpeg
    5F27FD6D-271D-4C8B-9B21-C60E919AEF19.jpeg
    8.3 MB · Views: 97
  • 719EFCCB-8EA6-40DB-8696-FB1240BCA491.jpeg
    719EFCCB-8EA6-40DB-8696-FB1240BCA491.jpeg
    8.8 MB · Views: 91
Hey, if anyone sees this, I could use some advice on how to do the chest straps. The files include "stand-ins", but I'm not sure how to convert those into foam. Should I 3D print it as it's modeled and use it as a kind of stencil, or should I basically flatten it out somehow, then make a stencil from that?
 
I'm not to sure by what you mean by stand-ins, but if you're trying to make a harness to attach your chest plate I recommend buying some clips. I used some nylon straps and clips to make a harness, then I used clips to make it easy to take on and off. Next I made attachment points on the vest for the chest plate. It's a lot easier to attach everything if you have a good base (Harness). I used this glue called Mitreapel to make the whole harness and attach everything.

Here are some links to the stuff I used:
Clips https://www.amazon.com/dp/B095W8QX6V/ref=sspa_dk_detail_1
Nylon Straps https://www.amazon.com/gp/product/B08LD8CJ8D/ref=ewc_pr_img_1
Glue https://www.amazon.com/MITREAPEL-Super-Spray-Adhesive-Activator/dp/B07Y6GV4TW/ref=sr_1_3

I found these two videos super helpful when it came to rigging and attaching things:

Hope this helps a bit:)
Thanks for the reply! As for what I mean by stand ins, I mean he included 3D models of the shoulder straps to make out of foam, and I was wondering if there was a way I could like flatten it out to turn it into a stencil. I’ll include a pic of what I mean. Sorry for the poor quality
 

Attachments

  • IMG_8501.jpeg
    IMG_8501.jpeg
    4.6 MB · Views: 36
I mean you could make the model 2D by shrinking its Z axis until its 2D but that wouldn't be a accurate stencil since the 2D model wouldn't have the curve length and would only have the dimensions of the model with the curve but squished. You could just print the model out and use it to trace a stencil that's really the only way I see you making it out of foam. Sorry I couldn't be much more help :(
 
Hey, if anyone sees this, I could use some advice on how to do the chest straps. The files include "stand-ins", but I'm not sure how to convert those into foam. Should I 3D print it as it's modeled and use it as a kind of stencil, or should I basically flatten it out somehow, then make a stencil from that?
Can you share picture of the chest rig in it's entirety? It might help to see the big picture of what you're going for. I've seen some ODST's mount everything to a tactical vest. I have the Aguilar Workshop armor with came with a nylon rigging system and the pieces 3D print with the channels. Because I have the strap system instead of adding the foam pieces to the top of the shoulders I opted for a backpack which I'm replacing with the ODST rucksack.
 
Thanks for the reply! As for what I mean by stand ins, I mean he included 3D models of the shoulder straps to make out of foam, and I was wondering if there was a way I could like flatten it out to turn it into a stencil. I’ll include a pic of what I mean. Sorry for the poor quality
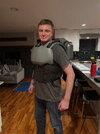
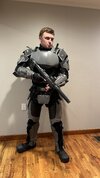
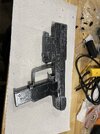
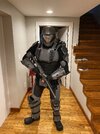
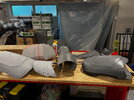
Hey, this was one of the parts that stumped me on my build but I found a pretty good solution. I did just what you said. I 3D printed them and traced them onto paper. I ditched the 3d printed stomach piece and I completely free handed EVA foam a piece that stretched from my stomach, to my upper chest so all of the torso pieces could connect as well as those new foam shoulder straps. that I glued onto the back. Ive seen some people layer foam around the decorative nylon/elastic straps too and it looks really good, I have also seen them wrap them in fabric which looks great as well. I was running out of time and just plastidipped and painted mine, threw elastc and nylon on, and found some decorative buckles. I was a bit iffy with how it would look but I think after the weathering it was good enough for me! I also chopped off the bottom undersuit pieces on the back piece cause they were jabbing me, I dont have pics but I re-bondoed them and painted over them. For the small side plates of the lower torso, I put heavy duty velcro on them to connect the foam vest piece to the back. Hope this helps because it was a bit daunting of an obstacle for my build! I can take some more photos soon of the whole thing all cleaned up as well if you'd like!
 

Attachments

  • IMG_6913.jpg
    IMG_6913.jpg
    1.1 MB · Views: 30
  • IMG_6912.jpg
    IMG_6912.jpg
    1.7 MB · Views: 24
  • IMG_6911.jpg
    IMG_6911.jpg
    1.8 MB · Views: 21
  • IMG_6910.jpg
    IMG_6910.jpg
    1.7 MB · Views: 22
  • IMG_6909.jpg
    IMG_6909.jpg
    1.8 MB · Views: 22
  • IMG_6908.jpg
    IMG_6908.jpg
    1.1 MB · Views: 22
  • IMG_6907.jpg
    IMG_6907.jpg
    1.4 MB · Views: 23
  • IMG_6905.jpg
    IMG_6905.jpg
    1.2 MB · Views: 25
  • IMG_6914.jpg
    IMG_6914.jpg
    1.2 MB · Views: 34
Thanks for the reply! As for what I mean by stand ins, I mean he included 3D models of the shoulder straps to make out of foam, and I was wondering if there was a way I could like flatten it out to turn it into a stencil. I’ll include a pic of what I mean. Sorry for the poor quality
May be a little late to this, but in the armory there are pepakura files for this set that include those straps. You could possibly use those so you have a template.
 

Your message may be considered spam for the following reasons:

If you wish to reply despite these issues, check the box below before replying.
Be aware that malicious compliance may result in more severe penalties.
Back
Top